eBook - ePub
16 Metalworking Workshop Projects for Home Machinists
Practical & Useful Ideas for the Small Shop
Harold Hall
This is a test
- 250 pages
- English
- ePUB (adapté aux mobiles)
- Disponible sur iOS et Android
eBook - ePub
16 Metalworking Workshop Projects for Home Machinists
Practical & Useful Ideas for the Small Shop
Harold Hall
Détails du livre
Aperçu du livre
Table des matières
Citations
À propos de ce livre
Create useful and essential items that can't be purchased commercially, from an auxiliary workbench and tap holders to distance and height gauges, a lathe backstop, faceplate clamps, and so much more. 16 Metalworking Workshop Projects for Home Machinists contains a collection of unique projects based on the author's most popular articles that have been published in Model Engineer's Workshop magazine. Every project is intended to make workshop tasks easier once the item is completed and ready for use.
Foire aux questions
Comment puis-je résilier mon abonnement ?
Il vous suffit de vous rendre dans la section compte dans paramètres et de cliquer sur « Résilier l’abonnement ». C’est aussi simple que cela ! Une fois que vous aurez résilié votre abonnement, il restera actif pour le reste de la période pour laquelle vous avez payé. Découvrez-en plus ici.
Puis-je / comment puis-je télécharger des livres ?
Pour le moment, tous nos livres en format ePub adaptés aux mobiles peuvent être téléchargés via l’application. La plupart de nos PDF sont également disponibles en téléchargement et les autres seront téléchargeables très prochainement. Découvrez-en plus ici.
Quelle est la différence entre les formules tarifaires ?
Les deux abonnements vous donnent un accès complet à la bibliothèque et à toutes les fonctionnalités de Perlego. Les seules différences sont les tarifs ainsi que la période d’abonnement : avec l’abonnement annuel, vous économiserez environ 30 % par rapport à 12 mois d’abonnement mensuel.
Qu’est-ce que Perlego ?
Nous sommes un service d’abonnement à des ouvrages universitaires en ligne, où vous pouvez accéder à toute une bibliothèque pour un prix inférieur à celui d’un seul livre par mois. Avec plus d’un million de livres sur plus de 1 000 sujets, nous avons ce qu’il vous faut ! Découvrez-en plus ici.
Prenez-vous en charge la synthèse vocale ?
Recherchez le symbole Écouter sur votre prochain livre pour voir si vous pouvez l’écouter. L’outil Écouter lit le texte à haute voix pour vous, en surlignant le passage qui est en cours de lecture. Vous pouvez le mettre sur pause, l’accélérer ou le ralentir. Découvrez-en plus ici.
Est-ce que 16 Metalworking Workshop Projects for Home Machinists est un PDF/ePUB en ligne ?
Oui, vous pouvez accéder à 16 Metalworking Workshop Projects for Home Machinists par Harold Hall en format PDF et/ou ePUB ainsi qu’à d’autres livres populaires dans Technik & Maschinenbau et Technische & produzierende Gewerbe. Nous disposons de plus d’un million d’ouvrages à découvrir dans notre catalogue.
Informations
Sous-sujet
Technische & produzierende GewerbeChapter 1
Auxiliary Bench
This is the simplest of all the items included and without doubt the one that has repaid my time making it by more times over than any other. It is an auxiliary workbench and took me around 15 minutes to make. I did though have a suitable size piece of ply available for the top, but even if you have to cut the top to size 1 hour should be more than enough.
The bench was initially conceived for holding pieces of sheet steel for cutting using a jig saw, nibbler, etc. This was something I found difficult using my normal bench with it having only one edge available, resulting in clamps and saw wanting to share the same position. The bench, Photo 1, is about 450mm square and has a 75mm × 50mm piece of timber screwed onto the under side which is gripped in the bench vise. Photo 2, shows it being used for it original purpose.

Photo 1 An auxiliary bench with a multitude of uses
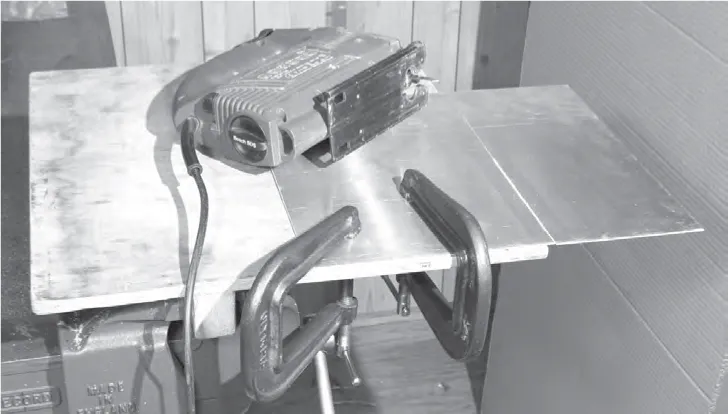
Photo 2. Being used to hold a sheet of metal while it is being cut using a jig saw.
I soon realized that in its elevated position it was also of considerable benefit when marking out, similarly, carrying out delicate assembly work, electronic or mechanical. If you have a small workshop with only limited bench space it will be a worthwhile addition if only to increase your working space, maybe larger may not be a bad idea.
If a long bolt is added to the timber bar this can be gripped in the bench vise and the top tilted to make a small drawing board, Photo 3.
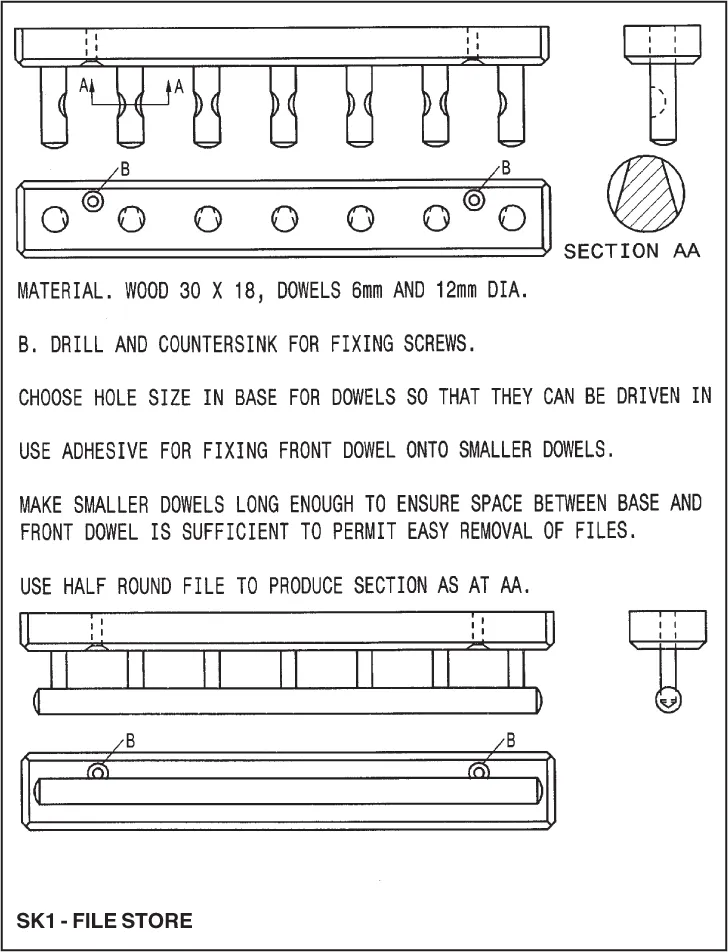
File storage
While in a woodworking theme, the method of storing files on the rear of a cupboard door, Photo 4, is worth considering. It keeps them in the same place all the time so they are easily found and by keeping them apart protects their working faces. Sketch 1 shows the construction in detail. If mounted on a wall rather than on the rear of a door then the lower half could possibly be omitted.
Chuck boards
These were the result of a request from a workshop owner who was beginning to find it difficult to move his lathe chucks to and from the lathe. Additionally, aligning them with the lathe’s mandrel.
Photo 5 shows two boards, one for the three jaw and one for the four jaw. These are used on a gap bed lathe and the piece of wood in front is for placing in the gap to prevent the board tipping with the weight of the chuck. Note how the carrying handles pass in front and behind the chuck ensuring they are secure when being carried.
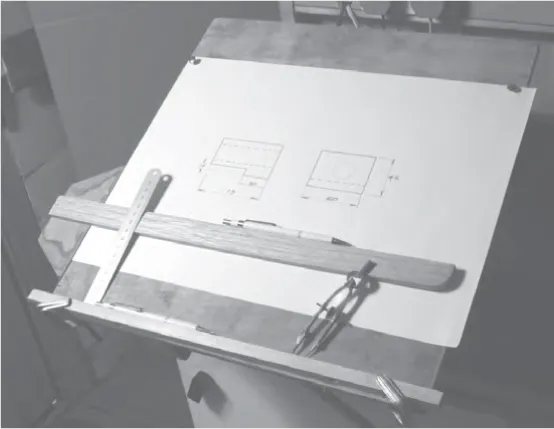
Photo 3 Used tilted it makes a small drawing board for use in the workshop.
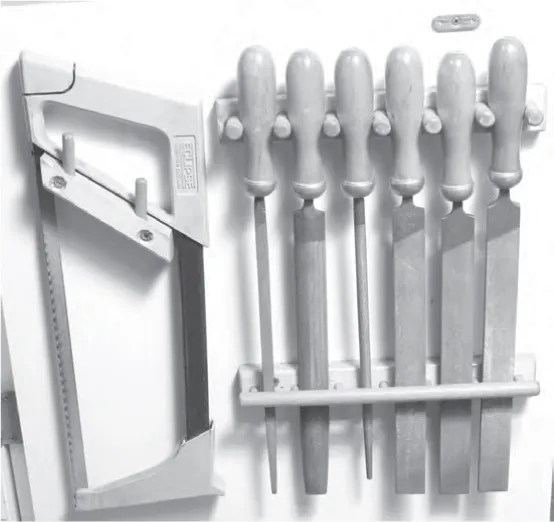
Photo 4 A method of supporting files on the rear of a cupboard door.
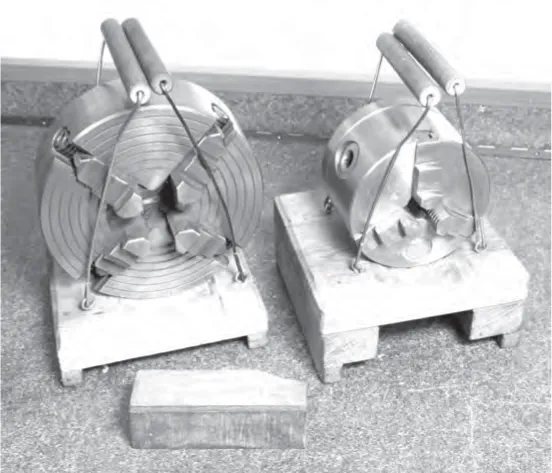
Photo 5 These chuck boards make carrying the chucks to and from the lathe an easier operation. Also, while on the lathe’s bed they protect the bed from accidents and holding the chuck at center height assists in fitting them to the lathe’s mandrel.
To make the board place it against the chuck while fitted to the lathe and mark its edge with the shape of the chuck. Start chiseling out the shape, frequently checking it for a close fit under the chuck. The ease of screwing the three jaw chuck onto the lathe’s mandrel is further enhanced by placing a long length of rod in the chuck and loosely closing the drill chucks jaws onto the other end. This will align the chuck with the mandrel making the process a simple one.
Having started with a woodworking theme, in the next chapter we get down to the real purpose of the book, metalworking!
Chapter 2
Tapping Guides
Hand tapping into metal components would at first appear to be a problem free task. This providing the correct tapping size hole has been prepared as an unnecessarily small hole is often the reason for a broken tap!
Attempting the task though it will soon be found not to be as easy as first thought. The main problem is getting the tap to enter in line with the hole’s axis. To achieve this it requires the tap to be viewed in two planes, often not that easy. At best the tapped hole may present a problem when the parts are assembled as a tilted screw attempts to pass through a perpendicular clearance hole. With a number of fixings, assembly may only be possible if the clearance holes are increased in size beyond what would be considered acceptable.
This though is not the only problem, especially with small diameter taps. In this case, as the tap enters further into the hole prepared, it will begin to cut more on one side than the other. As a result, smaller size taps are more likely to be broken, even if having the correct tapping hole.
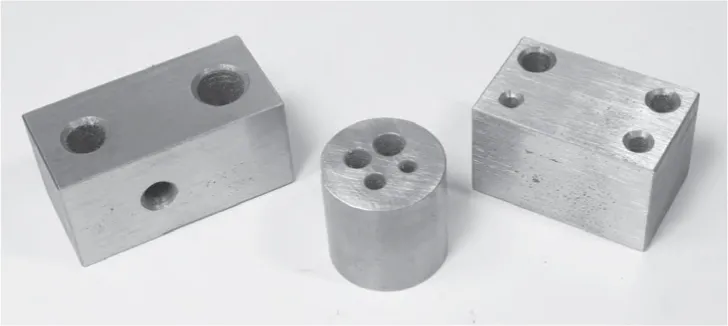
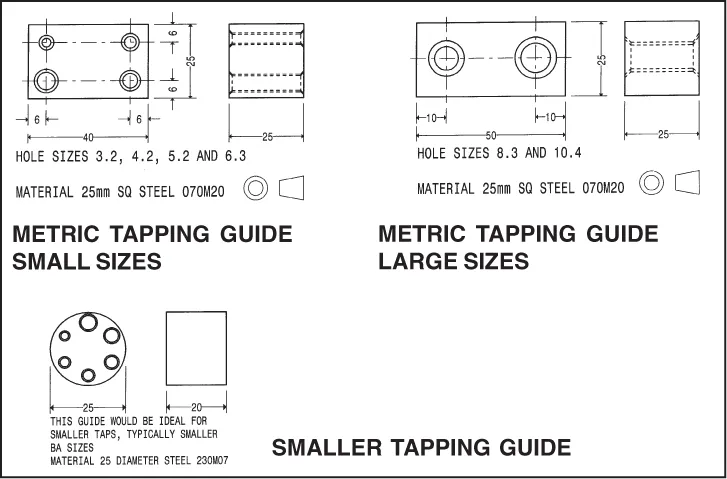
Photo 1 Three typical tapping guides.
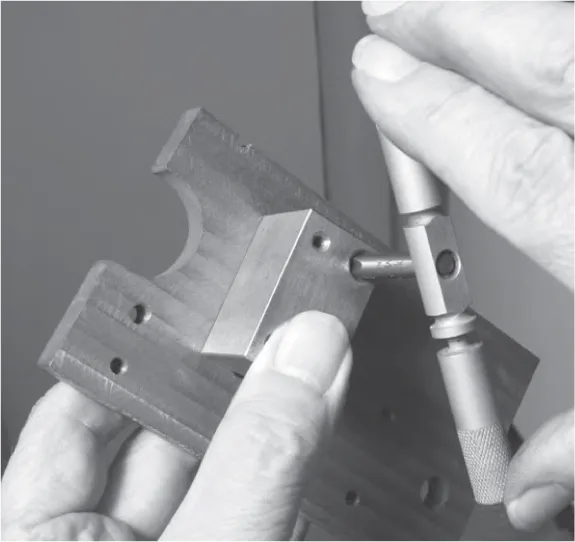
Photo 2. For smaller sizes tapping can be carried out purely by hand.
Photo 1 show two forms of tapping guide that, while simple, almost eliminates the problems of tapping square. The tap is passed through the appropriate guide and its end located in the hole in the workpiece. With this done, the guide is held onto the workpiece using one hand while the other rotates the tap ensuring that the tapped hole is perpendicular to the surface of the component, Photo 2.
The process works well providing the tap can be rotated by a single hand, typically a maximum of 10-32, 3/16in or M5. For larger sizes though, the guide will need clamping in place, Photo 3. In this, the guide is clamped to the workpiece using a toolmakers clamp which in turn is held in the bench vise.
There will of course be some cases where the nature of the workpiece prevents these guides from being used but for most readers, I would assume they would be suitable for the vast majority of hand tapping carried out. Hardly anywhere else will so little time spent making workshop equipment be repaid so many times over in terms of the quality of the final item. I thoroughly recommend these tapping guides to you!
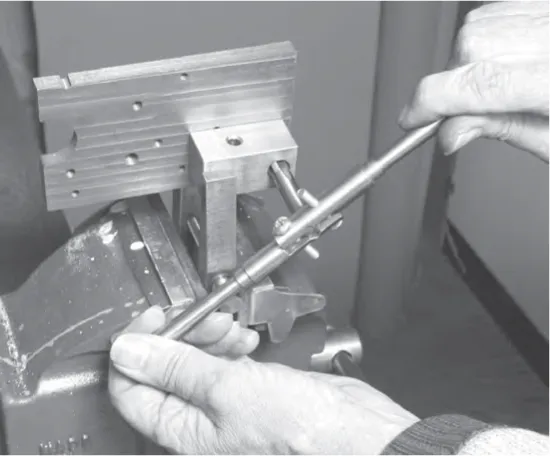
Photo 3. Larger size threads will need the guide to be clamped to the workpiece and held in a bench vise so that both hands are available to turn the tap.
Chapter 3
Guided Die Holder
Rather like the problem starting a tap in line with its tapping hole, as mentioned in Chapter 2, similarly, starting a die at an angle will cause the thread to go out of line with the bar on which it is being made, Photo 1. This is particularly a pr...