![]()
Part I: Command Line Basics
In This Part
CHAPTER 1: Configuring the Local Machine
CHAPTER 2: Making Remote Connections
CHAPTER 3: Automating Tasks
![]()
Chapter 1: Configuring the Local Machine
In this chapter, you will learn to:
- Configure the Command Window
- Set the Window Options
- Change the Font
- Choose a Window Layout
- Define the Text Colors
- Set the Environment
- Manage Environment Variables with the Set Command
- Manage Environment Variables with the SetX Utility
- Perform Common Tasks
- Clear the Display
- Determine the Operating System Version
- Start an Application
- Work with Services
- Shut Down the System
- Obtain Command Line Help
You can access the command line anytime you want. Issuing commands will work just fine without doing anything special. However, if you want to have the best possible experience at the command line, then you need to perform a few configuration tasks before you proceed. This chapter describes basic configuration procedures you can use to enhance your command line experience and make it better.
Configure the Command Window
Many users start the command window, see the typical command prompt, and just assume that they’ll never see anything else. Fortunately, you can easily configure the command window to appear as you want, at least within limits.
You can access these features using these steps:
1. Click the box in the upper left corner of the command window and choose Properties from the context menu. You’ll see a properties dialog box with four tabs.
2. Set the properties on each tab to meet specific needs, such as displaying the text in another color. Each of these tabs is described in the sections that follow.
Set the Window Options
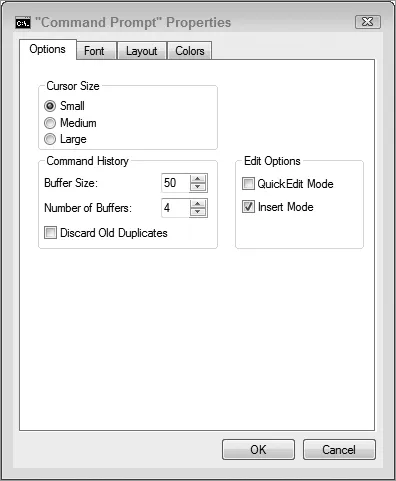
The Options tab shown in Figure 1-1 defines how the command window reacts when you open it. The Cursor Size option controls the size of the cursor, with small being the default. The Large option provides a block cursor that’s very easy to see. The Display Options determine whether you see the command window full screen or as a window. Using the full screen mode when you have a number of tasks to perform is easier on the eyes.
NOTE Older versions of Windows let you change the display mode through a property setting. However, Server Core (the version of Windows Server 2008 that comes without the usual GUI and relies exclusively on the command line for configuration) doesn’t let you run the command window in full screen mode by changing the Display Options setting. This particular option is missing when you view the dialog box shown in Figure 1-1. In most cases, you don’t want to run the command window in full screen mode when working with Server Core because the few graphical elements it provides can become inaccessible and it’s already possible to maximize the screen real estate by maximizing the window. Without a Start menu, taskbar, or other graphical elements to consume space, using Windows shouldn’t cause any problems. (If you really must work in full screen mode, you must modify the registry to do it.)
The Command History is especially important. The Buffer Size option determines the number of commands the buffer will store. Every command requires memory, so increasing this number increases the amount of memory the command prompt requires. Increase this number when you plan to perform a number of complex commands. A smaller number will save memory for larger command line applications. The Number of Buffers Option controls the number of individual histories. You need one history for each command process (application environment) you create. Generally, the four buffers that Figure 1-1 show work fine.
To better understand how buffers work, try this experiment:
1. Open a command window.
2. Type a command such as CLS or Dir and press Enter.
3. Press the Up arrow.
You should see the command you just typed—there’s the buffer. The command you typed appears in the first buffer. Remember that you have four buffers that you can use at the command processor when using the default settings.
4. Press Esc. The command processor clears the command from the prompt so you have a blank prompt to use.
5. Type Cmd and press Enter. You’ve just created a new command processor. This command processor uses the second buffer.
6. Press the Up arrow. You don’t see anything because this command processor is using its own buffer.
7. Now, type a different command (such as CLS or Dir) and press Enter.
8. Press the Up arrow. You’ll see the command you just typed, but not any of the commands from the previous command processor.
9. Press Esc to clear the command.
10. Type Exit and press Enter to close the current command processor. You’re back to the previous command processor.
11. Press the Up arrow twice and you’ll see whatever command you typed earlier because this command processor is using the first buffer.
12. Press Esc to clear the command.
13. Type Cmd and press Enter. This action creates a new command processor that will use the second buffer.
14. Press the Up arrow.
Wait, what are you seeing here? You see the Exit command. Press the Up arrow again and you’ll see the command you typed in step 7 for the second buffer. Each buffer retains its content, even if you close the command processor.
15. Type Exit and press Enter. You return to the first command processor.
16. Type Exit again and press Enter; the command processor window closes.
The Edit Options determine how you interact with the command window. Check the QuickEdit Mode when you want to use the mouse to work with the entries directly. The only problem with using this feature is that it can interfere with some commands such as Edit that have a mouse interface of their own. The Insert Mode option lets you paste text into the command window without replacing the text currently there. For example, you might copy some information from a Windows application and paste it as an argument for a command.
Change the Font
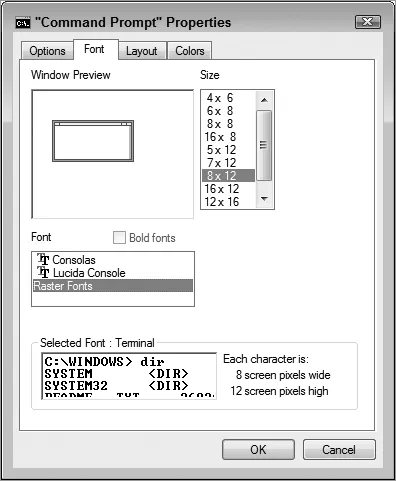
The Font tab shown in Figure 1-2 controls the font used to display text. The font size automatically changes when you resize the window, but you can also control the font size directly using this tab. The raster fonts give the typical command line font appearance that works well for most quick tasks. The Lucida Console font works better in a windowed environment. It’s easier on the eyes because it’s smoother, but you might find that some applications won’t work well with it if they create “text graphics” using some of the extended ASCII characters. The extended ASCII characters include corners and lines that a developer can use to draw boxes and add visual detail.
Choose a Window Layout
The Layout tab shown in Figure 1-3 has the potential to affect your use of the command window greatly when working in windowed mode. The Screen Buffer Size controls the width and height of the screen buffer, the total area used to display information. When the Window Size setting is smaller than the Screen Buffer Size, Windows provides scroll bars so you can move the window around within the buffer area and view all it contains. Some commands require a great deal of space for display purposes. Adjusting the Screen Buffer Size and Window Size can help you view all of the information these commands provide.
The Window Position determines where Windows places the command window when you first open it. Some people prefer a specific position on the screen so they always know where a new command window will appear....