
eBook - ePub
Elementary Woodwork - A Series of Lessons Designed to Give Fundamental Instruction in Use of All the Principal Tools Needed in Carpentry and Joinery - 1893
- 110 pages
- English
- ePUB (mobile friendly)
- Available on iOS & Android
eBook - ePub
Elementary Woodwork - A Series of Lessons Designed to Give Fundamental Instruction in Use of All the Principal Tools Needed in Carpentry and Joinery - 1893
About this book
Part of the "Carpentry for Boys" series, this vintage book contains a course of lessons on elementary woodwork designed for children or teenagers that focuses on tools and their uses. Carpentry is a skilled trade where the main work performed is the shaping, cutting, and installation of building materials used for the things like ships, buildings, timber bridges, concrete formwork, etc. Written in clear, simple language and profusely illustrated, this book will be of considerable utility to those with a practical interest in woodwork and carpentry, and it would make for a fantastic addition to DIY collections. Contents include: "Use of the Hammer", "Use of the Gauge", "Measurement", "Use of the Try-square and the Bevel Slitting and Cutting-off Saws", "Use of Saws", "Surface Planing", "Edge and End Planing", "Use of the Bit and the Brad-Awl", etc. Many vintage books such as this are increasingly scarce and expensive. It is with this in mind that we are republishing this classic volume now in an affordable, modern, high-quality edition complete with a specially-commissioned new introduction on wood working.
Trusted by 375,005 students
Access to over 1.5 million titles for a fair monthly price.
Study more efficiently using our study tools.
Information
LESSON I.
USE OF HAMMER.—NAIL–DRIVING.
The hammer consists of two parts, the head and the handle.
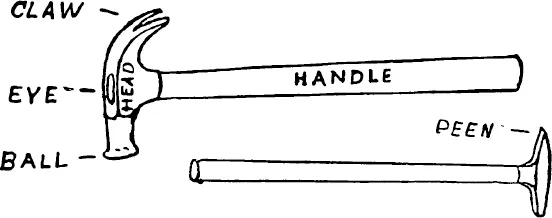
Fig. 7.
The head has three divisions. First, the ball, which is the end that strikes a blow. Second, the eye, or the hole which receives the handle; and third, the claw of the nail-hammer, or peen of the brad-hammer.
Problem I. Driving Steel-Wire Nails.—Take for each pupil a block of pine or other soft wood, 8 in. × 1 7/8 in. × 1 7/8 in. On one side draw three pencil lines, as in Fig. 8, and place points 1 in. apart on each line. Supply each pupil with 1 1/2 dozen 6d. steel-wire nails.
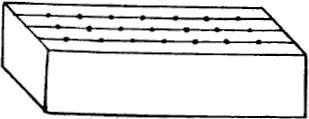
Fig. 8.
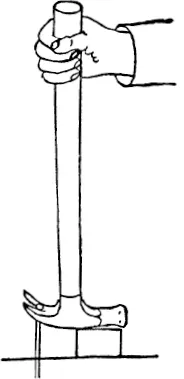
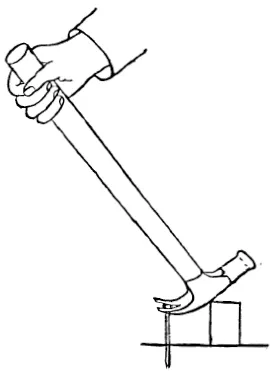
Hold the hand as in Fig. 9, with the thumb on the upper side of the handle, or as in Fig. 10, with the hand turned so as to bring the thumb partially to one side. Fig. 9 is the scientific position, as the thumb is the stronger digit, while Fig. 10 is more convenient in practice. The forefinger should not rest on the top of the handle, as many amateurs are tempted to do. The end of the handle should project about an inch beyond the hand.
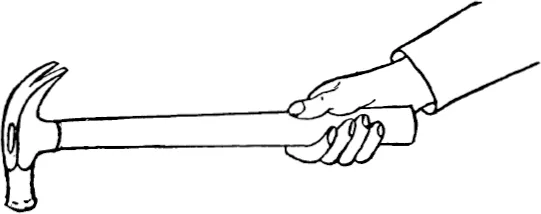
Fig. 9.
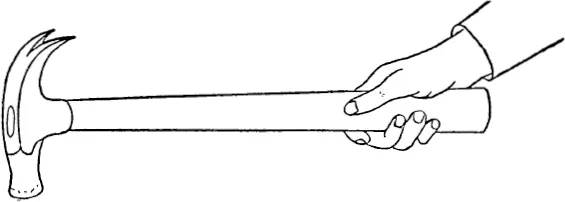
Fig. 10.
At each of the extreme points on one of the lines in Fig. 8 hold a nail vertical and strike it once. If the blow has caused it to incline, push it back a little past a vertical position, and, holding it there, strike it again. If it continues to incline, it must be loosened in order to press it to a vertical position. Drive each nail until only 5/8 in. of it projects above the block, as in Fig. 11. At each of the intervening points on the same line drive nails, sighting with the eye to see that the heads are all in line, as in Fig. 12.
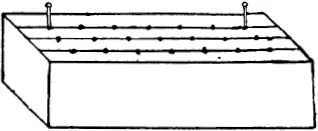
Fig. 11.
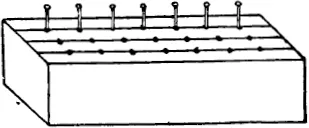
Fig. 12.
Rapid workmen may drive a second row. If it is deemed desirable to mark the work, mark 10 off from 100, for every nail which inclines 1/8 in. from perpendicular, or whose head is in. above or below the line of 5/8 in. in height.
Problem II. Drawing Steel-Wire Nails.—Place the work in the vise, with its top level with the bench top, as in Fig. 13.
Supply each pupil with a fulcrum block 8 in. × 1 1/2 in. × 7/8 in. Hold the hammer as in Fig. 13, supporting its eye on the thickness of the fulcrum block, and draw the nail about 5/8 of an inch, moving the hand through about 1/8 of a circle; that is, to a vertical position, as in Fig. 14.
Support the eye on the width of the block, as in Fig. 15, and draw the nail entirely from the wood. The eye of a hammer should always be supported thus when drawing nails. The support should be a little higher than the nail head when any partial drawing commences, and each partial drawing should be about 1/2 in. to 5/8 in. in amount, in order not to bend the nail, or strain the hammer handle. I have seen workmen break hammer handles and nails resist drawing when neither would have occurred had the above simple direction been followed. Mark 10 off from 100 for every bent nail.
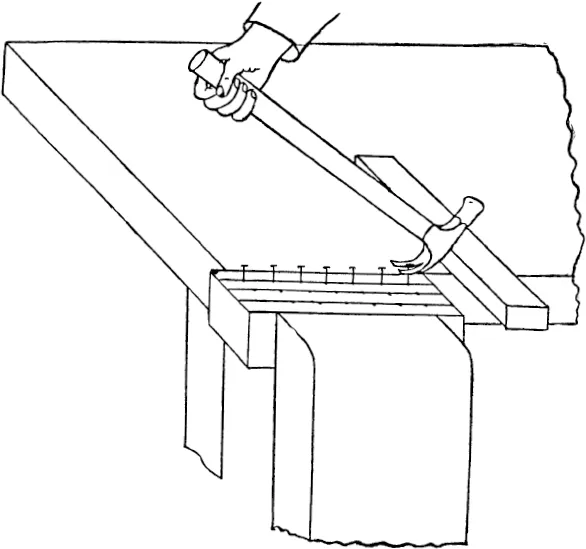
Fig. 13.
Problem III. Driving Cut Nails.—Upon another side of the block used in the two last problems, draw lines as before and drive 6d. cut nails. These are wedge-shaped viewed from one side, while of uniform thickness viewed from the adjacent side. Insert them as in Fig. 16, in order that they may not split the wood, which will be the case if they are turned 1/4 the way around.
Follow the order given in Problem I. and drive one row. Follow the order given in Problem II. and draw them without bending. If any nails do become inadvertently or carelessly bent, straighten them on the anvil. Mark as in previous problems.
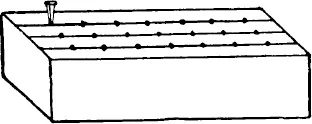
Fig. 16.
Fig. 17.
Problem IV. Curve-Nailing.—Take the block used in the previous problems, draw a line on one side 1/4 in. from the edge, and place points at every inch upon it. On an adjacent side draw a line 1/2 in. from the edge, as in Fig. 17
Provide 1 in. No. 18 steel-wire nails. Using the pliers, bend a nail about 1/8 in. from the point, as in Fig. 18. Insert the nail in one of the prepared points on the first side of the block, with its body standing perpendicular, as in Fig. 19, where an end view of the block is shown.

Fig. 18.
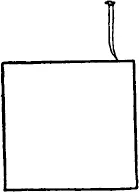
Fig. 19.
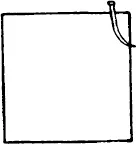
Fig. 20.
Drive the nail carefully, causing the point to appear on the 1/2 in. line on the adjacent side of the block, as in Fig. 20. In a similar manner drive nails at the other prepared points, which are on the first side of the block. Mark 10 off from 100 for every nail whose point appears 1/8 in. from the line on the adjacent side.
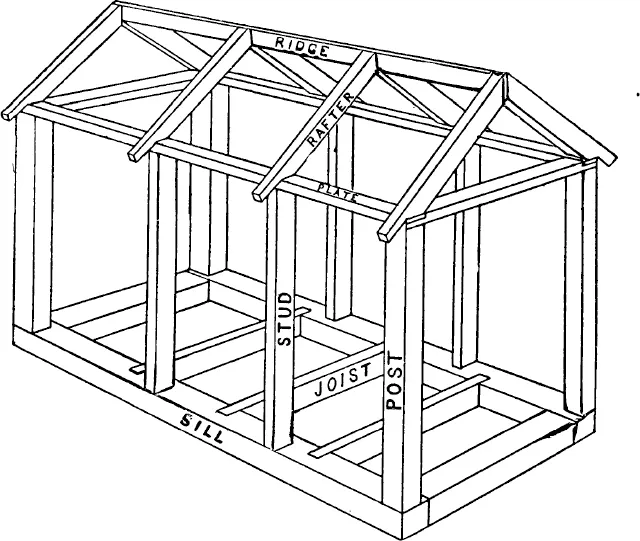
Fig. 21.
Problem V. Toe-Nailing.—Call attention to the different timbers of a common house-frame, as shown in Fig. 21.
These timbers are largely fastened together by a process called toe-nailing.
Take a piece of soft wood 2 in. × 2 in. × 7/8 in. to represent a sill, and a piece 2 in. × 7/8 in. × 7/8 in. to represent a post or stud. Lay the post on the bench, and with the peen hammer start a 5/8 in. finishing-nail, or patent brad, 1/4 in. from one end, as in Fig. 22, remembering the relation its wedge shape needs to bear to the grain of the woo...
Table of contents
- Cover
- Title
- Copyright
- Contents
- Introduction
- Equipment
- Lesson
Frequently asked questions
Yes, you can cancel anytime from the Subscription tab in your account settings on the Perlego website. Your subscription will stay active until the end of your current billing period. Learn how to cancel your subscription
No, books cannot be downloaded as external files, such as PDFs, for use outside of Perlego. However, you can download books within the Perlego app for offline reading on mobile or tablet. Learn how to download books offline
Perlego offers two plans: Essential and Complete
- Essential is ideal for learners and professionals who enjoy exploring a wide range of subjects. Access the Essential Library with 800,000+ trusted titles and best-sellers across business, personal growth, and the humanities. Includes unlimited reading time and Standard Read Aloud voice.
- Complete: Perfect for advanced learners and researchers needing full, unrestricted access. Unlock 1.5M+ books across hundreds of subjects, including academic and specialized titles. The Complete Plan also includes advanced features like Premium Read Aloud and Research Assistant.
We are an online textbook subscription service, where you can get access to an entire online library for less than the price of a single book per month. With over 1.5 million books across 990+ topics, we’ve got you covered! Learn about our mission
Look out for the read-aloud symbol on your next book to see if you can listen to it. The read-aloud tool reads text aloud for you, highlighting the text as it is being read. You can pause it, speed it up and slow it down. Learn more about Read Aloud
Yes! You can use the Perlego app on both iOS and Android devices to read anytime, anywhere — even offline. Perfect for commutes or when you’re on the go.
Please note we cannot support devices running on iOS 13 and Android 7 or earlier. Learn more about using the app
Please note we cannot support devices running on iOS 13 and Android 7 or earlier. Learn more about using the app
Yes, you can access Elementary Woodwork - A Series of Lessons Designed to Give Fundamental Instruction in Use of All the Principal Tools Needed in Carpentry and Joinery - 1893 by George B. Kilbon in PDF and/or ePUB format, as well as other popular books in Technology & Engineering & Technical & Manufacturing Trades. We have over 1.5 million books available in our catalogue for you to explore.