![]()
FOCUSING ON FEATURES
Before creating a full canine portrait, it’s a good idea to get to know the general shapes that make up each feature. As you practice rendering the features of a variety of dogs, notice the subtle changes in shape, value, and proportion that distinguish each breed.
Eyes
The eyes are possibly the most important feature when it comes to capturing the personality and character of an animal. Below I provide two basic viewpoints for drawing the eyes: a three-quarter view (turned slightly away from center) and a side view.
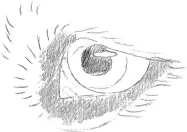
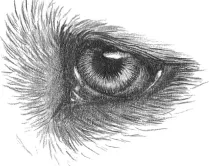
Three-Quarter View of the Eye
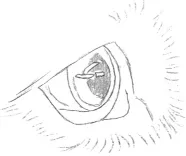
Step 1 Using an HB pencil, begin by outlining the main areas of the eye—the pupil, the iris, the eyelids, and the highlight. Also sketch the hair around the eyes. Almost all dog breeds have a very dark area of bare skin surrounding the eyeball, so shade this area with solid tone.
Step 2 Next, using a 2B pencil, block in the darkest values of the eye, including the pupil (avoiding the highlight) and the area surrounding the eyeball. As you shade, leave small highlights in the corners of the eye to convey the impression of a moist, glistening surface.
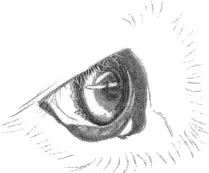
Step 3 Begin creating the pattern of the iris using an HB pencil, drawing lines that radiate outward from the pupil toward the outer edge of the iris. Also use the HB pencil to add more hair around the eye, following the direction of growth.
Step 4 Finish the eye with an H pencil, adding more tone to the iris and then lifting out some graphite to indicate reflected light. Also soften the highlight with a tortillon. Then continue developing the hair, stroking over the top of the lid and over the outer corner.
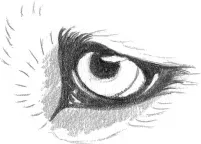
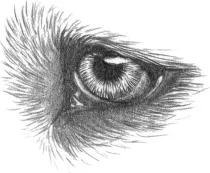
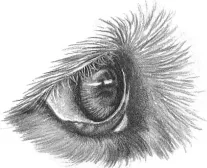
Side View of the Eye
Step 1 From the side, the shapes that make up the eye are quite different. The iris and pupil appear elliptical, but the overall eye has a triangular shape. Start by delineating the main areas of the eye, including the highlights.
Step 2 Before blocking in darks, indent some lashes along the upper eyelid using a blunt needle or stylus. Then apply dark tone to exactly the same areas as in the front view. When you shade over the lashes, the indented lines remain white.
Step 3 Now add the midtones and lights. Use radial lines for the iris, covering it with a midtone. Then emphasize the highlights using tack adhesive, noting the direction of light. Finally, add the hair with short, tapering strokes.
Noses
There is a tremendous variation in size, shape, and even color of noses from one breed to the next. Below I’ll draw the nose from two common viewpoints: a frontal view and a three-quarter view. Be sure to observe your subject from a variety of angles to truly understand the shape of its features.
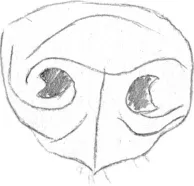
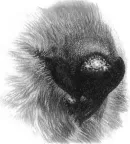
Front View of the Nose
Step 1 Begin by using an HB pencil to sketch the shape of the nose, including the nostrils. Be sure to study your subject and draw the shape you really see—not the shape you expect it to be. Then add rough guidelines to show where the main areas of light and shadow will be.
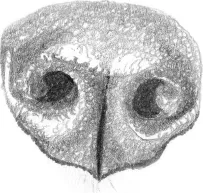
Step 2 Next add tone with a 2B pencil, using tiny circular strokes to emulate the unique texture of a dog’s nose. Darken the nostrils and the vertical crease through the middle of the nose. Then begin shading the rest with lighter layers of circles. Leave the highlight areas free of graphite.
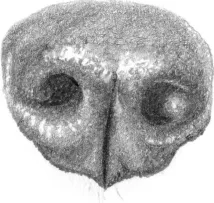
Step 3 Go over the entire nose with small circles to soften the texture slightly, but keeping the bumpy effect. Leave the top of the nose and the area under the nostril light to suggest the reflected light. To create the appearance of a wet nose, avoid blending the darks into the lights, instead allowing harsh separations.
Step 4 To connect the nose to the rest of the dog’s face, begin adding the surrounding hair. As with the eyes, the hair grows away from the nose, with the darkest areas directly under and above the nose. The hair just below the nose is generally coarse, so keep these lines dark and short.
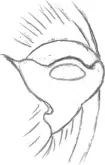
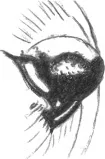
Three-Quarter View of the Nose
Step 1 Viewed from this angle, a dog’s nose almost forms a V. Begin this puppy’s nose by blocking in the light and dark areas using a 2B pencil. Also suggest the direction of hair growth.
Step 2 Use a 2B pencil to fill in the darkest areas and start establishing texture around the highlight with half-circle strokes. Indicate the position of the nostrils by placing a subtle highlight beneath them.
Step 3 Further build up the darks, and shade the slightly lighter curve along the left side of the nose. Then suggest the very fine, short hairs above the nose with a 2B pencil.
Ears
Ears vary greatly in the canine world—they can be long or short, dropped or upright, and long haired or short haired. Here I provide examples of two basic types of ears: the upright ear of a German Shepherd Dog and the dropped ear of a Pug.
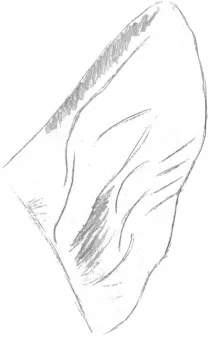
Upright Ear
Step 1 The German Shepherd Dog has relatively large ears—especially given that they stand upright. In this example, we’re viewing the dog’s left ear straight on, so the shape is triangular. Begin by sketching the ear shape with an HB pencil, outlining the folds and mapping out some of the darke...