eBook - ePub
Victoria Crosses on the Western Front: August 1914–April 1915
Mons to Hill 60
- 362 pages
- English
- ePUB (mobile friendly)
- Available on iOS & Android
eBook - ePub
About this book
The research for this book commenced in 1988 while the author was serving in the Army. In the years since, numerous sources have been consulted, but career imperatives left insufficient time to complete the project until retirement from the military. In the past the author spent many days on the First and Second World War battlefields wondering precisely where the Victoria Cross actions took place. He resolved to find out.The book is designed for the armchair reader as much as the battlefield visitor. A detailed account of each VC action sets it in the wider strategic and tactical context. Detailed sketch maps show the area today, together with the battle-lines and movements of the combatants. It will allow visitors to stand upon the spot, or very close, where the VCs were won. Photographs of the battle sites illustrate the accounts. There is also a comprehensive biography for each VC recipient and photographs. The biographies cover every aspect of their lives 'warts and all' - parents and siblings, education, civilian employment, military career, wife and children, death and burial or commemoration. There is also a host of other information, much published for the first time. Some fascinating characters emerge, with numerous links to many famous people and events.As featured on BBC Radio Wiltshire and in the Daily Record, Gloucestershire Echo, Canterbury Times and Barking & Dagenham Post.
Trusted by 375,005 students
Access to over 1.5 million titles for a fair monthly price.
Study more efficiently using our study tools.
Information
Chapter One
The Retreat from Mons
Battle of Mons, 23rd August 1914
1 Lt Maurice Dease, 4th Royal Fusiliers (9th Brigade, 3rd Division), Nimy, Mons, Belgium
2 Pte Sidney Godley, 4th Royal Fusiliers (9th Brigade, 3rd Division), Nimy, Mons, Belgium
3 Cpl Charles Garforth, 15th Hussars (3rd Division), Harmignies, Belgium
4 Capt Theodore Wright, 57th Field Company RE (3rd Division), Mariette, Belgium
5 LCpl Charles Jarvis, 57th Field Company RE (3rd Division), Jemappes, Belgium
On 14th September, at Vailly on the River Aisne, Captain Wright was assisting the passage of 5th Cavalry Brigade over a pontoon bridge built by 56th and 57th Field Companies the previous night. While supervising repairs to the bridge he was constantly exposed to heavy enemy fire and was eventually mortally wounded as he assisted some injured men into shelter.
Action of Elouges, 24th August 1914
6 Capt Francis Grenfell, 9th Lancers (2nd Cavalry Brigade, Cavalry Division), Audregnies, Belgium
7 Maj Ernest Alexander, 119 Battery RFA (5th Division), Elouges, Belgium
The unexpected withdrawal of the French Fifth Army on the BEF’s right flank on 23rd August and increasing pressure from overwhelming numbers of German troops, necessitated pulling back from the Mons-Condé Canal. From dawn on 24th August the German IV Corps tried to envelop the retreating BEF’s left flank, held by 5th Division (II Corps). The Divisional Commander ordered a rearguard (1st Norfolk, 1st Cheshire and 119 Battery RFA), to occupy the high ground west of Elouges, facing northwest towards Quievrain. Two British cavalry brigades were also in the area. At 12.30 p.m., before the rearguard was ready, a concerted attack developed from the direction of Quievrain and Baisieux.

On 24th August 1914 the area of the rearguard action was covered in mines, spoil heaps and a number of light railways. The mines have gone, but the spoil heaps (mainly wooded) and the railway embankments remain. The road between Elouges and Audregnies offers excellent views to the north and northwest, but it can be extremely fast. If you stop (there are normally places to pull in a car), ensure you get right off the roadway. The sugar factory can be approached along the Roman Road from Audregnies, but it is quite rough in places and only recommended for cross-country vehicles; easier access is from the west through Baisieux, where there is a café.
2nd Cavalry Brigade had been in action since 4.00 a.m., conducting a fighting withdrawal through Elouges. It was ordered to block the enemy by reoccupying positions vacated earlier to the north of Audregnies. While moving into these positions a strong enemy attack developed from Quievrain. The situation was critical; if the Germans broke through before the rearguard was prepared, it could have resulted in the destruction of the entire 5th Division. 9th Lancers, with 4th Dragoon Guards and 18th Hussars in support, was ordered to halt the attack at all costs.

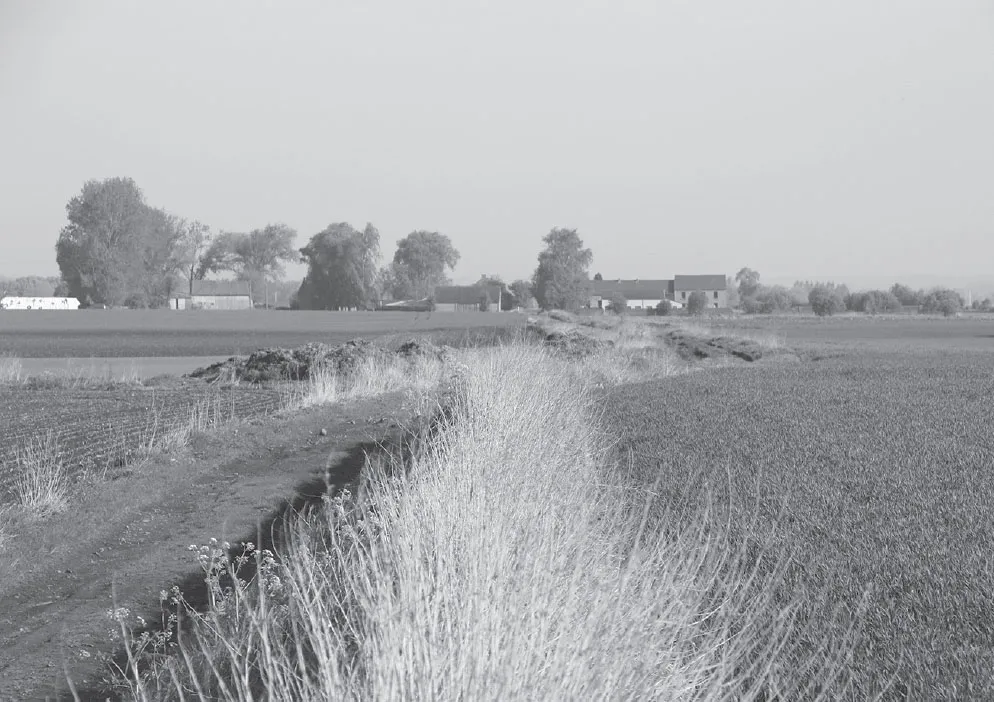
Looking north along the Roman Road, astride which 9th Lancers and two troops of 4th Dragoon Guards advanced against the flank of IV German Corps. The sugar factory is behind the camera.

The cavalry would not have charged the whole distance, some 1,500m. To do so would have risked arriving at the enemy positions on exhausted horses. In any case obstacles such as this sunken lane across the line of advance would have slowed progress to a walk in places.
The sugar factory from the north. B Squadron, 9th Lancers took cover around it and nearby spoil heaps to engage the advancing Germans after the charge petered out.
A cavalry charge, although a desperate measure against unbroken infantry, was the only way of stopping the enemy in the time available. Setting off from north of Audregnies, 9th Lancers and two troops of 4th Dragoon Guards, advanced astride the Roman road towards the enemy flank. When still 450m away, they were halted by a wire fence and engaged by nine enemy batteries and heavy small arms fire. The Germans suffered little damage as a result of the charge, but the psychological effect delayed their advance for some hours. The British artillery did great execution amongst the massed German ranks and gave the rearguard a much needed respite to prepare rudimentary positions on the high ground. Meanwhile the rest of the Division slipped away.
The fence that halted the Lancers has been the subject of some controversy. In 1921, local people knew nothing about it; indeed some insisted it never existed. Whatever it was may never be known, but it was certainly not positioned by the advancing Germans.

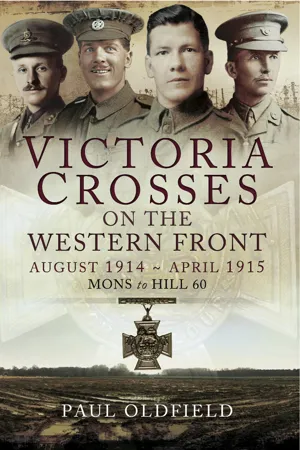
The cavalry’s escape route from the sugar factory looking east with the light railway embankment on the left (now a cycle track). 1st Norfolk held the high ground from the embankment to the right where the tree covered spoil heap marks the site of a mine in 1914.
The reverse view of the previous picture with the sugar factory on the left and the railway embankment on the right. The construction of the wind farm altered the view significantly, but did provide a number of convenient tracks to areas of the battlefield that were previously inaccessible.
When the 9th Lancers charge petered out, Captain Francis Grenfell kept B Squadron together. They took cover behind small slagheaps and around a sugar factory about 1,250m southeast of Quievrain, where they dismounted and engaged the enemy with their rifles. About 2.30 p.m. the Germans resumed their attack and the Lancers were forced to retire eastwards towards Elouges under the cover of a light railway embankment. Grenfell chose to ride along the embankment and was wounded in the hand and thigh. Earlier in the day his horse had been killed while bullets had passed harmlessly through his boots and tunic.
The Germans then threw twelve battalions against the rearguard, but were driven back by the infantry with support from L Battery RHA (awarded three VCs a week later at Néry) and a section of 119 Battery under Lieutenant COD Preston. This section was forced to retire under fire, but came back into action 450m to the right of the rest of the Battery, where it engaged targets until they were closer than 200m. Just before the Germans surrounded it, Preston pulled back but, moving along a road in front of the rest of the Battery, became mixed up with the retiring cavalry.
One of the lead horses was shot and Sergeant McCartney dismounted to cut it free. Preston extracted the section from the cavalry and came back into action again. When the Germans were 700m away he sent one gun out of action and was wounded for the second time. McCartney went back to assist with the other gun and, once Preston had been evacuated for treatment, got both guns away.

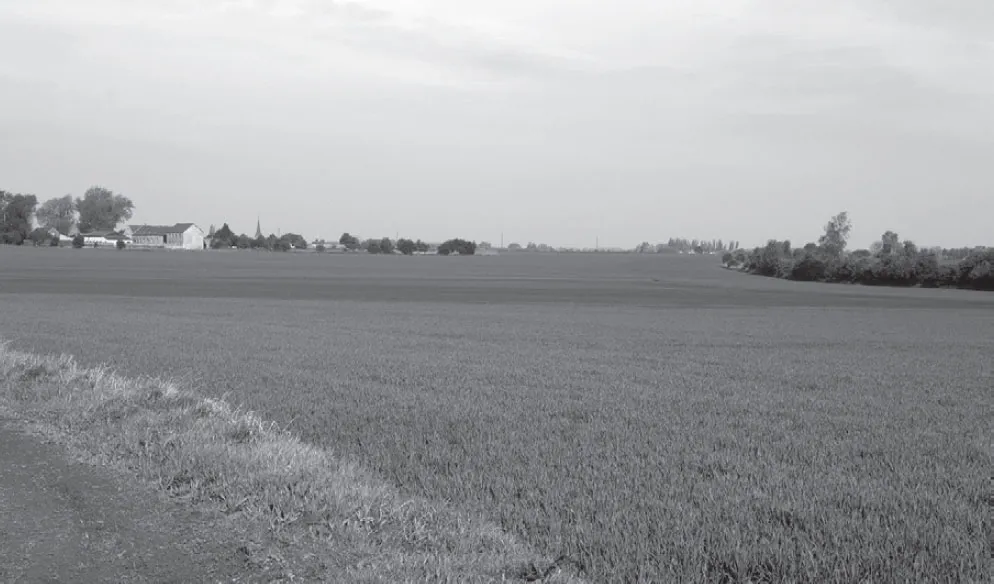
Looking east along the road from Audregnies towards Elouges. 119th Battery was to the right of the road, firing across it to the northwest. The gunners came under fire from German infantry on the tree covered spoil heap on the left. Alexander got his men and the guns into the cover of the hollow on the right below the derelict industrial building, which stands alongside another disused light railway embankment.
Meanwhile the rest of 119 Battery had come out on top in a duel with two enemy batteries. The German advance was checked again but, as the forward troops withdrew, two sections of the Battery were exposed to heavy flanking fire from nearby mine dumps. Earlier in the afternoon, Captain J C Walford had wisely moved the wagon lines into a hollow alongside a railway embankment, where they were sheltered from the enemy fire. Major Ernest Alexander, commanding 119 Battery, got his men into the hollow while he went to obtain permission to withdraw from Lieutenant Colonel Ballard of 1st Norfolk, commanding the rearguard. Meanwhile Battery Sergeant Major F Smyth organised some gunners on the embankment to engage the enemy with their rifles. Two cavalry machine-guns joined them.

The route taken to run the guns into the hollow.
Alexander returned with authority to pull back but, due to the close proximity of the enemy, it was not possible to use the horse teams in the hollow. The only option was to run the guns back into cover by hand. Despite the heavy fire, Alexander led the men back across 300m of open ground to manhandle the guns into the cover of the embankment. This was a most difficult, dangerous and arduous task. With so few men due to casualties and over heavy ground they could only move one gun at a time.
Alexander had succeeded in recovering one gun when B Squadron, 9th Lancers arrived. Grenfell readily accepted Alexander’s appeal for assistance and calmly went off to find an escape route for the guns. He then rode back to where his men were sheltering and reminded them of when the Regiment had rescued the guns at the Battle of Maiwand in Afghanistan in 1880. Every man came forward; approximately eleven officers and forty troopers. Covered by a few men firing from the embankment, the cavalrymen and a dozen or so gunners raced over two fields and slowly manhandled the guns and limbers into safety. A number of journeys had to be made before everything was recovered. During this time they were exposed to three German batteries, as well as heavy small arms fire from the mine dumps.
One of the guns being moved by Grenfell’s team was lifted off the ground when a shell landed beneath it, but fortunately it failed to explode. Grenfell was wounded again, this time in the face, but carried on. With the guns in the cover of the embankment and temporarily out of view of the Germans, the drivers were able to limber up. Alexander went back to rescue a wounded man then split the Battery in two to get away. He sent the guns and some wagons east in the cover of the railway embankment, which they had to cross before reaching the road, thereby exposing themselves to the enemy fire for about 300m. Walford took the rest of the wagons and the limbers by a different route over a level crossing. Alexander satisfied himself everyone and everything that could be moved had got away before leaving himself behind the guns.
Only one wagon and a limber were lost, but 119 Battery suffered forty-six casualties, including ten killed, and lost forty-three horses during the day. 9th Lancers had fourteen killed. Grenfell refused treatment and rode back sixteen kms with his men, despite having been in continuous action since dawn. An officer of 4th Dragoon Guards saw him on the journey, “...with a bleeding hand tied up in a bandana handkerchief and bullet h...
Table of contents
- Front Cover
- Title Page
- Copyright Page
- Contents
- Master Maps
- Abbreviations
- Introduction
- Chapter 1: The Retreat from Mons
- Chapter 2: Battle of the Aisne 1914
- Chapter 3: Operations in Flanders 1914
- Chapter 4: First Battle of Ypres 1914 (Master Map 6)
- Chapter 5: Winter Operations 1914-1915
- Chapter 6: Summer Operations 1915
- Biographies
- Sources
- Useful Information
Frequently asked questions
Yes, you can cancel anytime from the Subscription tab in your account settings on the Perlego website. Your subscription will stay active until the end of your current billing period. Learn how to cancel your subscription
No, books cannot be downloaded as external files, such as PDFs, for use outside of Perlego. However, you can download books within the Perlego app for offline reading on mobile or tablet. Learn how to download books offline
Perlego offers two plans: Essential and Complete
- Essential is ideal for learners and professionals who enjoy exploring a wide range of subjects. Access the Essential Library with 800,000+ trusted titles and best-sellers across business, personal growth, and the humanities. Includes unlimited reading time and Standard Read Aloud voice.
- Complete: Perfect for advanced learners and researchers needing full, unrestricted access. Unlock 1.5M+ books across hundreds of subjects, including academic and specialized titles. The Complete Plan also includes advanced features like Premium Read Aloud and Research Assistant.
We are an online textbook subscription service, where you can get access to an entire online library for less than the price of a single book per month. With over 1.5 million books across 990+ topics, we’ve got you covered! Learn about our mission
Look out for the read-aloud symbol on your next book to see if you can listen to it. The read-aloud tool reads text aloud for you, highlighting the text as it is being read. You can pause it, speed it up and slow it down. Learn more about Read Aloud
Yes! You can use the Perlego app on both iOS and Android devices to read anytime, anywhere — even offline. Perfect for commutes or when you’re on the go.
Please note we cannot support devices running on iOS 13 and Android 7 or earlier. Learn more about using the app
Please note we cannot support devices running on iOS 13 and Android 7 or earlier. Learn more about using the app
Yes, you can access Victoria Crosses on the Western Front: August 1914–April 1915 by Paul Oldfield in PDF and/or ePUB format, as well as other popular books in History & Military Biographies. We have over 1.5 million books available in our catalogue for you to explore.