![]()
LIGHTING & GEAR
107 FINESSE EXPOSURE FOR PORTRAITS
A good exposure is essential for a good photograph. You arrive at one by reading the light in a scene and adjusting your aperture, shutter speed, and ISO according to the exposure triangle—a visual that helps you tweak these settings in relationship to each other to arrive at a perfect exposure.
Too little light, and your subject will be underexposed—somber with few visible details. Too much light, however, and the scene’s highlights will blow out. While your camera’s built-in light meter often does a fine job of measuring light and automating a suitable exposure, it can be baffled by tricky lighting situations. Here are some coping strategies.
TRY SPOT-METERING While evaluative mode is the common go-to for many scenes, portraits can present a challenge: The face is the most important part of the image, but it often isn’t large enough to affect an evaluative-meter reading. Turn on spot-metering instead to measure the light on the subject’s face.
USE EXPOSURE COMPENSATION Once you’ve taken a shot, check your histogram—never trust your LCD screen, as it isn’t meant to deliver an accurate exposure reading. If you see a spike on the left or right side of the graph, consider adjusting exposure compensation by 1 or 2 stops to balance out the light—without having to change your ISO, shutter speed, or aperture. It’s most important to fix any high spikes on the right-hand side; while it’s okay to have part of an image appear black, a completely white area of an image contains no data, and you won’t be able to fix it in postprocessing.
LOCK IN EXPOSURE This quick, tried-and-true method works best when your subject is relatively still inside the frame. Check your camera’s manual to find out how to turn on exposure lock, and then point your camera at the area of the scene you would like to expose for, lock it in, and recompose for the final image.
SHOOT IN RAW We really can’t say it enough. Using your camera in RAW mode will capture the most detail possible, which will allow you to more readily adjust exposure after the fact. If the shot is too dark or washed out, convert it with Adobe Camera Raw and then adjust the Shadow/Hightlight and Midtone Contrast sliders in Adobe Photoshop to arrive at a look you like.
108 BRACKET FOR IDEAL EXPOSURE
Unsure whether your exposure settings will be up to snuff? Flick on your camera’s autoexposure bracketing mode—it will fire off several shots at different exposures, using your camera’s initial reading of the scene for the first blast and then shooting in preset increments (between 1/3 to 2 stops) on either side of that first exposure. It ensures you’ll get a usable image when you don’t have time to check your histogram.
109 EXPERIMENT WITH DEPTH OF FIELD
A portrait is about a person. Unless the setting offers clues about your subject or makes for an arresting composition, the background should be neutral—or, at the very least, not distracting. Photographers often manipulate aperture to edit a background so the subject really stands out. Measured in f-stops, adjustments to aperture size change an image’s depth of field, the amount of distance that appears acceptably sharp, without seeming blurry or fuzzy (see #005). Here are some examples of what manipulating your aperture size can do for a single scene.
SHALLOW DEPTH OF FIELD Here, a relatively big aperture of f/2.8 creates an extremely shallow depth of field, smearing the background almost completely. This treatment certainly makes the subject pop. However, some objects in the background are blurred into a large highlight, which can distract in its own way.
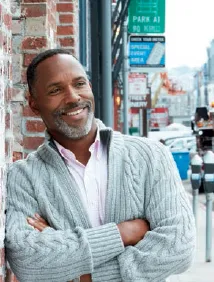
MIDDLE GROUND Using an aperture on the larger size (f/8) pleasantly blurs the background so that the subject is dominant but you can still tell he’s in an urban setting. At this f-stop, other figures in the frame don’t even divert attention from the main person of interest.
EVEN DEPTH OF FIELD The small aperture of f/32 used here creates a consistent focus throughout the image, giving subject and background equal standing. Some viewers might be distracted by all the detail—which is so crisp you can read the street signs.
110 BLUR A BACKGROUND INTO A DREAM SCENE
To transform an ordinary portrait into a magical dreamscape, move your subject away from the camera—far, far away, until he or she is a detail in the landscape. Then lengthen your exposure time to a full minute. All the mundane detail of a natural setting (blowing leaves, splashing water) will blur out into an evocative fog that frames your subject in mystery.
STEP 1 Find an outdoor setting without the visual jumble of trees, buildings, or beachgoers. The more empty the scene, the better.
STEP 2 Wait for the right conditions, preferably morning or late afternoon on an overcast day. The soft light will suffuse the landscape and soften the horizon.
STEP 3 Bring along a DSLR with a bulb setting and a lens whose focal length will allow you to isolate your subject in a small area of the frame at your camera position. Pack a tripod to stabilize the camera during long exposures, and neutral-density filters to cut the light hitting the camera sensor. A remote shutter release will allow you to fire the camera without disturbing it.
STEP 4 After mounting your gear and composing the shot, ask the model to turn her face away from you (so her features won’t blur) and hold absolutely still for the entire duration of the exposure—which ended up being 79 sec at f/11, ISO 100. Check beforehand that her pose is natural and easy to hold.
STEP 5 Fire the camera using a remote trigger and repeat the shot several times. Back home, use the Gaussian blur tool in your photo software to remove extraneous details, melt straight lines, and heighten the dreamy isolation of your subject.
111 SHOOT FROM AFAR
An expressive portrait needn’t actually show much of your actual subject—instead, you can use a natural setting and a bit of stage direction to tell a compelling story about that subject.
Many natural features—roads, steep hills, shorelines—provide visual suggestions of narrative and chronology. Consider the story you (and your subject) wish to tell: the timeline of his life? A moment of personal transformation? Should the mood be one of optimism (sunny fields) or ambiguity (cloudy skies)?
Once you’ve scouted a great setting, ask your subject to wear simple, dark clothes that will silhouette him and focus viewers’ attentions on the landscape. To de-emphasize his form further, ask the subject to walk away from you so the camera can’t record his face. Shoot as he recedes into the distance, and later pick out the most dramatic shot from the sequence.
112 FLATTER WITH DIFFERENT FOCAL LENGTHS
You can take great portraits with just about any lens—from a fisheye to an extreme telephoto—but each one creates a slightly different type of portrait. Most photographers use a fairly modest range of lenses for portraiture: 28–105mm on a full-frame camera body, 18–70mm on an APS, 14–50mm on Four Thirds (see #011 for more on picking a lens for your camera’s sensor). Some people like to use fast lenses wide open—f/1.4 or wider—for a shallow depth of field. Here are a few favorite focal lengths and their effects.
WIDE STANDARD Great for environmental and street portraits, lenses with focal lengths between 28 and 35mm allow you to get a lot of context around your subject. With the camera turned to the vertical position, this length usually lets you get the whole body in the shot without having to stand too far back. The rough equivalent for an APS is 18–25mm; for a Four Thirds, 14–18mm.
STANDARD TO SHORT TELEPHOTO Lenses with focal lengths between 45 and 60mm (28–40mm on APS, 21–30mm on Four Thirds) are nice for capturing three-quarter figures. In particular, the so-called “nifty fifty”—a 50mm, f/1.8 prime lens—creates a shallow depth of field that yields crisp, distinct subjects and creamy backgrounds.
LONG Hands down, the classic portrait lens is 85mm. It gives a very flattering perspective on the face and, especially when coupled with a large aperture, lets you blur out the background to avoid distraction. The longer lens also lets you be a bit farther from your subject, which may make her more comfortable. Try a lens in a range of 75–135mm (50–90 on APS or 35–70mm on Four Thirds).
VERY LONG Any lens with a focal length between 180 and 300mm (120mm+ on APS and 90mm+ on Fo...