Landmark 1
Important: Before you go any further, to get the most benefit from this book you should ensure you try the following self-test exercise first.
It will act as a reference point for you to measure your progress, and you will be asked to repeat it twice more through the book.
Self-test 1
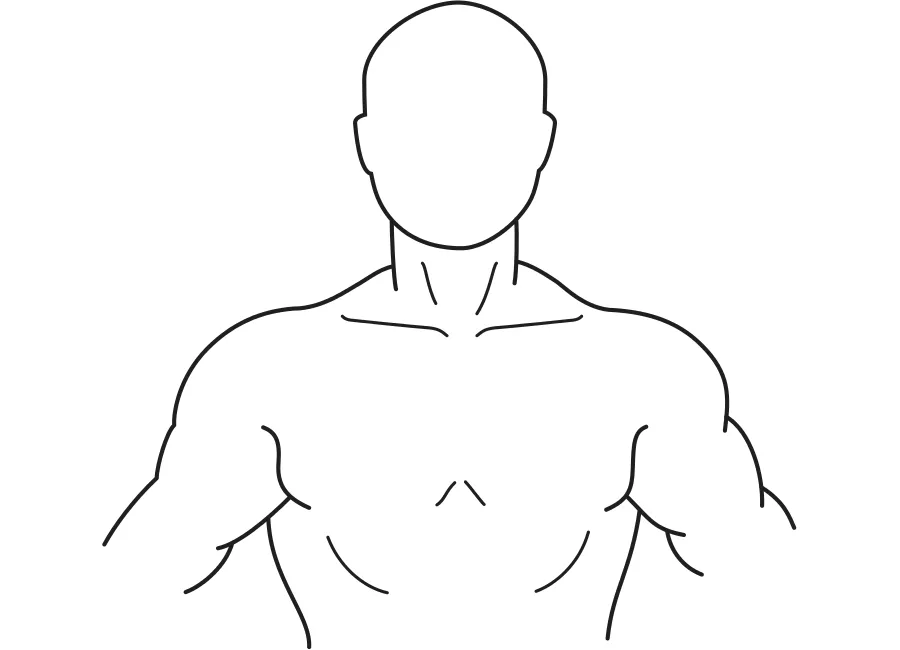
Take a deep breath, and think about where you can feel the air inside your body. Draw on the picture of the torso below where you feel the air going in your body.
Once you have drawn the full extent of where you feel the air go into your chest, I would like you to note down how you would rate the quality of this breath on a scale of 1 to 10.
Note down your score so you can compare this with the two further self-tests you will do later in the book.
Chapter 1
Knowing your body
The vast majority of people go throughout life without ever having to consider their breathing. For some, the first time they pay any attention to their lungs is when they get close to their last breath. As I work almost daily with people with COPD, I find that breathing can preoccupy their minds for considerable periods of the day. What amazes me is how little most of these COPD patients know about the workings of their lungs, so I always take time to explain the basic structure and function of the respiratory system so that they get a gist of what I will be asking them to aim towards throughout the Brice Method. There are certain structures of the body that play pivotal roles in healthy breathing, and others that can contribute to breathlessness. You will need to be able to identify these structures as you go through this book, and you will eventually be able to feel yourself using parts of your body in a way that will help, not hinder, your breathing.
Not all the COPD patients I see are completely oblivious to how they can control their breathing. Many people will have learnt particular breathing techniques through activities they have done throughout their lives. Some people will have sung, or played a wind instrument, and learned how to control their breath to make music. Others may have played a sport where the manner of breathing is pivotal to performance, and others may have had a job where activities have required them to breathe in a certain way. I find this reference point can be very useful; if you can cast your mind back to an activity in your life where you have had to control your breathing to some degree, this may help you take on board the information in this book more readily. If you have never done anything where you have had to think about your breathing, don’t worry. This book is designed to take you through each stage of the process. One of my ex-patients, who was in his late nineties, put into words what I was thinking when he learned to breathe in a stress-free way: ‘You have taught an old dog a new trick!’
Important reminder
If you decide not to do Landmark 1 (self-test, page 13) prior to reading on, you are highly unlikely to recognise what improvements you are making as you progress through the programme. If you are serious about learning how to breathe more effectively, you will need to do the self-test and record the outcomes, so you can refer back to it at a later date.
I have found that the first thing you need to do to help you improve your breathing is to understand where your lungs are, and how they are designed to work. It is my experience that it is only when you know this information that you can fully understand where you could be going wrong and what you can do to improve your breathing.
Know where your lungs are
Strange though it may seem, the vast majority of patients that I see have absolutely no idea of where their lungs are located, and have almost no concept of their size and capacity. Once I have asked patients about their medical history and their breathing has settled down, I ask them to take a deep breath and tell me where their lungs are positioned. Most simply gesture to the general area of the chest, looking at me as if I am a bit daft bothering to ask them such an obvious question. It is a couple of seconds later when they struggle to explain exactly where their lungs are, that they realise that, even though they have a lung condition, they know very little about the organ that limits their lives so dramatically.
At this point, I take the opportunity to show my patients a picture of a normal set of lungs (see Figure 1.1). When patients see that their lungs take up almost the entirety of the inside of the rib cage, some start to get an inkling of where their problems might lie, especially if they can feel the air going only a little way into the chest in the self-test exercise, Landmark 1. (Hopefully you will have done this exercise, recorded your 1–10 score, and written down a short description of how the breath felt to you. Sorry to keep on about this, but it really is important.)
Lung structure
The next step I take is to teach a patient how the lungs are structured, and how this structure affects their proper functioning. I will quickly run through this using a diagram of the anatomy of the respiratory system (see Figure 1.2). The area occupied by the lungs is known as the thorax, and the parts of the spine associated with this area (the thoracic spine) are called the thoracic vertebrae.
Looking at Figures 1.1 and 1.2, probably the first thing you will notice is how enormous the lungs actually are. I find it useful to compare the lungs to sponges that almost completely fill the inside of the rib cage. Also inside the rib cage there is a gap for the heart, plus the tube that leads to the gut (the oesophagus), and a few blood vessels and nerve bundles (not shown here). The rib cage is designed to protect the fragile lungs, but to do so whilst still allowing the chest to be mobile enough for the lungs to work effectively. This structure is also flexible enough to assist with relatively complex body movements like walking, throwing, lifting and carrying, not to mention maintaining an upright stance.
You are already likely to know that the primary role of the lungs is to draw air into the body, extract the oxygen from the air, and make it available to the bloodstream to circulate round the body. The lungs also help get rid of carbon dioxide as well as heat, both of which are waste products of the body, as it uses up the oxygen. Oxygen is essential to help power every living cell in your body, transforming glucose into energy. Every cell requires oxygen to function effectively, and this is why the respiratory system is so important – ultimately it is key to our survival.
I feel it is vital to emphasise that the overall capacity of the lungs is ultimately linked to the expansion and contraction of the rib cage and the cavity that houses the lungs. This will be explored many times throughout this book. The lungs sit above the abdominal mass of the liver, stomach, gut and other organs. They are physically separated from the abdominal mass by an extremely strong dome-like muscle called the diaphragm.
Inhalation (breathing in) causes air to be drawn in through the nose via the nasal cavity, or directly in through the mouth. This air passes the pharynx inside the head, and then into the larynx, and down the windpipe. The windpipe, or ‘trachea’, is a thick cartilage-ringed pipe that takes the air down the neck into the main structure of the lungs. The trachea splits into two primary bronchi that allow air into the left and right lungs. These in turn split into ever-smaller pipes until the air reaches the minute bronchioles. Oxygen does not transfer into the bloodstream directly from these pipes; they merely transport the air into the active part of the lungs. The active part, where the oxygen is absorbed into the bloodstream, is made up of structures called ‘alveoli’.
All of these structures are shown in Figure 1.3.
There are literally millions of alveoli in an adult lung, and they have the ability to expand and contract rather like a sponge. If you were to take a healthy lung from a small adult, and spread out all the alveoli on the floor, the surface area would take up the size of a badminton court. Do the same for a large adult, and the surface area would be closer to the size of a tennis court. Once you understand that such large surface ...