eBook - ePub
Photoshop for Landscape Photographers
John Gravett
This is a test
Share book
- 300 pages
- English
- ePUB (mobile friendly)
- Available on iOS & Android
eBook - ePub
Photoshop for Landscape Photographers
John Gravett
Book details
Book preview
Table of contents
Citations
About This Book
This practical book explains the process of landscape photography, leading you easily through the stages of editing an image to lift your photographs and bring out the image you captured at the taking stage. Topics covered include: screen grabs; black and white landscapes; combining photos into realistic high-dynamic-range images; creating stitched panoramas; popular plug-ins for Photoshop and shortcuts and keystrokes to speed-up your Photoshop work. With step-by-step instructions and practical advice, this book an essential guide for photographers keen to capture the true beauty of a scene. Beautifully illustrated with 300 stunning colour photographs.
Frequently asked questions
How do I cancel my subscription?
Can/how do I download books?
At the moment all of our mobile-responsive ePub books are available to download via the app. Most of our PDFs are also available to download and we're working on making the final remaining ones downloadable now. Learn more here.
What is the difference between the pricing plans?
Both plans give you full access to the library and all of Perlego’s features. The only differences are the price and subscription period: With the annual plan you’ll save around 30% compared to 12 months on the monthly plan.
What is Perlego?
We are an online textbook subscription service, where you can get access to an entire online library for less than the price of a single book per month. With over 1 million books across 1000+ topics, we’ve got you covered! Learn more here.
Do you support text-to-speech?
Look out for the read-aloud symbol on your next book to see if you can listen to it. The read-aloud tool reads text aloud for you, highlighting the text as it is being read. You can pause it, speed it up and slow it down. Learn more here.
Is Photoshop for Landscape Photographers an online PDF/ePUB?
Yes, you can access Photoshop for Landscape Photographers by John Gravett in PDF and/or ePUB format, as well as other popular books in Media & Performing Arts & Digital Media. We have over one million books available in our catalogue for you to explore.
Information
Subtopic
Digital MediaChapter 1
Photography and Photoshop
As landscape photographers, we should be using editing software like Photoshop to improve and enhance photographs rather than rescue poor images. There is an old adage – rubbish in, rubbish out – and this applies to the photographic process as much as anything else.

The photographic process doesn’t start with importing the pictures into editing software, but right back at the beginning, with the initial exposure. In the days of film, we talked about going out and taking photographs. Now it might be more relevant to talk about shooting data, as the more data we can capture at the taking stage, the better our final image quality will be. Some photographers these days refer to ‘making photographs’ and that is what editing software gives us the ability to do.

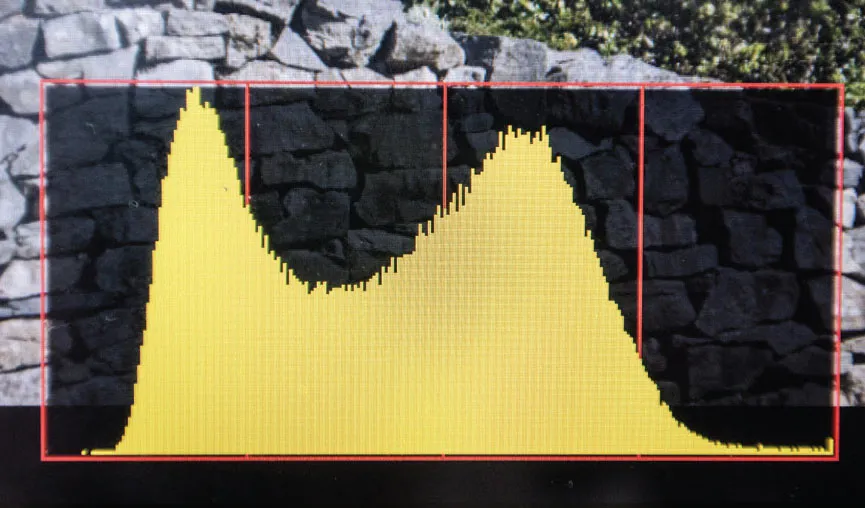
Fig. 1.1
The histogram showing the spread of data from dark tones (on the left), to highlights (on the right).
I started really looking at the histogram on the back of my camera a few years back, not just to see if the exposure was ‘acceptable’ but to see if I could maximize the data in my file by improving the exposure. Changing from slide film to digital was a real step change for me. With slides, the initial exposure produced the final shot – no further adjustments were possible. With digital, the greatest aggregation of data occurs at the right end of the histogram, so pushing the histogram to the right (by maximizing exposure) will give more data to work with. In doing this, it is of course vital that you retain highlight detail, and don’t clip your highlights, but getting into the habit of this will give greater data with significantly improved shadow detail. Over-lightening dark shadows in Photoshop is a sure-fire way to create poor images with noise.

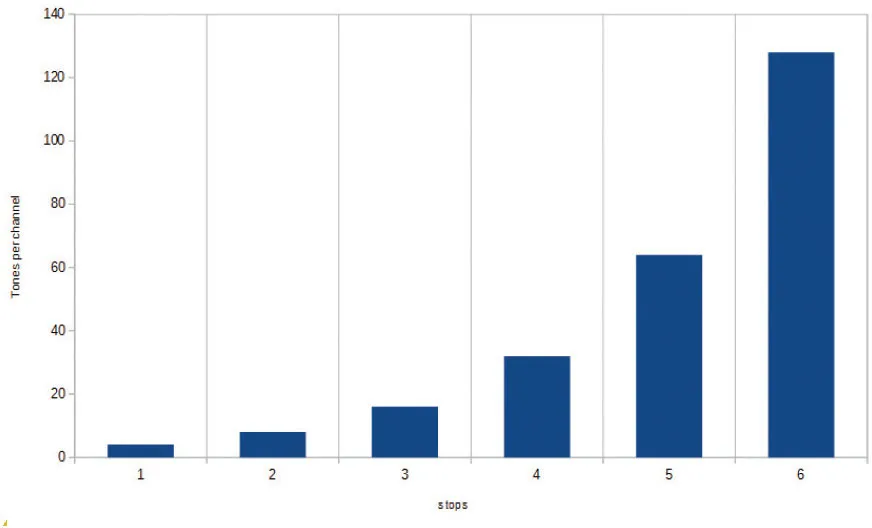
Fig. 1.2
Data spread over the 6 stops of the dynamic range of a typical digital camera – showing that the right-hand stop of the histogram holds 50% of the total available data.
Although the dynamic range of the human eye is only about 7 stops, as we scan a scene the eye constantly adjusts and the brain pieces together the information, giving us an effective dynamic range of in excess of 20 stops. The digital image recorded in-camera has a dynamic range of about 6 stops; this works well with most subjects, but where the dynamic range exceeds the capabilities of the camera, either highlight or shadow detail will be lost. Getting round this problem is something we will be looking at in Chapter 8. On a typical scene though, where there is a bit of leeway at each end of the histogram, positioning makes a huge difference.
If we look at the spread of data across the histogram first (and these numbers relate only to the JPEG image – RAW files have significantly more data), there are 256 tones in each of the red, green and blue channels, from white through to black. These however are not spread evenly across the 6 stops of the histogram. The extreme right-hand (lightest) stop holds 50 per cent of the information, in other words 128 tones, the next 64, then 32, 16, 8 and 4 respectively.
It follows therefore, if you lighten dark shadows excessively, you are pushing data from an area which contains say, 4 tones per channel, into an area that requires 8 or 16 tones per channel, effectively trying to create new data, which is achieved simply by creating noise. Pushing your histogram as far to the right as possible at the taking stage should give you more data, as long as you retain highlight detail.
 | WHAT SHAPE SHOULD A HISTOGRAM BE? A question I get asked time and time again – ‘Should a perfect histogram be high in the middle and low at each end – a classic bellshaped histogram?’ The answer is of course that there is no correct shape for a histogram, it merely shows the distribution of the brightness across an entire image. But as far as exposure is concerned, we are striving to keep the brightest highlights towards the right end of the histogram. If the image is predominantly dark, with a few light areas, the majority of the histogram will be to the left, but those few bright areas will be towards the right, and we endeavour to push them as far to the right as possible without clipping the highlights. |  |
 |  |
RAW FILES V JPEGS
The debate on what type of file to shoot – RAW or JPEG – has raged since digital photography has been about, and will doubtless continue forever. The simple answer is – whichever suits you best. Both have their advantages, both their disadvantages. For me, one clearly outweighs the other, but this is dependent upon your priorities.
JPEGs
Shooting an 8-bit JPEG will give you a relatively small file size, minimizing the space taken up on your computer. A certain amount of processing can occur in-camera – maybe not as sophisticated as doing it in Photoshop, but the downloaded thumbnails will have a more ‘complete’ look than with RAW, possibly encouraging you to look at them further, and certainly for those without the inclination to process pictures this may be the better option.
The downside of JPEGs is that the way they are written to the computer means they are compressed to take up as little space as possible. As the JPEG format is a lossy format, every time a JPEG file is written to, data is compressed in slightly different ways, losing (destroying) the quality of the image.
Lightening shadow details on JPEG files is more likely to cause noise due to the lack of information present in the original data. Similarly, trying to create texture in relatively smooth areas, such as cloudy skies, is more likely to create artefacts and banding (lines across areas that should be a smooth transgression of tones) in the image, compromising the quality. That said, if editing is kept to a minimum, JPEGs can still produce superb results.
RAW files
RAW files have a greater bit depth, typically 14-bit, though some older cameras shoot in 12-bit. When imported into Photoshop, they open up as 16-bit files, with 32,769 tones per channel (as compared to the JPEG’s 256) clearly containing significantly more data. More data can ultimately lead to a better-quality print. They have more shadow detail, and areas of dark shadows or slightly blown highlights can be recovered in processing. File sizes are significantly larger, so fewer images will fit on your card in-camera, and they will take up significantly more space on your computer. They have to be processed, as in-camera settings for increased contrast and so on are never applied to the RAW file – that’s just what it is, RAW data. No applied colour space, nor contrast or sharpening enhancements, just basic data. To truly assess your picture, a modicum of processing needs to be applied; in addition files need to be sharpened. Other benefits include the ability to alter the white balance within the RAW converter; if the original photo was shot on the incorrect colour balance (or even AWB) the changes can be easily applied.
Whether you choose to shoot JPEGs or RAW files, I would tend to set the camera up in the same way:
Shoot in Adobe RGB colour space
Shoot with the appropriate white balance (rather than AWB).

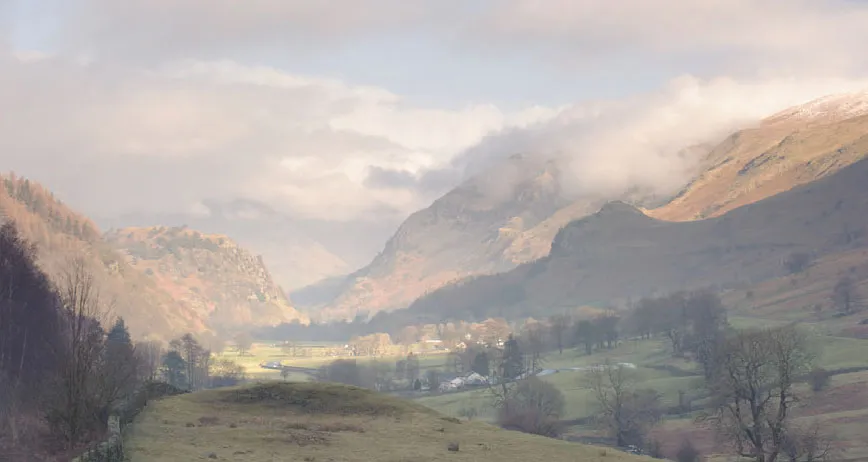
Fig. 1.3
The unedited file straight out of the camera – the image appears washed out and flat with no great separation of tones and little contrast.

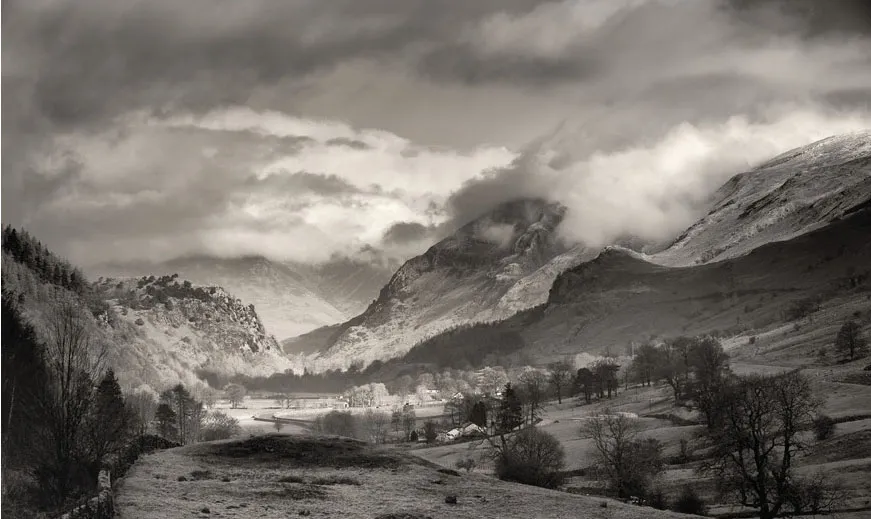
Fig. 1.4
The fully processed file, converted to monochrome, showing a full range of tones, dynamic contrast and more drama than the original file. A conversion like this is possible because the original file was exposed to retain detail in the highlights and to preserve as much shadow detail as possible.
Use the most neutral colour setting. It will have no effect on the RAW file, but the review image you get on the back of the camera appertains to the JPEG data; if you shoot at a ‘Vivid’ or ‘Landscape’ setting, the RAW file you download will be totally different from the image you reviewed on the back of your camera. If you shoot a JPEG, you have far more sophisticated means of altering colour and contrast in Photoshop than in the camera.
I know many photographers who swear by either. Indeed, I know of some internationally famous photographers who shoot JPEGs very successfully, and many keen amateurs who win medals in international exhibitions from images shot as JPEGs. If the original file is well exposed and correct, there is no reason why very high-quality prints cannot be made from JPEGs. Most photographers are of the opinion that you’re only serious about your photography if you shoot RAW files – I might go as far as saying RAW files make it easier to cover up your mistakes, by allowing more control and recovery at the initial processing stage. Remember, photography is more about choice than about rights and wrongs.
Personally, I shoot RAW files.
Below, I set out a comparison of two photos – both from the same file. The first is the unprocessed RAW out of the camera; the second is the edited version, i...