Etching can seem mysterious and inaccessible, but this practical book guides you through the process to reveal the potential of this distinctive means of creating artists' prints. With clear instructions and visual guides, it explains the many ways that marks are first made on a metal plate before ink is applied and the image transferred onto a sheet of paper. The book goes on to introduce a broad menu of techniques, allowing the visual artist to develop a uniquely personal approach. Explanations are given for photo-etching, aquatint, as well as related intaglio processes such as drypoint and photopolymer. This new book encourages artists to experiment and try combining techniques to explore their potential, and includes interviews with leading artists explaining their approaches.

- 192 pages
- English
- ePUB (mobile friendly)
- Available on iOS & Android
eBook - ePub
About this book
Trusted by 375,005 students
Access to over 1 million titles for a fair monthly price.
Study more efficiently using our study tools.
Information
Topic
ArtSubtopic
Art Techniques
CHAPTER 1
MATERIALS AND EQUIPMENT
This chapter will cover only those materials and equipment that make up the essential elements we work with and choose from in order to make our prints. There are, of course, many others but these are covered in more detail in their own specific process chapters, or within the necessary health and safety aspects of where we work and what we do.

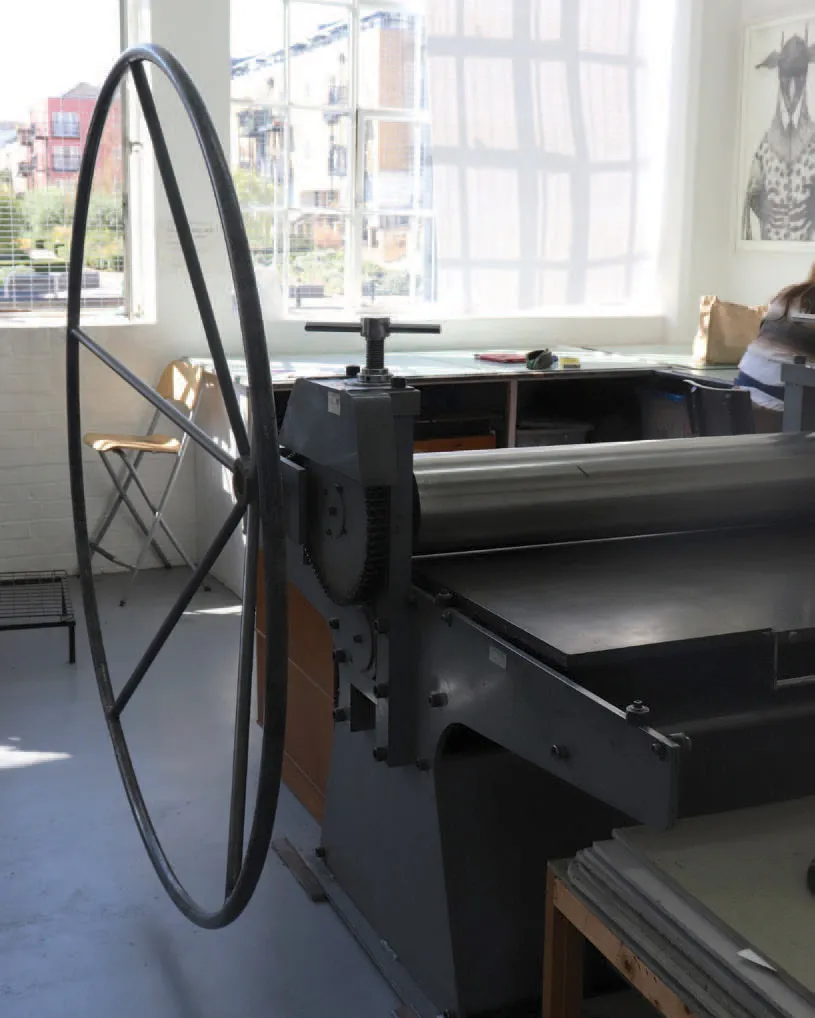
These top roller driven presses must have the bed fully extended before the blankets can be laid on the bed and wound in.
Presses that are bottom roller driven have an adjustable top roller which can be lowered onto the etching blankets.
The etching press
There are two basic designs to an etching press in terms of how the roller is put in contact with the bed. Some presses are top roller driven; this means that the top roller is always in contact with the bed and so the blankets have to be pushed in while turning the handle. The second design of press is bottom roller driven, allowing for the top roller to be lifted up above the bed, the blankets inserted and then the roller dropped back onto the blankets and put under pressure.
Bottom roller presses have the added advantage of being able to print thicker items, such as wood or lino cuts, as the roller can be held in place above the bed.
The correct setting of the pressure for printing is slightly different for each type of press. For presses that allow for the top roller to be lifted and held in place, lift the roller and put the bed and blankets evenly in the centre of the press. Drop the top roller down into contact with the blankets, and, depending on whether the press has been pre-marked for the correct pressure (often done in communal studios), engage the pressure screws either side of the press evenly to the given point, or until you can see the roller touching the blankets. Then turn the handle so that the bed and blankets move to one side of the press, lift the blankets and place a bevelled plate into the centre of the press.
Place a sheet of newsprint on the top, drop down the blankets and roll through the press as if taking a print. Lift the blankets once it has passed through and you should hopefully see some impression of the plate in the newsprint. If it is a weak impression, increase the pressure through the screws and repeat the printing process until there is a slight tearing of the newsprint evenly down the sides of the printing area. Then the press is ready to take a proof and ultimately it is only through the printing of an inked plate that you can fully judge whether the pressure is correct. Once it is printing well, it is advisable to mark the pressure screws in some way, as the pressure is usually going to be roughly the same for similar size plates of the same thickness.
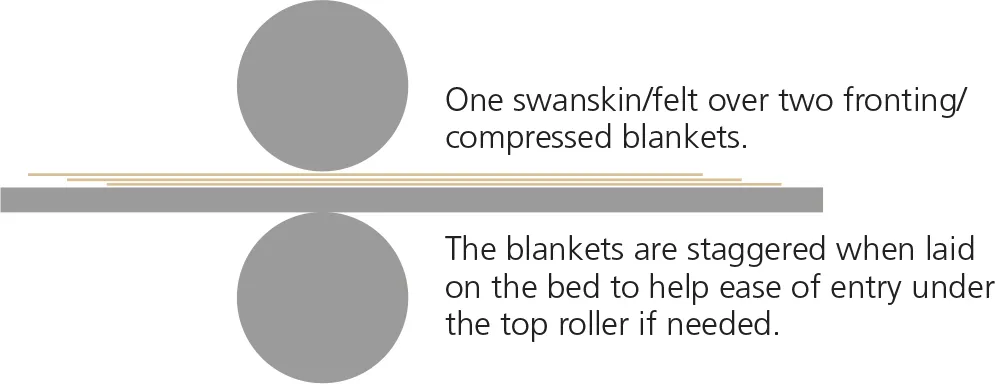
With presses where the top roller sits on the bed and cannot be raised, the main difference is the placing of the blankets under the roller. In this case the bed must be wound out to a safe, full extension. Then the blankets are placed on the bed, the two thinnest fronting blankets first with the thicker swanskin placed on top. It is best to stagger them slightly so that there is about a centimetre gap between the bottom blanket leading edge and the second, and the same between the second and third blankets. This makes it easier to get the blankets under the roller as they act as a ramp to lift the roller, rather than a solid mass that can act as a barrier. Once you have the blankets lined up, turn the handle with one hand while encouraging the bed to move forward with the other. (On an older press, pushing the bed gently with your hip can help to get it moving!) The bed will move forward until all three blankets are under the top roller.

Adjusting both the pressure screws is best done before the blankets are inserted. Just a small adjustment can make all the difference to how well a plate prints.

The blankets are stepped to make it easier to feed them under the roller as it turns. Take care to keep fingers away from the roller as the bed moves forward.
A system of pressure measurements can then take place, basically the same as mentioned above. There is a difference in that the full weight of the top roller is already on the bed and blankets, so try not to over-tighten the pressure screws before you test it with a plate.
If the embossing on the paper is uneven across the plate you will need to adjust the pressure until both sides are equal, using the pressure screws above either side of the top roller. Turning a screw handle by just a tiny fraction can make all the difference.
UV exposure units
Many print studios have an ultra-violet exposure unit, as it is useful for several different photo print processes. The light produced hardens the photo emulsion on the plate which, when developed, reveals only the drawn image areas to the action of the acid. The ideal is a machine specifically designed for exposing plates for photopolymer and photo etching. Inevitably this is not always available but alternatives can work just as well.

Preparing a photo test plate gives you the chance to work out optimal exposure times. The top of this plate was exposed in stages at intervals of fifty units.
You may find that the unit you have access to is also used for screenprinting or lithography. It is almost inevitable that the surface of the glass will be scratched from repeated high-speed removal of large and quite cumbersome screens or plates. Scratches can show as marks on your positive, but this can be alleviated a little by placing a sheet of clear acetate between the glass and the plate.
It is also possible to make your own simple exposure unit. Indeed, devising an exposure method can be as much an outlet for creativity as the artwork itself.
I have seen various configurations for UV exposure. Perhaps the most straightforward is to build a wooden box with a glass top on which to lay a plate upside down. The UV bulbs are wired into the wooden box to shine upwards against the plate on the glass and the whole is protected against daylight during exposure with blackout curtains. I have even seen tanning lights used for photopolymer exposure. If no vacuum is available the inverted plate can be compressed against the positive with a heavy sheet of wood, MDF or Perspex.
Alternatively, you can suspend UV bulbs from above and surround the exposing plate with blackout curtains. The positive can be held against the photo emulsion with a clean glass or Perspex sheet during exposure. Another way of creating compression is to use a tightly sealed transparent bag intended for compressing packed clothes. This can be used to pull the positive down against the light sensitive plate if a vacuum cleaner is attached to the bag opening.
In an extremely sunny climate daylight exposure is possible, although timing is inevitably problematic as the amount of UV light changes during the course of a day. In the UK this is difficult even in sunny weather as there is likely to be a small amount of cloud passing between the sun and the plate at some point during the exposure period.
Checking exposure times
Each exposure unit has its own optimal exposure times. However, once these timings have been established they are generally consistent for each positive exposed. Whether the image is digital or hand drawn the exposure time will be much the same.
Most studios have a written record somewhere about their UV unit and optimal timings. If none is available, you can use a ‘Stouffer step wedge’ to calculate optimum times. This is a small clear acetate with a range from light to dark steps of tone. By giving the plate a single exposure and developing it, you can calculate the optimum exposure by seeing what has developed, what has burnt out and what has not developed at all.
However, an easier method is a simple form of test plate similar to ones made for aquatint. Get an image you wish to use and tape it down to a test plate. Cover the whole area except the first 5cm with a sheet of completely opaque film (red masking film if available).
Expose the plate for a set time, for example 1 minute. Then, once the vacuum on the unit has released, move the opaque film back another 5cm and repeat the exposure. Do this several times, recording the timings, perhaps increasing the time to 2 minutes, or even 3, until the whole plate is done. Remove the tape to remove the photographic image from the plate, develop and proof. Hopefully this should give you an idea of optimum times for exposure. Once you have this it will tend to be the same for all similar films used, so normally this process will only need to be done once.
Plates and etching solutions
The four primary metals you will come across in an etching studio are copper, zinc, aluminium and steel. The popularity of each varies over time, partly due to price fluctuation, partly due to the changing concerns regarding the health and safety aspects of the chemicals surrounding their use and partly due to their ease, or otherwise, of use within any particular studio environment.
In choosing which metal to work with there are a number of factors in addition to those mentioned above. One may be easier to use than others with particular processes; another may be more durable and another more physically workable. Each has their place and qualities in an etching studio. However, most artists and studio workshops will have their own single preferred option, as it is generally more cost-effective to work around one metal and its related chemicals.
Zinc has, until recently, been the most commonly used etching plate within art schools. It is a relatively crude metal in terms of its mark-making as it is hard and brittle and the etching solution used most often, nitric acid, is quite hazardous and aggressive when it bites. The action of the biting creates bubbles, which need to be constantly removed, thus making fine detail harder to obtain. It also has a tendency to not simply bite straight down but also along and sideways in what is called crevé. The fine lines break down into one broader ‘open bite’, leading to the loss of the original detail of the drawing. However, this relative crudeness can itself be a creative tool by offering a natural coarseness to the drawn mark that might be harder to achieve with the more delicate copper.
Copper sulphate offers a more benign etching solution for zinc but must be dried out after use and disposed of as crystals. The lines on the zinc plate will etch outwards a little, just as in nitric acid, and the bubbles will need feathering as it etches.
Copper, which has become cheaper over the past few years and therefore more accessible, is the softest material generally used for chemical etching. There are several etching solutions used to bite the plate and these vary between mildly alkaline to strongly acidic. Ferric chloride, an alkaline salt, bites very cleanly and accurately. It is generally much slower than most zinc/nitric equivalent bites, but will give a broader tonal range and more delicate line work.

Co...
Table of contents
- Cover
- Halftitle
- Title
- Copyright
- Contents
- Introduction
- 1 Materials and Equipment
- 2 Getting Started
- 3 Hard ground
- 4 Printing
- 5 Soft ground
- 6 Aquatint
- 7 Colour
- 8 Photo techniques
- 9 Non-etch and extended techniques
- 10 Editioning, finishing and presentation
- List of open access print studios
- Stockists and suppliers
- Bibliography and further reading
- Index
Frequently asked questions
Yes, you can cancel anytime from the Subscription tab in your account settings on the Perlego website. Your subscription will stay active until the end of your current billing period. Learn how to cancel your subscription
No, books cannot be downloaded as external files, such as PDFs, for use outside of Perlego. However, you can download books within the Perlego app for offline reading on mobile or tablet. Learn how to download books offline
Perlego offers two plans: Essential and Complete
- Essential is ideal for learners and professionals who enjoy exploring a wide range of subjects. Access the Essential Library with 800,000+ trusted titles and best-sellers across business, personal growth, and the humanities. Includes unlimited reading time and Standard Read Aloud voice.
- Complete: Perfect for advanced learners and researchers needing full, unrestricted access. Unlock 1.4M+ books across hundreds of subjects, including academic and specialized titles. The Complete Plan also includes advanced features like Premium Read Aloud and Research Assistant.
We are an online textbook subscription service, where you can get access to an entire online library for less than the price of a single book per month. With over 1 million books across 990+ topics, we’ve got you covered! Learn about our mission
Look out for the read-aloud symbol on your next book to see if you can listen to it. The read-aloud tool reads text aloud for you, highlighting the text as it is being read. You can pause it, speed it up and slow it down. Learn more about Read Aloud
Yes! You can use the Perlego app on both iOS and Android devices to read anytime, anywhere — even offline. Perfect for commutes or when you’re on the go.
Please note we cannot support devices running on iOS 13 and Android 7 or earlier. Learn more about using the app
Please note we cannot support devices running on iOS 13 and Android 7 or earlier. Learn more about using the app
Yes, you can access Etching by Ann Norfield in PDF and/or ePUB format, as well as other popular books in Art & Art Techniques. We have over one million books available in our catalogue for you to explore.