Automate your mobile app testingAbout This Book• How to automate testing with Appium• Apply techniques for creating comprehensive tests• How to test on physical devices or emulatorsWho This Book Is ForAre you a mobile developer or a software tester who wishes to use Appium for your test automation? If so, then this is the right book for you.You must have basic Java programming knowledge. You don't need to have prior knowledge of Appium.What You Will Learn• Discover Appium and how to set up an automation framework for mobile testing• Understand desired capabilities and learn to find element locators• Learn to automate gestures and synchronize tests using Appium• Take an incremental approach to implement page object pattern• Learn to run Appium tests on emulators or physical devices• Set up Jenkins to run mobile automation tests by easy to learn steps• Discover tips and tricks to record video of test execution, inter app automation concepts• Learn to run Appium tests in parallel on multiple devices simultaneouslyIn DetailAppium is an open source test automation framework for mobile applications. It allows you to test all three types of mobile applications: native, hybrid, and mobile web. It allows you to run the automated tests on actual devices, emulators, and simulators. Today, when every mobile app is made on at least two platforms, iOS and Android, you need a tool that allows you to test across platforms.Having two different frameworks for the same app increases the cost of the product and time to maintain it as well. Appium helps save this cost.With mobile app growth exploding, mobile app automation is mainstream now. In this book, author Nishant Verma provides you with a firm grounding in the concepts of Appium while diving into how to set up appium & Cucumber-jvm test automation framework, implement page object design pattern, automate gestures, test execution on emulators and physical devices, and implement continuous integration with Jenkins. The mobile app we have referenced in this book is Quikr because of its relatively lower learning curve to understand the application. It's a local classifieds shopping app.Style and approachThis book takes a practical, step-by-step approach to testing and automating individual apps such as native, hybrid, and mobile web apps using different examples.
- 256 pages
- English
- ePUB (mobile friendly)
- Available on iOS & Android
eBook - ePub
Mobile Test Automation with Appium
About this book
Trusted by 375,005 students
Access to over 1.5 million titles for a fair monthly price.
Study more efficiently using our study tools.
Information
Writing Your First Appium Test
In the last two chapters, we saw what Appium is and how to set up the machine for both Mac OSX and Windows. Now that we have the ecosystem set up, let's start using Appium and writing some actual tests on Appium. In this chapter, we will set up an Appium Java project using IntelliJ and write our first test.
So, the set up we need before we actually write the code is this:
- Create a sample Java project
- Add Appium (automation tool) as a dependency
- Add Cucumber-JVM as a dependency
- Write a small test for a mobile web
For this example project, we will use Cucumber to write the specification. Cucumber is a tool based on the behavior-driven development framework. We have a separate section in this chapter that briefly talks about Cucumber.
While authoring this book, both the Mac OSX as well as Windows machine support has been included. However, the features of Appium on Windows is not in sync with Mac OS Appium app. Windows users might find the Appium UI option to be missing on certain screens, please do proceed with the most similar option available.
Creating an Appium Java project (using gradle)
Let's create a sample Appium Java project in IntelliJ. This forms the foundation of all the code-related and Appium-related discussions we will have in the subsequent chapters. The following steps help you to achieve this:
- Launch IntelliJ and click on Create New Project on the welcome screen.
- On the New Project screen, select Gradle from the left pane. Project SDK should get populated with the Java version.
- Click on Next, enter the GroupId as com.test and ArtifactId as HelloAppium. The version will already be populated; click on Next.
- Check the Use auto-import option and ensure that Gradle JVM is populated. Click on Next. In case the Gradle JVM is not populated, please follow the below steps:

-
- Click on Configure > Project Defaults > Project Structure:

-
- Choose Project under Project Settings as shown below:

-
- Click on New... button.
- Point it to the JDK installed on your machine.
-
- Click on OK to close the pop up and go to the new Project creation screen.
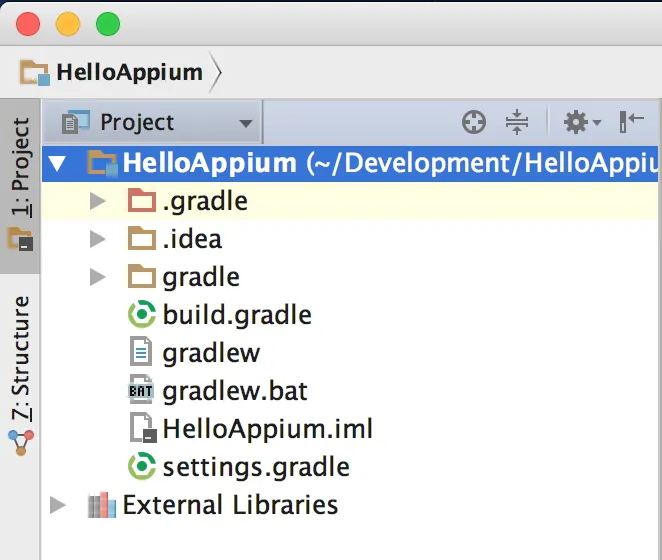
- The Project name field will be auto-populated with what you gave as ArtifactId. Choose a Project location and click on Finish. IntelliJ will be running the background task (Gradle build), which can be seen in the status bar.
- This should create a project with the following structure:
- Open the build.gradle file. You will see a message, as shown; click on Ok, apply suggestion!:

- Enter the following two lines in build.gradle. This adds Appium and cucumber-jvm under dependencies:
 compile group: 'info.cukes', name: 'cucumber-java',
version: '1.2.5'
compile group: 'io.appium', name: 'java-client',
version: '5.0.0-BETA6'
- Here's how the gradle file should look:

- Once done, navigate to View > Tools Windows > Gradle and click on the Refresh all gradle projects icon. This will pull all the dependencies in External Libraries:

- Navigate to Preferences > Plugins, search for Cucumber for Java, and click on Install (if it's not previously installed).
- Repeat the preceding step for Gherkin and install the same. Once done, restart IntelliJ if it prompts.
Once done, we are ready with the IntelliJ project creation. The next step is to write a Cucumber feature file; however, let's first understand what Cucumber is.
Introduction to Cucumber
Cucumber is a test framework that supports behavior-driven development (or BDD, in short). The core idea behind BDD is domain-specific language (known as DSL) where the tests are written in normal English, expressing how the application or system has to behave. DSL is an executable test that starts with a known state, performs some action, and verifies the expected state:
 Given I launch the app
And I click on Register
Then I should see register with Facebook and Google
Dan North (creator of BDD) defined behavior-driven development in 2009 as --BDD is a second-generation, outside-in, pull-based, multiple-stakeholder, multiple-scale, high-automation, agile methodology. It describes a cycle of interactions with well-defined outputs, resulting ...
Table of contents
- Title Page
- Copyright
- Credits
- About the Author
- About the Reviewers
- www.PacktPub.com
- Customer Feedback
- Preface
- Introduction to Appium
- Setting Up the Machine
- Writing Your First Appium Test
- Understanding Desired Capabilities
- Understanding Appium Inspector to Find Locators
- How to Synchronize Tests
- How to Automate Gestures
- Design Patterns in Test Automation
- How to Run Appium Test on Devices and Emulators
- Continuous Integration with Jenkins
- Appium Tips and Tricks
- Appium Desktop App
- Appendix
Frequently asked questions
Yes, you can cancel anytime from the Subscription tab in your account settings on the Perlego website. Your subscription will stay active until the end of your current billing period. Learn how to cancel your subscription
No, books cannot be downloaded as external files, such as PDFs, for use outside of Perlego. However, you can download books within the Perlego app for offline reading on mobile or tablet. Learn how to download books offline
Perlego offers two plans: Essential and Complete
- Essential is ideal for learners and professionals who enjoy exploring a wide range of subjects. Access the Essential Library with 800,000+ trusted titles and best-sellers across business, personal growth, and the humanities. Includes unlimited reading time and Standard Read Aloud voice.
- Complete: Perfect for advanced learners and researchers needing full, unrestricted access. Unlock 1.5M+ books across hundreds of subjects, including academic and specialized titles. The Complete Plan also includes advanced features like Premium Read Aloud and Research Assistant.
We are an online textbook subscription service, where you can get access to an entire online library for less than the price of a single book per month. With over 1.5 million books across 990+ topics, we’ve got you covered! Learn about our mission
Look out for the read-aloud symbol on your next book to see if you can listen to it. The read-aloud tool reads text aloud for you, highlighting the text as it is being read. You can pause it, speed it up and slow it down. Learn more about Read Aloud
Yes! You can use the Perlego app on both iOS and Android devices to read anytime, anywhere — even offline. Perfect for commutes or when you’re on the go.
Please note we cannot support devices running on iOS 13 and Android 7 or earlier. Learn more about using the app
Please note we cannot support devices running on iOS 13 and Android 7 or earlier. Learn more about using the app
Yes, you can access Mobile Test Automation with Appium by Nishant Verma in PDF and/or ePUB format, as well as other popular books in Computer Science & Open Source Programming. We have over 1.5 million books available in our catalogue for you to explore.