![]()
1
Sample Handling and Laboratory Standardization—Developing Standard Operating Procedures
Over the last decade, the availability of hematology and clinical chemistry instrumentation for in-clinic use has increased exponentially. There is a wide choice of instruments being marketed for use in veterinary practices. While the convenience of rapid result turnaround is touted as a primary reason for purchase and use of in-clinic instrumentation, the full impact of their use on technical personnel time or training needs and the full cost of appropriate management of the in-clinic laboratory are usually not well addressed during the decision process. When a veterinary practice decides to provide in-clinic clinical pathology service, it must make the commitment to ensure that the data produced by its in-clinic laboratory is of the same quality as that obtained by reference laboratories. The management of the practice must understand the need for trained personnel, standard operating procedures, and appropriate quality control and quality assurance programs.
The In-House Clinical Laboratory
Once a veterinary practice decides to purchase in-clinic clinical pathology instrumentation, it is the veterinary technician who is given the responsibility to obtain accurate data from the diagnostic samples for clinical management of the patient. This chapter is an introduction to laboratory management. The first aspect of integrating an in-clinic laboratory into the general practice is to identify a location for the laboratory equipment with sufficient workspace that includes space for sample processing, sample/reagent storage, and instrumentation. The area should be convenient to the treatment/surgery areas and examination rooms but out of congested traffic areas. In addition to hematology and clinical chemistry instrumentation, a free-arm centrifuge for spinning down serum and urine samples, a microhematocrit centrifuge, a quality microscope, and a refrigerator with a non–frost-free freezer compartment are needed.
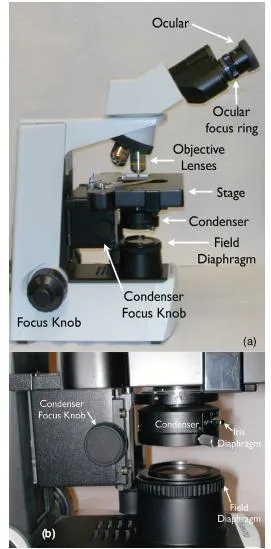
The need for a quality microscope cannot be emphasized enough. The ability to critically examine hematology and cytology specimens depends upon the clear optics of the microscope. Figure 1.1 identifies the components of a compound bright field microscope. The objective lenses of the microscope should be the highest quality affordable. The standard lenses on most light microscopes are 10×, 40×, and 100× oil emersion. The addition of a 20× or a 50× oil emersion lens can facilitate the rapid examination of cytology and hematology samples. Each microscope manufacturer can provide options for magnification and optical correction and should be able to assist in the choice of objectives for the type of clinical use in each practice. Objective lenses differ considerably in cost. It is worth the additional cost for higher-quality lenses that provide a large, flat viewing field. The higher-quality objective will significantly reduce eyestrain experience by the microscopist and improve diagnostic accuracy by providing the best quality image for viewing.
One important note is that the 40× high dry objective requires a coverslipped slide. The optics of this objective are optimized for viewing histopathology slides that are always coverslipped. A simple way to use the 40× objective to view hematology and cytology slides is to use a drop of immersion oil as a cover slip mounting medium. Place a drop of oil on the microscope slide and place a cover slip in top of the oil. This will allow sharp focus of the slide with the 40× objective. It is imperative that the high dry objective does not get immersed in oil. If this inadvertently happens, immediate cleaning with a quality lens cleaner (not xylene) and lens paper is necessary. A good habit is to always rotate the microscope objectives in one direction, from lowest power to highest power. This will keep the microscopist from dragging the 40× objective through oil.
The microscope manufacturer and the individual who is chosen to clean and maintain the scope are great resources for choosing good immersion oil. Immersion oils have been standardized over the years and the most frequently asked question is concerning the viscosity of the oil. High-viscosity oils are often preferred by microscopes because less oil is required to fill the gap between the slide and the objective lens (high-viscosity oil does not spread out as much as low-viscosity oil) and, when viewing multiple slides, less oil is needed on subsequent slides because the oil clings to the objective when the previous slide is removed. To prevent oil dropping on the next slide before it is needed, the microscopist should develop a habit of switching to the 10x objective before removing one slide and placing a new slide on the stage.
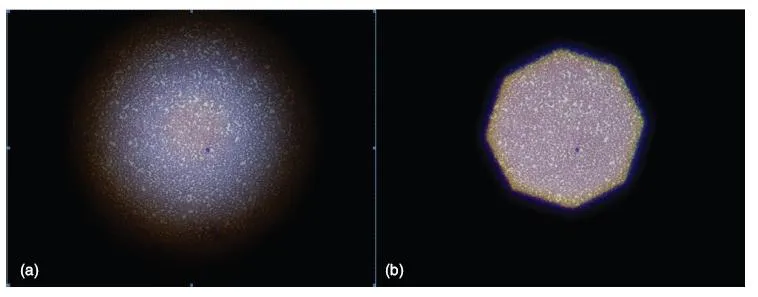
As with all laboratory equipment, maintenance is necessary to keep the microscope working appropriately. A yearly maintenance and cleaning schedule will result in a long and useful life for a good microscope. Microscopy training is essential for all personnel using the microscope. Tasks that should be understood by all microscopists include adjusting the microscope condenser to provide the best illumination (Köhler illumination), correct lens cleaning techniques, and bulb replacement. Köhler illumination is the process of adjusting the condenser to produce the best focus of the illumination source. The process is as follows:
1. Place a microscope slide on the stage and focus the image on the slide to 10×.
2. Close the field diaphragm completely.
3. Carefully move the condenser up or down to bring the edges of the field diaphragm into sharp focus (Figure 1.2).
4. Open the field diaphragm to allow complete illumination of the field.
Most good-quality microscopes sold today have an adjustable condenser and are parfocal. Parfocal means that if the image is in focus at 10×, there should be little need to focus at the higher magnification objectives. One way to optimize the parfocal lenses is to focus a microscope slide at the higher objective (preferably at 40×) and switch to the 10× objective. If the image is out of focus, use the focus rings of the eyepieces to bring the image back into focus. Once this is done, only fine focus should be needed as the microscopist moves from one objective to the next.
An excellent resource for microscopy tips is the individual that is contracted to maintain the microscope. In addition, there are excellent Internet resources for microscopy. Optimizing microscopy skills will allow veterinary technicians to fully utilize their microscopes and increase the efficiency of viewing hematology, urinalysis, and cytology slides.
A working understanding of the available clinical instrumentation and the procedures necessary to provide accurate clinical laboratory values is necessary—in fact, required—to best serve the interests of the patient. Veterinarians will make better decisions based on their physical exam, history, and diagnostic skills without any clinical pathology data than they will if they are given erroneous data. No clinical pathology data is far better than trying to interpret erroneous data. The following are the primary responsibilities of the veterinary technician placed in charge of laboratory equipment:
1. Institute and monitor a quality control system.
2. Maintain maintenance protocols.
3. Develop standard operating procedures for all tests performed in the laboratory.
4. Provide consistent training for all individuals who will be using the equipment in the laboratory.
Currently, there are several hematology instruments available for the in-clinic laboratory. It is often the responsibility of the veterinary technician to review the instruments available prior to the investment of a large amount of money. An understanding of the types of instruments available and the differences in methods used by each instrument in obtaining data will greatly increase the potential for making an appropriate choice.
Hematology Instruments
There are basically three types of instruments available for the veterinary clinic: centrifugal, impedance, and laser-based. The centrifugal system uses a large-bore capillary tube with a special float that expands the buffy coat when the tube is spun. The tube is coated with an eosin stain that will stain DNA and RNA. The differential uptake of the stain by white blood cells and erythrocytes allows the instrument to separate the populations in the expanded buffy coat. In the erythrocyte population, immature erythrocytes (reticulocytes) will take up the stain for RNA and, therefore, an estimate of reticulocyte number is possible. Once the sample is spun, white blood cell and platelet counts are estimated based on the height of each portion of the buffy coat that corresponds to each cell type and the average size of the cell type. The packed cell volume (PCV) is determined by measuring the height of the red cell column as a percentage of the total blood column in the tube.
Studies evaluating the accuracy of this methodology have shown good correlation with standard impedance instruments when samples from healthy animals are analyzed. When samples from ill animals are compared, the expanded buffy coat has poor correlation with other methods and with blood film analysis. Many pathological changes in blood interfere with an accurate evaluation of blood parameters using this methodology because alterations in cells result in abnormal layering during centrifugation.
The impedance cell counters use the principle that cells are poor conductors of an electric current. In an impedance counter, individual cells are counted as they flow through an electric field. In addition, the size of cells can be measured because the magnitude of the change in current is proportional to the cell size. This methodology has been the mainstay of automated hematology for over 50 years. It is precise and accurate in counting leukocytes, erythrocytes, and platelets and can produce a reliable but limited automated differential.
Laser-based flow cytometry instruments depend on a cell’s ability to scatter light as it passes through a sheath of diluent. The degree and direction of light scatter from the laser indicates the size and “complexity” of the cell. Based on these attributes, the laser-based instrument can provide up to a 5-part automated differential. The inherent variability in light stability of individual lasers can affect the precision of the instrument.
Regardless of the methodology, blood film review is an essential part of the use of hematology instrumentation. It is an excellent internal control. When comparing what is seen on the blood film to what the instrument measures, well-trained veterinary technicians can and should trust their eyes over the instrument.
Clinical Chemistry Equipment
The currently available in-clinic chemistry instruments are primarily closed systems that utilize either “wet” or “dry” chemistry methods. The wet chemistry systems are based on traditional spectrophotometric methods with individual tests or test profiles contained in a cartridge with separate cells containing all the reagents needed for the individual test reaction. The serum (or, in some cases, plasma) is introduced into the cartridge and parsed to each cell. There is little possibility for user error other than storage of reagents, sample handling, and instrument maintenance. There are in-clinic wet chemistry units that are smaller versions of the large clinical chemistry instruments that require reconstitution of individual reagents for each test. In these instruments, the reagents and serum/plasma sample are pipetted into a reaction cell. These instruments require significant training to maintain adequate performance because there is more possibility for user (technician) error in managing the reagents, instrument, and sampling.
Dry chemistry instruments use the principle of reflected light rather than transmitted light (as used for spectrophotometric methods). This method is less affected by both hemolysis and lipemia than spectrophotometric methods. Dry chemistry instruments use slides or reagent “sticks” that contain a pad of dried reagent onto which the serum/plasma sample is placed. Once the appropriate reaction time has passed, the amount of a specific type of reflected light is measured.
Considerations in Purchasing an Instrument
In most cases, the purchase of a clinical hematology or chemistry instrument is a major decision. There are several aspects to consider as this decision is made. One of the most important questions is how many samples will be run on the instrument each day. In most cases, greater than 5 CBC or clinical chemistry panels a day are necessary to warrant in-house instrumentation. The more often the instrument is used the more familiar the staff will be with the procedures needed to provide accurate data. Other considerations include the following:
1. Cost analysis for tests performed
a. Cost of reagents (include 10% additional reagent costs for rerunning samples if needed)
b. Cost of consumables (pipette tips, cuvettes)
c. Cost of technician time
d. Cost of overhead (electricity, building expenses)
e. Cost of quality control product
2. Available workspace for the instrument
3. Technical skill of the individuals performing the tests
4. Sample size required (the smaller the better for many small animals)
5. Test performance time
6. Monitoring requirements for the instrument
a. Quality control needs
b. Maintenance time and cost
7. Technical support and cost of service contracts
Evaluation of Instrumentation
Prior to purchase, the clinical staff should be allowed to evaluate the precision and accuracy of an instrument. This is done by performing a series of evaluations, usually by serial testing of a control product or products. In most cases, 20 consecutive samplings of the control product are run and their standard deviation and coefficient of variance is determined.
To calculate a standard deviation and coefficient of variance:
1. Run a selected control product on the new instrument. Add all 20 sample values of the variable together and divide by 20. This gives you the average or mean of the data set.
2. Calculate the deviance of the data from the mean. This is done by subtracting the total mean from each individual number.
3. Square each of the individual deviations and add these squared differences.
4. Divide that sum by 19.
5. Calculate the square root of the result of the previous step. The result of this calculation is the standard deviation.
6. Calculate the coefficient of variation (CV) by dividing the standard deviation by the mean. It can be expressed either as a fraction or a percent.
For Example: In Chart 1.1, your hospital team measures the following 20 control samples and notes the following values with a mean of 2.95.
| Step 1 | Calculate the average of these numbers or the mean.
a. Sum of all these numbers is 59
b. Average of these numbers is 59/20 = 2.95 |
| Step 2 | Calculate the deviance from each value by subtracting 2.95 from each value (see above). |
| Step 3 | Square each of the individual deviations and add these squared differences. The sum of the squared differences is 5.21 |
| Step 4 | Divide the number you got from adding the squared differences together by 19. In this case:
5.21/19 = 0.274211 |
| Step 5 | Calculate the square root of the result of the previous step. The result of this calculation is the standard deviation. In this case:
0.2742112 = 0.075191 |
| Step 6 | Calculate the coefficient of variance by dividing the standard deviation by the mean. In this case:
0.075191/2.95 = 0.0255 or 2.55% |
A low coefficient of variance indicates good instrument precision (<5%). In addition, running 20 samples of the control product over a period of 10 to 20 days will measure the long-term stability of the instrument. Once the 20 samples are obtained over 20 days, the coefficient of variance should be evaluated again. This will allow the hospital team to determine whether the coefficient varies over time, affecting overall precision.
Once precision is determined, the results of a specific set of tests on 20 patients can be compared to a reference laboratory to determine the instrument’s correlation to standard methods. It is very important to make sure that the reference laboratory to which the comparison samples are sent uses the same methodology as the in-clinic instrument. If the methods differ, the values may not be similar, especially the liver and pancreatic enzyme values. T...