![]()
retouching projects
essential skills
- Retouch and enhance images using the following techniques and tools:
- - Adjustments in Adobe Camera Raw
- - Adaptive Wide Angle and Warp
- - Adjustment layers and layer masks
- - Target tones
- - Healing Brush, Clone Stamp tool and Stamp tool
- - Shadow and Highlight adjustment
- - Adjustment layers, channels and layer masks.
Standard edit in ACR – Project 1
Most images that have come straight off the memory card of a camera benefit from some adjustments. These adjustments optimize images for screen or print, or correct for any in-camera auto settings that were inappropriate. Traditionally, these adjustments were always carried out inside the main editing space of Photoshop. These adjustments are now faster and easier to make in Adobe Camera Raw (ACR). ACR has been around since Photoshop 7 and was created as a gateway for all Raw files so that they could be optimized before they were opened in the main editing space of Photoshop (unlike JPEGs, Raw files are saved in the camera without any processing). The new revolutionary approach (or workflow) is to use ACR for Raw and JPEGs. ACR is non-destructive, simple and fast. The editing space of Photoshop is best used for specialized tasks. In this project we will perform the basic editing tasks to a Raw image in ACR and complete the project with a single adjustment layer in the main editing space of Photoshop.
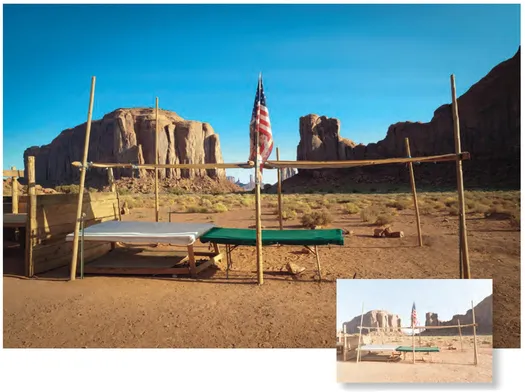
Note > If you want to follow this workflow using a JPEG image simply right-click on the JPEG in Bridge and choose Open in Camera Raw. If you are working with the project image you will notice the image is very bright when opened in ACR. The exposure for this image was set high in the camera to increase the quality of the shadows (a technique known as ‘Exposing Right’). The exposure latitude available to photographers shooting in the Raw format allows for extensive exposure adjustments in ACR that are not possible when capturing in JPEG images, due to their lower bit depth and exposure latitude.
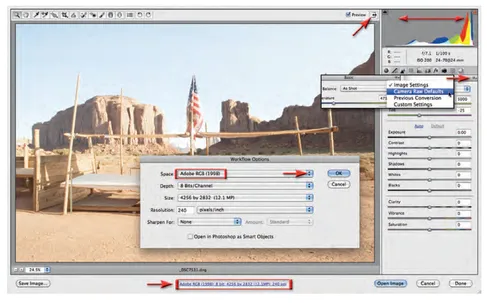
1 Open the project image in Adobe Camera Raw (ACR). Click on the Toggle Full Screen Mode icon (just to the left of the histogram in the top right-hand corner of the ACR dialog) or simply press the F key to maximize the use of your screen real-estate. Make sure the image is set to the Camera Raw Defaults by selecting the option in the flyout menu in the top right-hand corner of the Basic panel. This will establish the starting point for the image. Before optimizing the color and tone for an image it is important to establish the correct color space to suit your needs (print or web). Click on the blue writing at the base of the ACR dialog to open the Workflow Options dialog. Select Adobe RGB (1998) from the Space menu and then select OK. Selecting Adobe RGB will allow us to optimize the image for print.
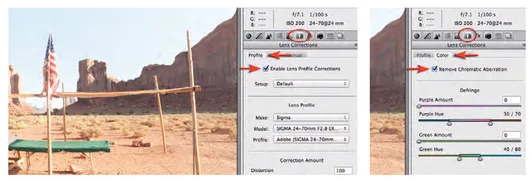
2 The second step we can take to ensure maximum quality is to select the Enable Lens Profile Corrections and Remove Chromatic Aberration options in the Lens Corrections panel (a Sigma 24-70 F2.8 EX Lens was used on a Nikon camera to capture this image). This will remove any lens distortions that were introduced into the image (if the appropriate lens profile is selected) and any possible color aberrations (common with wide-angle images). Once this has been done we can click on the Basic panel once again to start the color and tonal editing of this image.
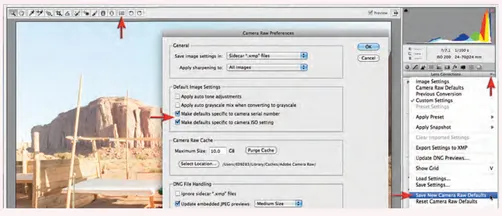
SETTING CAMERA RAW DEFAULTS
After setting a lens profile correction, removing chromatic aberration and making Detail adjustments (see the Noise Reduction in ACR and Sharpening in ACR sections that appear later in this project) it is possible to select the Save New Camera Raw Defaults option in the flyout menu. It is important to make only those adjustments that would be suitable for all images captured by the camera at a specific ISO setting. Prior to saving new Camera Raw defaults you should select the camera serial number and camera ISO setting options in the Camera Raw Preferences dialog (the dialog can be accessed by clicking on the icon in the Tools at the top of the ACR dialog).
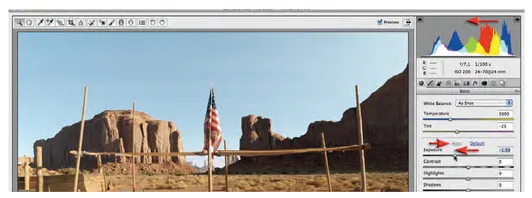
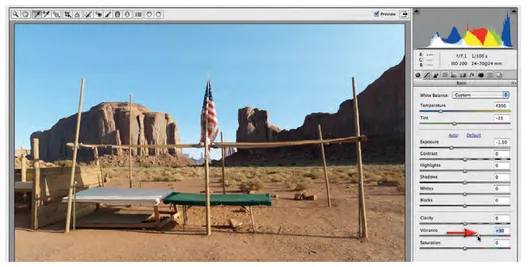
3 You can observe how ACR could automatically try to correct this image by clicking on the word 'Auto' in the Basic panel. Now click on the word 'Default' so that we can manually correct this image. We will adopt a top-down approach, in this instance, to adjust the tonality of this image (it is too difficult to start with correcting the Color Balance at the top of the basic panel when the image is so bright). Drag the Exposure slider to the left so that it has a negative value of-1.5. This action recovers a small amount of overexposure and adjusts the overall brightness of the image. Watch the histogram at the top of the ACR dialog change its shape. There is no 'correct' position for this Exposure slider and we may return to this slider at any time to finetune the overall brightness of the image after making additional adjustments.
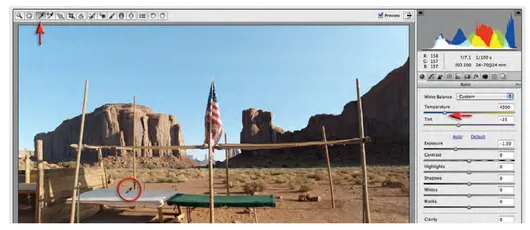
4 Now that we have adjusted the overall brightness we are able to assess the white balance for the image. The image was captured with the camera set to Auto White Balance. This, however, has created an image that feels a little too warm. It is possible to select an alternative white balance setting from the White Balance drop-down menu in the Basic panel (these are the alternative custom white balance options you could have selected in-camera at the time of capturing the image). None of these settings, however, gets the image closer to a 'neutral setting'. We can manually adjust the Temperature and Tint sliders or click on the White Balance tool in the top left-hand corner of the ACR dialog and then click on something that is neutral (gray) in the image. If we click on the tablecloth in the center of the table we should see the Temperature slider move to the left (4300) to create a slightly cooler looking image. The Tint slider should not move significantly.
5 When the image is adjusted cooler the warm colors appear less vibrant. We can compensate for this by dragging the Vibrancy slider to a value of +30. The Vibrancy slider is used in preference to the Saturation slider in most instances, as it protects any colors that are already vibrant from becoming too saturated.
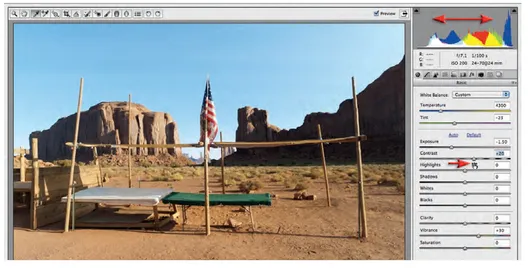
6 Now that we have set the Exposure, White Balance and Vibrancy we can set the Contrast for the file. Contrast is a subjective adjustment (no right or wrong). Before choosing a precise setting for this adjustment slider I recommend moving it in both directions in large and small amounts to see what can be achieved (good advice for all sliders). I would also take note of what is happening with the histogram as you move the slider so you can get an idea of what sections of the histogram are being adjusted. I have chosen to increase the contrast to +20. Adjusting contrast can also effect the saturation of the colors (raising contrast raises saturation) so some additional fine-tuning of the Vibrance slider may be required.
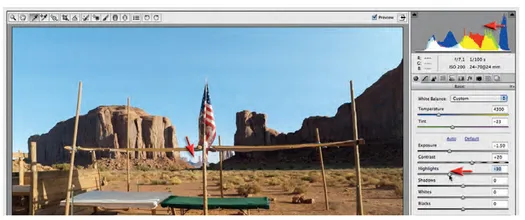
7 We can also control the image contrast using the Highlights and Shadows sliders. Using the Highlights slider we can control how bright or dark we wish to render these areas of the image. The highlights in this project image are represented by the lighter areas of the tablecloth, the white stripes on the flag and the brighter areas of the sky. If we render them too bright we will 'clip' or lose detail and the highlight warning triangle sitting above the top right-hand corner of the histogram will change from black to either white or a color. I have chosen to lower the Highlights slider to a value of -30 to protect the subtle detail in these areas.
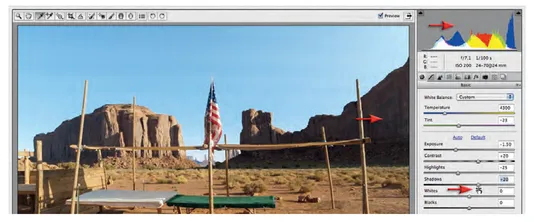
8 I have raised the Shadows slider to +20 so that the rock formations on the right side of the image do not become too dark. If we rend...