Creating Multi-sensory Environments
Practical Ideas for Teaching and Learning
Christopher Davies
- 148 páginas
- English
- ePUB (apto para móviles)
- Disponible en iOS y Android
Creating Multi-sensory Environments
Practical Ideas for Teaching and Learning
Christopher Davies
Información del libro
The revised edition of this highly practical guide to creating and using multi-sensory environments is packed full of ideas for low-cost, easy-to-assemble multi-sensory environments suitable for children of varying ages and abilities. Each creative learning environment is designed to be constructed in a classroom or school hall, encouraging creative thinking and learning, and the development of social and emotional skills. Each environment idea is accompanied by suggestions for use for children with special educational needs.
Key features of the revised edition include:
-
- Ideas for creating sensory experiences that stimulate all the sensory channels – auditory, visual, kinaesthetic, olfactory and gustatory
-
- Suggestions for extension or differentiation depending on student capability or time available
-
- A summary of the theory and background to multi-sensory learning, to allow you to adapt the suggested scenarios according to the needs of individual learners
Although these activities will be of particular value for children with special educational needs or sensory impairments, they are more broadly designed to provide stimulating learning environments, as promoted in the themes and principles of the Early Years Foundation Stage guidance. This is an invaluable resource for teachers and other professionals in education.
Preguntas frecuentes
Información
Section two
Environments and activities
Part 1
Rooms within rooms
Chapter 1
Musical Forest
What is set up as your students enter the room
| At the start | The room is filled with a forest of trees suspended from the ceiling. The trees make musical chiming sounds when moved. The forest is made up of a series of cardboard tubes, decorated to look like trees. The Musical Forest makes an intriguing environment to explore during a drama or movement session or as an art installation in its own right. |
| An alternative is to completely make the environment during an art session with the students (and staff) before hanging it up to use as an installation or a setting for drama. In which case the students enter to find all the materials (below) laid out. |
| Different sensory channels | |
| Visual |
|
| Auditory |
|
| Kinaesthetic |
|
| Olfactory/gustatory |
|
Equipment needed
| The basic environment |
|
| Visual |
|
| Auditory |
|
| Kinaesthetic |
|
| Olfactory/gustatory |
|
| For using puppet and/or character |
|

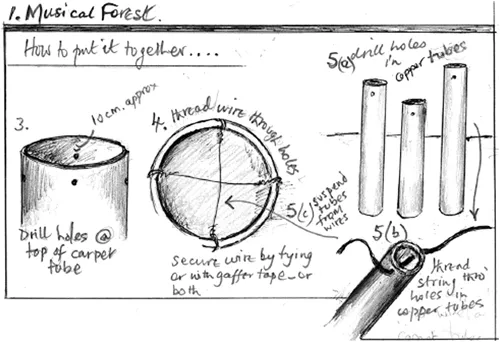
How to put it together
- Collect the materials you need from the above list – you may not need all of them – it will depend on what your purpose is.
- Suspend the camouflage net or ropes to the fixing points above the space (Structures 1, page 11) that is to become the forest.
- Make four holes at the top of each of the cardboard (carpet or other) tubes at north, south, east and west. See Figure 9.
- Thread wire through the holes and across the tube from north to south, bend it down onto the side of the tube and gaffer tape the wire into position. Then do the same from east to west so you have a cross of wire across the cardboard tube 10 cm or so from the end. From this the copper pipes, or other metal tubes can be suspended.
- Using a drill bit suitable for metal, drill two holes at either side of one end of each of the copper pipes. Thread the string through the resulting holes and loop three or four lengths of copper over the crossed wires in place at the end of the cardboard tube so that the copper pipes are suspended inside the cardboard tubes.
- Thread strong string through the north and south holes in the cardboard tubes to attach to fixtures in the ceiling. Then hang the cardboard tubes, which now become the trees, from the ceiling.