![]()
Introduction to Animation Working Practice
Chapter Summary
• How Animation Works
• Frames per Second
• What You Need for Your Studio
• Let’s Get Animating
• Flipping, Flicking and Rolling
• How to Use a Line Tester to Help Your Animation
• Exercises
• How to Relate Your 2D Animation to Your 3D Animation
• The 13 Things You Need to Know About Maya
• The 13 Things You Need to Know About 3D Studio Max
• Overview of the ‘Ball Drop’ Exercise in 3D
• How to Animate a Basic Bouncy Ball in Maya
• How to Animate a Basic Bouncy Ball in 3D Studio Max
• Drawing
• The 12 Principles of Animation
In this chapter I’ll take you through two things: the equipment needed to make a basic animation studio and some simple animation. We will look at X-sheets and how they help timing, flipping, flicking and rolling; how to use a line tester; and how to put the lessons learnt from your drawn exercises onto a 3D computer animation program. By the end of the chapter you will have learnt how to organise yourself and how to plan and execute a piece of animation.
I make no apologies for taking you right back to basics. You may know much of this but bear with me – it is worth refreshing your knowledge and reinforcing the basic principles behind animation.
How Animation Works
The Basics
2D drawn animation consists of a series of drawings shot one after another and played back to give the illusion of movement. This animation can be played back in a number of ways:
• In the form of a ‘flipbook’ (basically a pile of drawings in sequence, bound together and flipped with the thumb).
• Shot on film one drawing at a time with a movie camera and played back using a cinema projector.
• Shot on a video camera and played back with a video player.
• Shot with a video camera attached to a computer and played back on the same computer using an animation program.
• Scanned into a computer and played back.
Frames per Second
Animation shot on film and projected is played at 24 frames per second. Animation for television in Europe, Africa, the Middle East and Australia is played at 25 frames per second. These countries use a television system called PAL, which plays at 50 fields (frames) per second. Animation that plays at 25 frames per second is compatible with PAL, but if we played an animated film at 24 frames per second on a television we would see a black bar rolling up the screen. The Americas, the West Indies and the Pacific Rim countries use NTSC, which runs at 60 fields per second. This means that for this system you should be animating at 30 frames per second (60 is divisible by 30). Quite often some sort of digital converter is used to transfer one speed of film to another speed of video, allowing 24-frames-per-second film to be shown on a 60-fields-per-second (NTSC) television. If you stop-frame through a video of an animated film, you will find there are points at which one frame will blur into another. This is how the incompatibility of the two systems is overcome. (Stop-framing through animated movies is a very good way of learning about animation.) The most important thing to find out when animating something is what speed the animation will be played back at. All the animation taught in this book will be played back at 25 frames per second.
What You Need for Your Studio
In order to complete the drawn exercises in this book, you will need the following things (all of which are available from the professional animation equipment suppliers listed at the back of this book):
• Animation paper
• Peg bar
• Light box
• X-sheets
• Line tester
• Pencils
Animation Paper
When animating, you often find that you are working with four or more layers of paper. A level of translucency is necessary in order to see all of the drawings. Professional animation paper is made with this in mind.
It also comes in different sizes, which are referred to as field sizes. 12-field and 15-field are the most popular. 15-field is 15 inches wide and 12–field is 12 inches wide. (I’ll elaborate on this later in the chapter when I refer to field guides, the grids that measure field sizes.)
Most professional animation paper comes with three punched holes. It is possible to buy the paper with no holes (which is cheaper, but you will need a specialist animation punch, which is very expensive). Used with a peg bar, the holes allow accurate placing of each piece of paper with the next. This is important, as the slightest movement in a drawing will show when the sequence is shot.
It is possible to use A4 paper with standard ring-binder punched holes and a peg bar with two pins that fit the holes. This will work out far cheaper than professional animation paper.
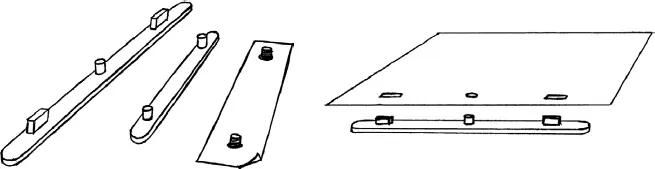
Peg Bars
Professional peg bars, used with professional animation paper, are made up of a strip of steel or plastic with three pins. They are made to an industry standard. They are used to register each piece of animation paper against the next.
It is possible to buy two-pin peg bars – these are often called ‘junior peg bars’.
It is equally possible to make your own, using a strip of wood with two pieces of dowel that correspond to the holes in your paper, or even to tape two 5 mm counter-sunk bolts onto your light box. These can then be used with ring-binder punched A4 paper.
As with the paper, bear in mind that, if you want to use your animation professionally, it is advisable to buy a three-pin peg bar.
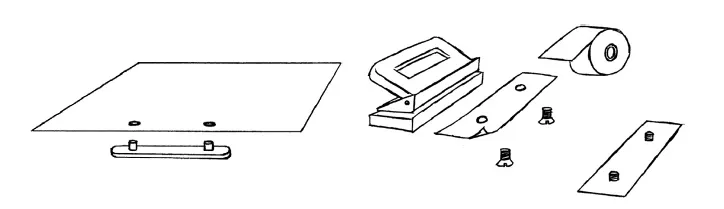
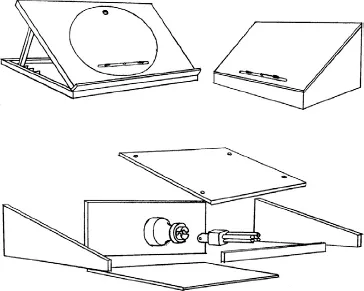
Light Boxes
In its most basic form, a light box is a flat sheet of opal Perspex over a light. Professional light boxes use a rotating disk. They should also have the ability to change the angle of the drawing surface. This makes drawing easier on both the wrist and the back.
Simple light boxes are relatively straightforward to make. You could use a wooden storage box with the top part cut off at an angle, mount a neon bulb inside and then fasten a piece of 6 mm opal Perspex to the top with screws.
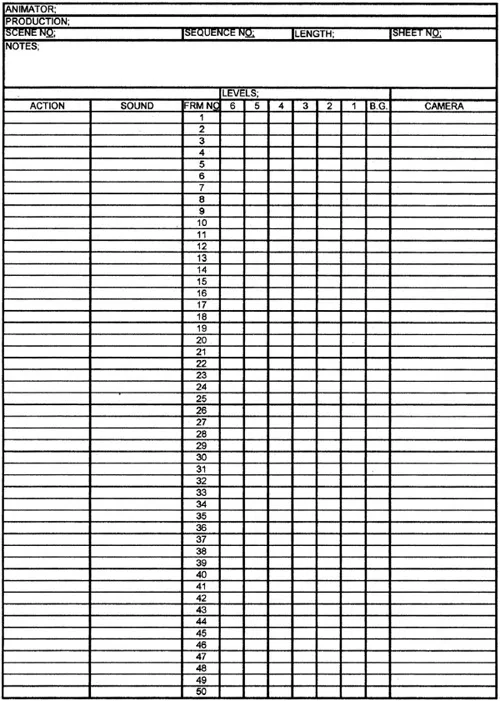
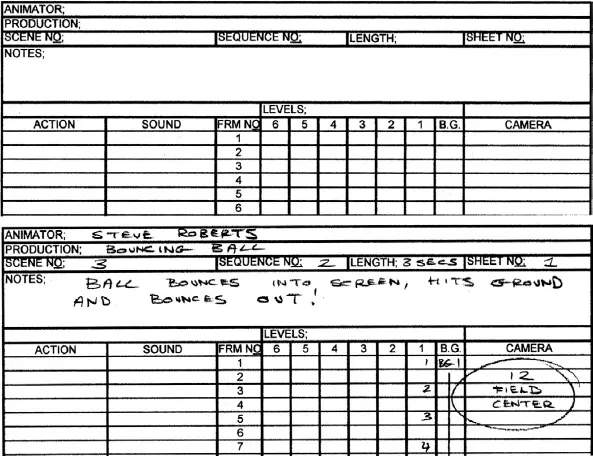
X-sheets
X-sheets are also referred to as dope sheets or exposure sheets. They are used by the animator to record all the necessary information relating to how the animation should be shot. A standard X-sheet consists of several columns that run from top to bottom and 100 rows that run from left to right (the illustration shows 50). Each row represents one frame of animation. If the animation is to be played back at 25 frames per second, 100 frames will equal 4 seconds of animation (or 2 seconds on the X-sheet shown).
The columns on an X-sheet are used as follows.
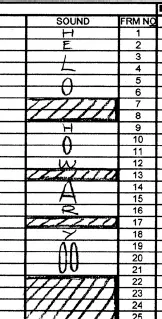
Sound
This column contains the sounds that are relevant to the animation. Very often this is the dialog spoken by the characters. For animation the dialog is recorded first. It is then ‘broken down’. This means that someone, usually an editor, goes through the sound track frame by frame. They work out where each word starts and ends and where each of the major vowel and consonant sounds are. These are then marked on the X-sheet in the sound column, frame by frame. You then know that at a certain frame in a scene a particular sound is made.
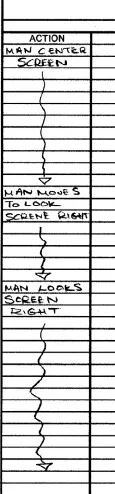
Action
This contains instructions on when a given piece of animation will start and end. An experienced animator will fill out this part of the X-sheet before they start animating. Sometimes the director will fill this out. The process is often referred to as ‘slugging out’.
Frame Numbers
As the name suggests, this is where the number of each frame is inserted. One of the main wa...