
eBook - ePub
CINEMA 4D 11 Workshop
Arndt von Koenigsmarck
This is a test
- 336 páginas
- English
- ePUB (apto para móviles)
- Disponible en iOS y Android
eBook - ePub
CINEMA 4D 11 Workshop
Arndt von Koenigsmarck
Detalles del libro
Vista previa del libro
Índice
Citas
Información del libro
Model, texture and animate with Cinema 4D 11 using the techniques and tips provided in Cinema 4D 11 Workshop. Starting with all of the basic concepts, functions, and tools - follow along to the workshop tutorials that deliver a hands-on knowledge of the new R11 toolset as well as the returning advanced features. The companion website provides all of the required tutorial media from the projects in the book so that you create your own working models and animations.
Preguntas frecuentes
¿Cómo cancelo mi suscripción?
¿Cómo descargo los libros?
Por el momento, todos nuestros libros ePub adaptables a dispositivos móviles se pueden descargar a través de la aplicación. La mayor parte de nuestros PDF también se puede descargar y ya estamos trabajando para que el resto también sea descargable. Obtén más información aquí.
¿En qué se diferencian los planes de precios?
Ambos planes te permiten acceder por completo a la biblioteca y a todas las funciones de Perlego. Las únicas diferencias son el precio y el período de suscripción: con el plan anual ahorrarás en torno a un 30 % en comparación con 12 meses de un plan mensual.
¿Qué es Perlego?
Somos un servicio de suscripción de libros de texto en línea que te permite acceder a toda una biblioteca en línea por menos de lo que cuesta un libro al mes. Con más de un millón de libros sobre más de 1000 categorías, ¡tenemos todo lo que necesitas! Obtén más información aquí.
¿Perlego ofrece la función de texto a voz?
Busca el símbolo de lectura en voz alta en tu próximo libro para ver si puedes escucharlo. La herramienta de lectura en voz alta lee el texto en voz alta por ti, resaltando el texto a medida que se lee. Puedes pausarla, acelerarla y ralentizarla. Obtén más información aquí.
¿Es CINEMA 4D 11 Workshop un PDF/ePUB en línea?
Sí, puedes acceder a CINEMA 4D 11 Workshop de Arndt von Koenigsmarck en formato PDF o ePUB, así como a otros libros populares de Medios de comunicación y artes escénicas y Películas y vídeos. Tenemos más de un millón de libros disponibles en nuestro catálogo para que explores.
Información
1 Short Projects
Typical complex projects can take several days to complete. To give you as much practical knowledge as possible and not focus on certain themes, I would like to show you some typical projects in this chapter. Along the way you will become familiar with other modeling tools and techniques not mentioned before.
The projects were chosen to demonstrate a complete production cycle from modeling to texturing and lighting, right up to the final rendering. The first example shows the use of primitives for modeling a flashlight. The second workshop demonstrates the use of the HYPERNURBS object and the realistic creation of a carabiner. The third example goes more in an artistic direction and shows the construction of an antique glass vase. Have fun and good luck!
Modeling with Parametric Objects—A Flashlight
Many technical shapes and objects for daily use can be built from simple shapes. Shapes such as a cylinder, sphere, or cube are offered by CINEMA 4D in a ready-to-use format as so-called primitives and can be easily modified in the viewports by value fields or virtual handlers. These objects also have the advantage that they can be rounded or further subdivided, for example, when a still image needs more DETAILS or when a curve has to have more definition.
We will start this workshop with an empty scene. Delete all objects in your scene or open a new scene at FILE>New. Several scenes can be opened in CINEMA 4D. You can switch between these scenes in the wiNdow menu of CINEMA 4D.
The Head of the Flashlight
First add a Cone object and change the upper radius to 90, the lower radius to 125, and the HEIGHT to 320 units, as shown in Figure 1.1. I took these measurements from a real flashlight. The units of these values generally don’t matter to CINEMA 4D. The object will have the same size regardless of whether you use millimeter, centimeter, or kilometer as units. The numerical value is what is important. For example, if you measure 32 mm on a real object, then this measurement can become 320 units in CINEMA 4D. The purpose for this is to have enough decimal places so adjustments can be made later if necessary. I used the same principle in this example. All measurements were done in millimeters and then multiplied by 10.
I increased the number of SEGMENTS around the cone circumference to 72 so there will be more detail in a close-up later on. You can work with a lower number of SEGMENTS if you want to use multiple flashlights in your scene and need to watch the number of polygons. There will be a deformation in the next step; therefore, additional points are needed on the surface of the cone. In that case the subdivision along the HEIGHT is set to 8.
The cone also has small roundings at its caps. Hardly any real object has perfectly sharp edges. This should be kept in mind during modeling. The highlights alone that will be captured by the rounded edge can improve the quality of an image tremendously.
The head of the flashlight is supposed to be bent in a soft curve between the different radii of the caps. This can be accomplished
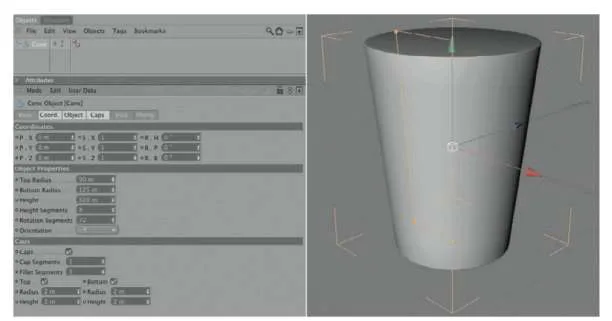
— Figure 1.1: A cone object will create the head of the flashlight.
quickly with a BULGE deformer. Subordinate the deformer under the cone, as shown in Figure 1.2. Make sure that the Y axis of the deformer points vertically up or down because the constriction or bulging of this deformer is always calculated vertically to the Y axis. This should automatically be the case if you haven’t changed the position or direction of the cone.
Now increase the value for STRENGTH of the BULGE object in the ATTRIBUTE MANAGER. You should be able to see now how the surface of the cone bulges outward in the middle. Increase the Y part of the deformer size to 320 units and the strength to about 12% in order to get a result like that shown in Figure 1.2. If the bulge of the cone appears too angled, then increase the number of SEGMENTS along the HEIGHT of the cone in its dialog box, as shown in Figure 1.1.
THE FOCUS RING
Above the head of the flashlight is the separately rotating focus ring, which turns the flashlight on or off and regulates the focus of the light beam for different distances. As the name indicates, it is a simple ring that is available as a primitive. I would like to use a spline with a NURBS object, though. Add a RECTANGLE spline and place it in the front viewport (XY viewport), above the right edge of the upper cone cap, as shown in Figure 1.3.
I gave the rectangle a WIDTH of 30 and a HEIGHT of 100 units. Zoom in to make sure the lower edge of the spline is level with the cone. You can see also the numerical value of the position in Figure 1.3.
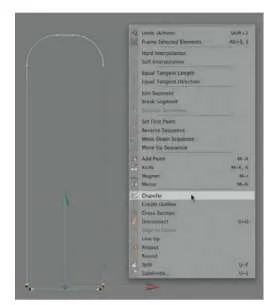
Instead of using the built-in rouNdiNg option of the RECTANGLE spline, we convert the spline with MAKE EDITABLE in the FUNCTIONS menu or by using the (C) key. The parameters of the spline in the ATTRIBUTE MANAGER are lost but we can now edit the points of the spline directly in USE POINT TOOL mode.
Use the LIVE or FRAME SELECTION to select either the upper or lower two points of the rectangle. Then right click into an empty area in the viewport and use CHAMFER from the
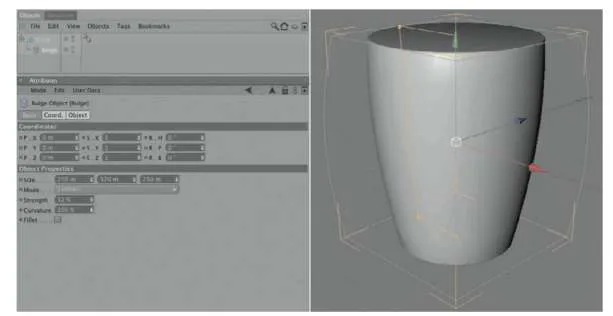
— Figure 1.2: Bending the cone.
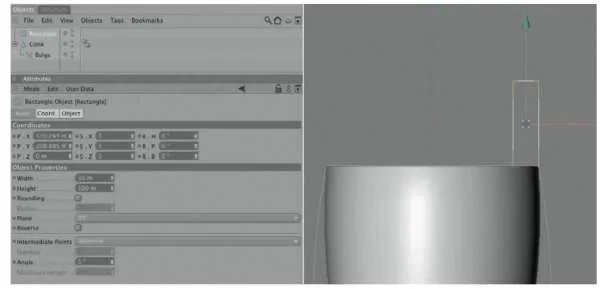
— Figure 1.3: A rectangle spline is used as the profile for the focus ring.
context menu. This command can also be found in the STRUCTURE menu under the EDIT SPLINE entry. While holding the mouse button, drag the mouse to the left or right to round the spline points, or enter a value in the ATTRIBUTE MANAGER after selecting the tool.
In this case, that should be enough to create an optically pleasing result. When you are done with the two points, select the other two points and do the same, but with a different radius. Try to match the radius in Figure 1.4.
— Figure 1.4: Individual rounding of the spline corner.
The Lathe NURBS Object
This completes the desired profile of the focus ring. To develop a three-dimensional shape, we will use a LATHE NURBS object and subordinate the rounded rectangle spline under it. Instantly an object is generated, as can be seen in Figure 1.5.
The Lathe NURBS rotates the subordinated spline around its Y axis. If your result looks different, check the location of the Lathe NURBS object and then control the position of the spline. The rectangle spline should be visible in the XY viewport and positioned directly above the upper edge of the cone.
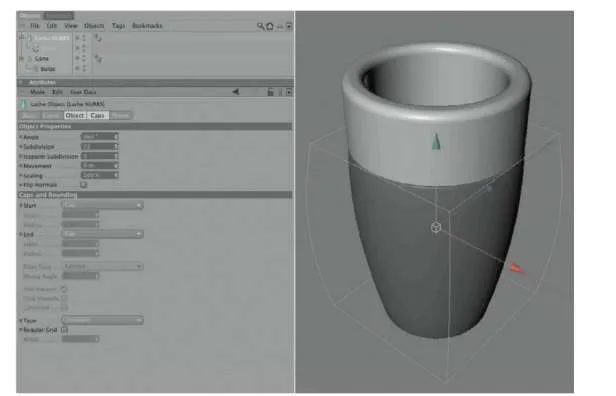
— Figure 1.5: The focus ring gets volume by using the Lathe NURBS.
Increase the number of SUBDIVISION in the Lathe NURBS object to the same value as was used for the circumference elements of the cone. In my case it was 72 SUBDIVISION. Otherwise there are no settings to be made.
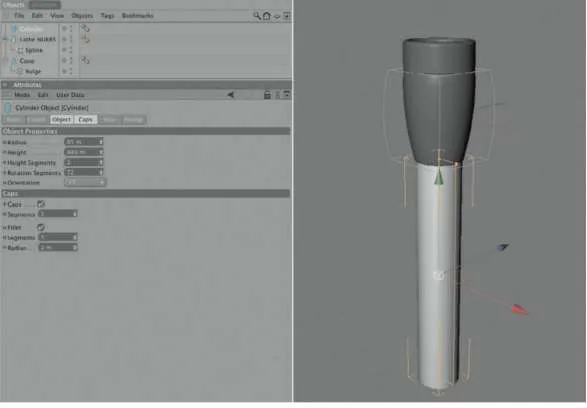
The Handle of the Flashlight
This completes the outer shape of the flashlight head, and we now can concentrate on the handle. It can be made out of a cylinder object, the HEIGHT of which should be 940 and the RADIUS 85 units. Here I use 72 SEGMENTS again around the circumference and a small rounding at the caps. Be sure that the cylinder is aligned along the Y ORIENTATION. Use the ORIENTATION menu within the cylinder settings in the ATTRIBUTE MANAGER or rotate the cylinder manually by 90° so it is positioned vertically under the model of the upper part of the flashlight.
Move the cylinder down along the Y axis until the upper cap is level with the head piece of the flashlight. Figure 1.6 shows the desired result.
The Bottom Cap of the Flashlight
The screw-on bottom of the flashlight is more difficult because there is an additional hole that can be used for a wrist strap. First we will take care of the outer shape of the bottom cap and again use a rectangle spline, as shown in Figure 1.7. Change its size to a HEIGHT of 90 and a radius of 170 units, and
— Figure 1.6: A simple cylin...