![]()
JOINTS.
SHOOTING EDGES OF BOARDS.
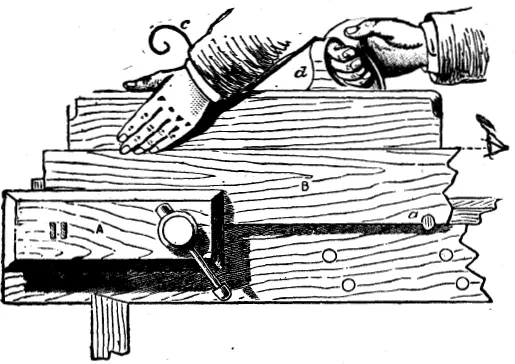
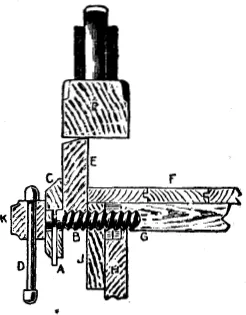
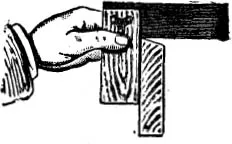
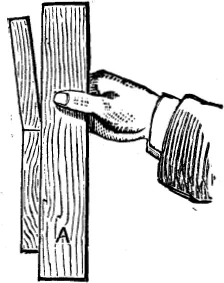
Before even plain glued butt joints can be attempted, there are one or two processes, not yet described, with which the beginner must familiarise himself. The first of these is shooting edges—that is, planing the edges of boards until they are square and true. Ordinary planing has already been discussed (see pp. 48 to 51). Insert a pin, made in the form of a hook, into one of the holes in the side of the bench, as at a (Fig. 540). The edge of the board B is then placed upon the hook, and the other end securely fastened in the bench vice, A. Fig. 540 shows this in front view, and Fig. 541 in end view. The edge is now planed first with the jack plane, and afterwards with the trying plane, until straight as viewed from the end, the edge being frequently tested with a square (as in Fig. 542). The trying plane is held in the manner shown in Fig. 540, the fingers of the left hand acting as a guide to keep it in position. The shavings should pass freely, as at c, and be taken off the whole length of board to finish. Fig. 541 shows the application of the jack plane to the edge of the board. In that illustration F indicates the bench top; C, vice; B, bench screw; K, head of screw; D, handle; A, stop; J, side of bench; H, leg; G, bearer; E, board; and P, the plane. For accurate work the shooting board is used; varieties of this appliance are illustrated and described on pp. 12 to 15. The work is placed on the bed of the shooting board, and a plane in good condition is shot along its edge, which is thus reduced to perfect truth.
Fig. 540.—Shooting Edge of Board.
Fig. 541.—End View of Shooting Plane and Board.
GAUGING BOARD TO THICKNESS.
A board to be reduced in thickness has first to be gauged along its edges. Set the marking gauge with its tooth at a distance from the head equal to the thinnest part of the board, and, grasping it firmly, work it along the edges of the board in a succession of short, sharp strokes, keeping the head firmly pressed to the face side of the board. Having gauged the board, roughly chamfer the edges nearly down to the line, as A B (Fig. 543), E being the face side. Now plane away the stuff until level, as at F. This, though completing it so far as the trueness of its surface is concerned, may yet leave it in a very rough state. The grain may have been strong and ripped up, or the irons of the planes may not have been in perfect condition, thus leaving marks or ridges. These have to be cleaned off with the smoothing plane (see p. 50).
GLUED JOINTS.
The glued joint is adopted where it is desired to make a number of narrow boards serve as one wide one. For instance, table-tops, panels of doors, and many other things, are made preferably by gluing up rather than by using one wide board. The plain glued butt joint, shown by Fig. 544, is serviceable enough for thin wood, say for anything under 1/2 in. thick, and, in certain situations, suffices for material of any substance. When the wood is thick enough something better than a butt joint can be used. With thin stuff, however, this is the only joint available, as there is no room for tongues or dowels. The plain glued butt joint will be considered first; then the stronger and more serviceable dowelled joint, and that formed by ploughing and cross tongueing, will be dealt with. A properly glued butt joint ought to be stronger than the natural wood; that is to say, a board should split at any part rather than the joint, except perhaps in the case of some tough woods. With ordinary pine or bay wood, if the fracture is along the joint, this proves that the workmanship or the glue is at fault. Under a severe strain a board often will give way, leaving the joint unbroken, it being actually stronger than the wood itself.
Fig. 542.—Testing Squareness of Shot Edge.
Fig. 543.—Board Chamfered and Planed to Thickness.
PREPARING BOARDS FOR JOINTING.
For first efforts at making a plain butt joint (Fig. 544) get two pieces of board, say about 2 ft. long, and not less than 1 in. thick. Plane up the board true and out of winding, always remembering to pencil the face mark upon the finished surface. Shoot the edges perfectly straight, true, and square, or at right angles to the face side; they should then be placed one upon the other (the bottom board to be in the bench vice), and a small straight-edge (A, Fig. 545) applied to the face to test the joint for “upright.” It will often occur that the boards “tip,” as shown. This will, of course, have to be rectified by shooting one or both edges. The boards being upright, the joint should be so placed that the light is thrown upon the back, when it is seen at once if the boards touch all along the joint. If they do not touch at one or two places, make a pencil mark upon the face where the bumps occur, and carefully take off a shaving at these points. The top board (A, Fig. 546) may then be taken in both hands, as shown, and gently rubbed along the other, and the feel will indicate if their edges are in good contact. Occasionally the edges touch at opposite corners, and then a little must be taken off each, the edge being in winding. The plane-iron for shooting joints should be very sharp and finely set, as this will add greatly to the ease with which a good joint can be made. In the case of very long joints, say from 6 ft. to 8 ft., some workmen allow the boards to touch at the ends, but not towards the centre; if the space is but small no great harm will result. They consider this space advisable for long pieces. To convey an idea of the hollowness of the edge towards the centre, assume two boards 5 ft. or 6 ft. long, with edges perfectly true. Now with the plane remove a shaving or two, just the suspicion of one at its commencement, a few inches from the end of the board, till there is, when the boards are placed together, a perceptible space between them tapering from the centre to nothing near the ends. Even at the widest the space must be narrow enough to be closed by pressure of the cramps, within which the boards will be placed while the glue is setting.
Fig. 544.—Plain Glued Butt Joint.