
Canon EOS 90D For Dummies
Robert Correll, Julie Adair King
- English
- ePUB (disponibile sull'app)
- Disponibile su iOS e Android
Canon EOS 90D For Dummies
Robert Correll, Julie Adair King
Informazioni sul libro
Get excited about the Canon EOS 90D and all it can do!
An amazing photo begins with a quality camera and the know-how to use it. If you've selected the Canon EOS 90D, you now have a digital camera that serves a range of photographers, from novices to professionals. It takes some know-how to take advantage of the camera's upgrades to its sensor, shutter speed, and video capabilities. Fortunately, Canon EOS 90D For Dummies canhelp you maximize the potential of the camera and its features.
Canon EOS 90D For Dummies lets you skip the photography class and start shooting high-quality images right away The book introduces the camera's settings; explains how to take control of exposure, focus, and color; and shows how to put all this new-found knowledge to work to shoot great portraits or action shots. The book is co-written by a pair of photography pros who share their professional experience on how to apply simple techniques for great shots.
- Choose the best setting for your situation
- Manage focus and color
- Make the most of your lighting
- Understand camera settings
- Customize your camera to your needs
Create remarkable photos and memories, whether you stick with user-friendly automatic settings or decide to dive into more advanced features. With your Canon EOS 90D and this book at your side, you can shoot quality video and capture moving subjects confidently.
Domande frequenti
Informazioni
Fast Track to Super Snaps
Getting Up and Running

Preparing the Camera for Initial Use
- Lens: Your camera accepts Canon EF and EF-S lenses; the 18–55mm or 18–135mm kit lenses sold as a bundle with the camera body falls into the EF-S category. If you want to buy a non-Canon lens, check the lens manufacturer’s website to find out which lenses work with your camera.
- SD, SDHC, or SDXC memory card: The SD stands for Secure Digital; the HC and XC stand for High Capacity and eXtended Capacity. The different labels reflect how many gigabytes (GB) of data the card holds. SD cards hold less than 4GB; SDHC, 4GB to 32GB; and SDXC, more than 32GB.The 90D is compatible with UHS-II cards. These cards are blazingly fast and capable of handling data transfer rates needed to shoot 4K video. They are also great for still photography. Look for the Roman numeral II on the card label and a double row of contacts (refer to Figure 1-26, later in this chapter) to confirm that it is UHS-II.

- Turn the camera off.
- Attach a lens.First, remove the caps that cover the front of the camera and the back of the lens. Then locate the proper mount index, which is a mark on the camera’s lens mount that indicates how to align the lens with the camera body. Your camera has two of these markers, one red and one white, as shown in Figure 1-1. Which marker you use depends on the lens type:
- Canon EF-S lens: The white square is the mount index.
- Canon EF lens: The red dot is the mount index.
Your lens also has a mount index; align that mark with the matching one on the camera body, as shown in Figure 1-1. Place the lens on the camera mount and rotate the lens toward the side of the camera that sports the white EOS logo (or, to put it another way, away from the shutter-button side of the camera). You should feel a solid click as the lens locks into place.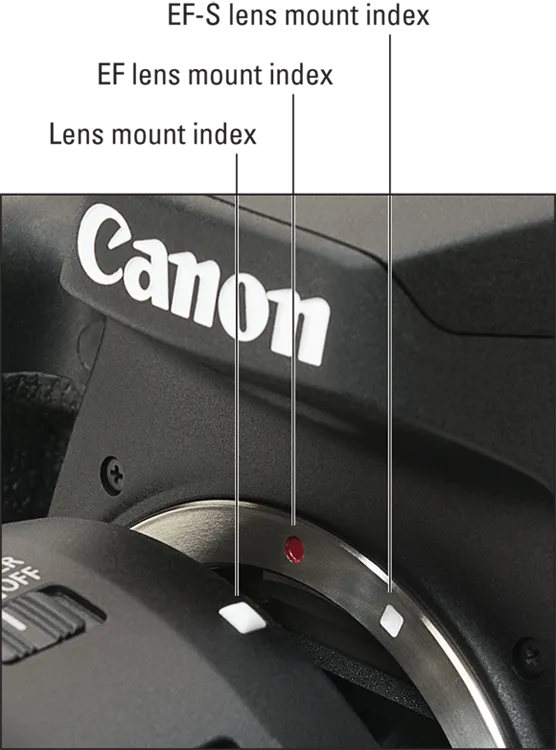 FIGURE 1-1: Align the mounting index on the lens with the one on the camera body.
 - Insert the battery.The battery compartment is on the bottom of the camera. When inserting the battery, hold it with the contacts so they go in first and the Canon imprint facing out (toward the side of the camera with the memory card cover). Gently push the battery in until the gray lock clicks into place, then shut the compartment door.
- Insert a memory card.Open the memory card door and orient the card so that the notched corner is on top and the label faces the back of the camera, as shown in Figure 1-2. Push the card gently into the slot and close the card door.The memory-card access light (refer to Figure 1-2) blinks a few times to let you know that the camera recognizes the card. (The light appears even when the camera is turned off.)
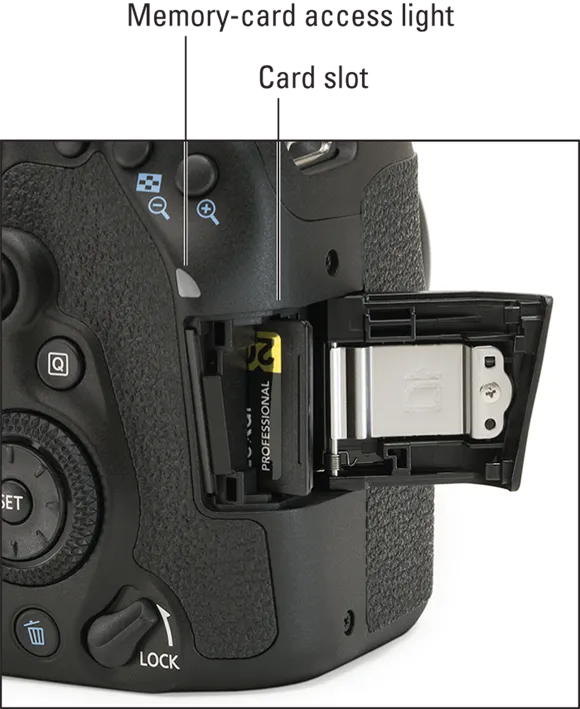 FIGURE 1-2: Insert the memory card with the label facing the back of the camera.
 - Rotate the monitor to the desired viewing position.When you first take the camera out of its box, the monitor is positioned with the screen facing inward, protecting it from scratches and smudges. Gently lift the right side of the monitor up and away from the camera back. You can then rotate the monitor to move it into the traditional position on the camera back, as shown on the left in Figure 1-3, or swing the monitor out to get a different viewing angle, as shown on the right.
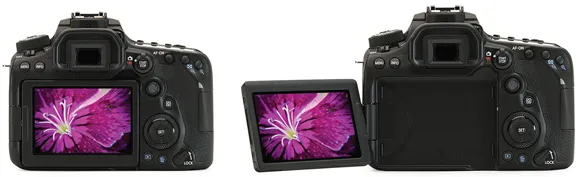 FIGURE 1-3: Here are just two possible monitor positions.
 - Turn the camera on.Slide the Power switch (see Figure 1-4) to the On position.
- Set the language, time zone, and date.When you power up the camera for the first time, the monitor displays a screen asking you to set the date, time, and time zone. The easiest way to adjust these settings is to use the touch screen, which is enabled by default. Just tap an option to select it and then tap the up/down arrows at the bottom of the screen to set the value for that option. Finally, tap OK to exit the screen.You also can adjust settings by using either multi-contoller. Press the left/right directional keys to highlight a setting, press the Set or center Joystick button to activate the option, press the up/down directional keys to change the value, and press Set or the center Joystick button again to finalize the change.The date/time information is included as metadata (hidden data) in the picture file. You can view metadata in some playback display modes (see Chapter 9) and in certain photo programs, including Canon Digital Photo Professional (see Chapter 10).

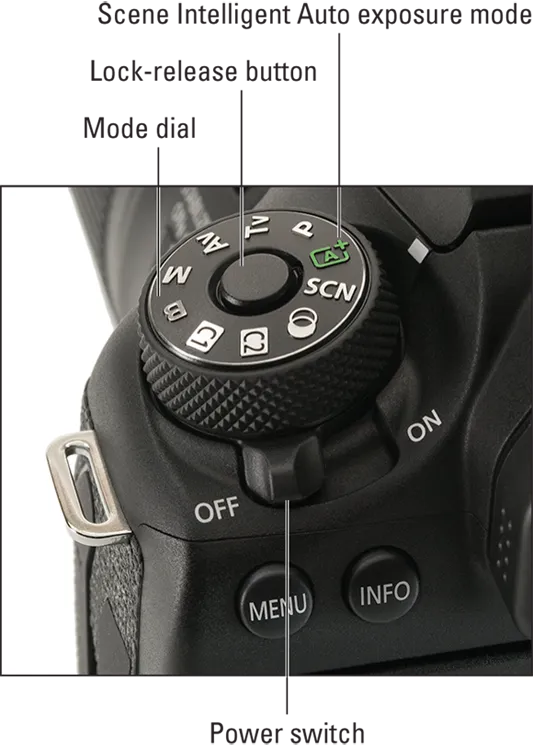 FIGURE 1-4: Rotate the switch to On to power up the camera.
 - Adjust the viewfinder to your eyesight.This step is critical; if you don’t set the viewfinder to your eyesight, subjects that appear out of focus in the viewfinder might actually be in focus, and vice versa. ...