A Guide to Microsoft Excel 2007 for Scientists and Engineers
Bernard Liengme
This is a test
This is a test
Condividi libro
336 pagine
English
ePUB (disponibile sull'app)
Disponibile su iOS e Android
eBook - ePub
A Guide to Microsoft Excel 2007 for Scientists and Engineers
Bernard Liengme
Dettagli del libro
Anteprima del libro
Indice dei contenuti
Citazioni
Informazioni sul libro
Completely updated guide for scientists, engineers and students who want to use Microsoft Excel 2007 to its full potential.Electronic spreadsheet analysis has become part of the everyday work of researchers in all areas of engineering and science. Microsoft Excel, as the industry standard spreadsheet, has a range of scientific functions that can be utilized for the modeling, analysis and presentation of quantitative data. This text provides a straightforward guide to using these functions of Microsoft Excel, guiding the reader from basic principles through to more complicated areas such as formulae, charts, curve-fitting, equation solving, integration, macros, statistical functions, and presenting quantitative data.
Content written specifically for the requirements of science and engineering students and professionals working with Microsoft Excel, brought fully up to date with the new Microsoft Office release of Excel 2007.
Features of Excel 2007 are illustrated through a wide variety of examples based in technical contexts, demonstrating the use of the program for analysis and presentation of experimental results.
Updated with new examples, problem sets, and applications.
Domande frequenti
Come faccio ad annullare l'abbonamento?
È semplicissimo: basta accedere alla sezione Account nelle Impostazioni e cliccare su "Annulla abbonamento". Dopo la cancellazione, l'abbonamento rimarrà attivo per il periodo rimanente già pagato. Per maggiori informazioni, clicca qui
È possibile scaricare libri? Se sì, come?
Al momento è possibile scaricare tramite l'app tutti i nostri libri ePub mobile-friendly. Anche la maggior parte dei nostri PDF è scaricabile e stiamo lavorando per rendere disponibile quanto prima il download di tutti gli altri file. Per maggiori informazioni, clicca qui
Che differenza c'è tra i piani?
Entrambi i piani ti danno accesso illimitato alla libreria e a tutte le funzionalità di Perlego. Le uniche differenze sono il prezzo e il periodo di abbonamento: con il piano annuale risparmierai circa il 30% rispetto a 12 rate con quello mensile.
Cos'è Perlego?
Perlego è un servizio di abbonamento a testi accademici, che ti permette di accedere a un'intera libreria online a un prezzo inferiore rispetto a quello che pagheresti per acquistare un singolo libro al mese. Con oltre 1 milione di testi suddivisi in più di 1.000 categorie, troverai sicuramente ciò che fa per te! Per maggiori informazioni, clicca qui.
Perlego supporta la sintesi vocale?
Cerca l'icona Sintesi vocale nel prossimo libro che leggerai per verificare se è possibile riprodurre l'audio. Questo strumento permette di leggere il testo a voce alta, evidenziandolo man mano che la lettura procede. Puoi aumentare o diminuire la velocità della sintesi vocale, oppure sospendere la riproduzione. Per maggiori informazioni, clicca qui.
A Guide to Microsoft Excel 2007 for Scientists and Engineers è disponibile online in formato PDF/ePub?
Sì, puoi accedere a A Guide to Microsoft Excel 2007 for Scientists and Engineers di Bernard Liengme in formato PDF e/o ePub, così come ad altri libri molto apprezzati nelle sezioni relative a Negocios y empresa e Inteligencia empresarial. Scopri oltre 1 milione di libri disponibili nel nostro catalogo.
Microsoft with the advent to the Office 2007 has abandoned the interface consisting of a menu and a collection of toolbars so common in all Windows applications until now. Their place has been taken by a ribbon divided into groups of commands located on named tabs. This chapter helps know the correct name for the various parts of the window. This makes using the Help facility more productive and aids in conversing with other users. The description of title bar, office button, quick access toolbar, and ribbon is included. The ribbon stretches across the window under the title bar. It holds every command that can be used within Excel 2007. The Home tab holds mainly formatting commands.
The Excel Window
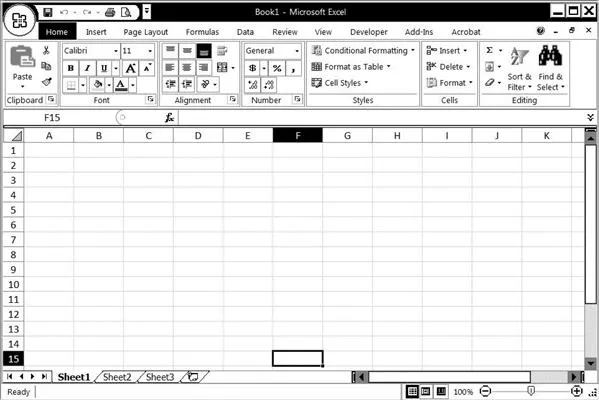
With Office 2007, Microsoft has abandoned the interface consisting of a menu and a collection of toolbars so common in all Windows applications until now. Their place has been taken by a ribbon divided into groups of commands located on named tabs. Figure 1.1 shows the Excel 2007 window; for this screen shot, the Excel window was “restored down” to occupy about half of the monitor screen.
Figure 1.1
It is helpful to know the correct name for the various parts of the window. This makes using the Help facility more productive and aids in conversing with other users. It is recommended that you read this chapter while seated at the computer and experiment as you read it. Remember that pressing the
key will back you out of an action you do not wish to pursue.
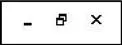
Title bar: This is at the very top and displays the name of the currently opened file together with the phrase Microsoft Excel. To the right are the three controls to minimize, restore, and close the Excel application.
Office button: This is the name given to the colorful circle in the top left corner of the window. We can click on this icon to access commands relating to the file (open, close, and print). At the bottom of the Office dialog you will find a command to open a dialog to customize Excel. We will look at this in later chapters.
Quick Access Toolbar (QAT): This is the only toolbar in Excel 2007. When Excel 2007 is first installed, the QAT holds the commands Save, Undo, and Redo. However, it may be customized to hold others. Furthermore, one can change the location of the QAT from above the ribbon to below the ribbon.
Ribbon: The ribbon stretches across the window under the title bar. It holds every command that can be used within Excel 2007. In Figure 1.1 the Home tab has been selected, and the ribbon displays groups of commands that are accessed by clicking the appropriate icon. The Home tab holds mainly formatting commands. Use the mouse to open another tab by clicking it. We will see shortly that the ribbon can be minimized when you wish to see more of the document. The tabs shown in Figure 1.1 include Developer and Acrobat. We will learn in a later chapter how to add the Developer tab to the ribbon. The Acrobat tab gets added if you install Adobe® Acrobat®, which is not part of Microsoft Office products. Additional tabs (contextual tabs) get displayed when you are performing certain operations; so when you are working on a chart, the Chart tab appears.
The appearance of a tab will change with the amount of space allocated to the Excel window. Figure 1.2 shows the Home tab when Excel is in full-screen mode. Note how items that were arranged vertically in Figure 1.1 are now arranged horizontally.
Figure 1.2
If you let the mouse pointer hover over a command icon, a screen tip will appear giving a brief description of the command’s purpose.
Icons with solid inverted triangles
(disclosure triangle) have associated drop-down menus that present further choices. When the diagonal arrow
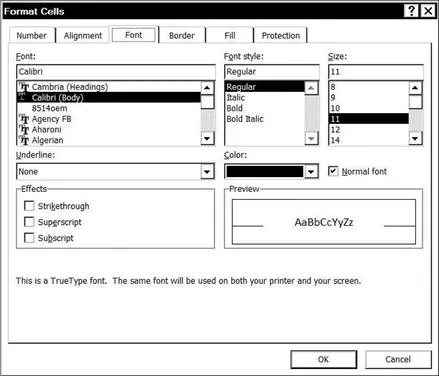
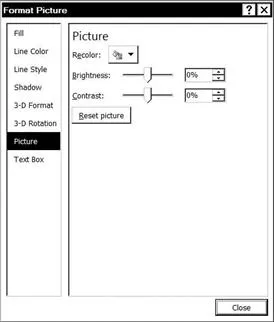
(the dialog launcher) on a group is clicked, a dialog box opens up. Generally these do not have new commands but present the group’s commands in another way. Many dialog boxes have tabs either horizontally at the top or vertically at the left-hand side—see Figures 1.3 and 1.4. You can navigate from tab to tab with the mouse or with the arrow keys.
Figure 1.3
Figure 1.4
Help button: To the right of the tabs on the ribbon you will find the Help button. By default this connects you to the on-line help facility at the Microsoft Excel 2007 site.
Minimize, Restore, and Close buttons: To the right of the Help button are three tools used to minimize, restore, and close the worksheet. Note that we have one set of these buttons for the Excel application (on the title bar) and another (on the ribbon) for the current document.
Formula bar and name box: Just under the ribbon is the formula bar with the name box to the left. In Figure 1.1 the name box is displaying F15. You will notice that both the F column heading and the 15 row heading are highlighted and that the cell at the intersection of this column and row is picked out by a border. We call this the active cell, and we say that the name box displays the reference (or address) of the active cell. Later we shall see that when the active cell contains a literal (text or number), the formula bar also displays the same thing, but when the cell holds a formula then the formula bar displays the actual formula while the cell generally displays the result of that formula.
Worksheet window: The worksheet window occupies most of the Excel space. In most cases this window displays a simple worksheet, but later we will see how to display two or more concurrently. A workbook may contain worksheets and chart sheets (collectively called sheets); we will concentrate on worksheets for now.
Sheet tabs: Below the worksheet window we have tools to navigate from sheet to sheet and to scroll a sheet horizontally. By default, Excel 2007 opens a new workbook with three worksheets that can be changed in the Options setting. To the right of the last sheet tab is a tool to insert a new worksheet. Let the mouse pointer hover over this tool to discover that the shortcut is
. To the right of the sheet tabs is the horizontal scroll tool; the vertical scroll tool is on the right side of the worksheet.
Status bar: At the very bottom of the Excel window we have the status bar. To the left is the mode indicator. When you move to a cell this displays Ready; when you start typing it becomes Enter; if you double click a cell (or press the
key) it becomes Edit. We will ignore the second tool for now. To the right we have Page View buttons that let us display the worksheet in different ways, and the Zoom tool that enlarges/reduces the display. If we experiment with the Page View buttons, we may notice that the worksheet gets vertical and horizontal dotted lines. These show how much will fit on a printed page. Right clicking the status bar brings up a dialog ...