
Canon EOS Rebel T8i/850D For Dummies
Julie Adair King
- English
- ePUB (disponibile sull'app)
- Disponibile su iOS e Android
Canon EOS Rebel T8i/850D For Dummies
Julie Adair King
Informazioni sul libro
Learn to take gorgeous photos with this beginner-friendly guide todSLRphotography
The Canon EOS Rebel T8i/850DdSLRcamera has dozens of featuresthat can help you take beautiful and striking photos. But if you're new to photography, where do you begin?And is it possible to get up to speed quickly, without a lot of technical knowledge?
Absolutely!In Canon EOS Rebel T8i/850D For Dummies, expert photography educator Julie Kingdrawson her years ofexperience as shewalks you through theins and outsof photography and your Canon camera.Julie skips the technical jargon and gives you the info you need in plain language, guiding you through everything fromshooting your first photos in auto modetotaking full control of your camera's features.
In the book you'll:
- Take the fast track to stunning stillswithcamera setup, picture settings, and Canon's Auto Mode
- Customize your picture taking experience by taking control of settings like exposureandfocus
- Access and organize your new picture library both on your camera andyourcomputer
Perfect for anyone who's just received a Canon EOS Rebel and doesn't know where to begin, this book will also earn a place in the libraries of more seasoned photographers who want tounlock everything this great camera has to offer.
Domande frequenti
Informazioni
Fast Track to Super Snaps
Getting Up and Running

Preparing the Camera for Initial Use
- Lens: Your camera accepts Canon EF and EF-S model lenses; the 18–55mm kit lens sold as a bundle with the camera body falls into the EF-S category. If you want to buy a non-Canon lens, check the lens manufacturer’s website to find out which lenses work with your camera. Flip to the later section “Familiarizing Yourself with the Lens” for details on this critical component of your camera.
- SD (Secure Digital) memory card: Like all digital cameras, the T8i/850D stores picture and movie files on a memory card. The camera accepts SD cards only. For information about buying SD cards, skip to the section “Working with Memory Cards.”
- Make sure the camera is turned off.
- Attach a lens.First, remove the caps that cover the front of the camera and the back of the lens. Then locate the proper mounting index, which is a mark on the camera’s lens mount that indicates how to align the lens with the camera body. Your camera has two of these markers, one red and one white, as shown in Figure 1-1. Which marker you use depends on the lens type:
- Canon EF-S lens: The white square is the mounting index.
- Canon EF lens: The red dot is the mounting index.
Your lens also has a mounting index; align that mark with the matching one on the camera body, as shown in Figure 1-1. Place the lens on the camera mount and rotate the lens toward the side of the camera that sports the red Rebel logo. You should feel a solid click as the lens locks into place.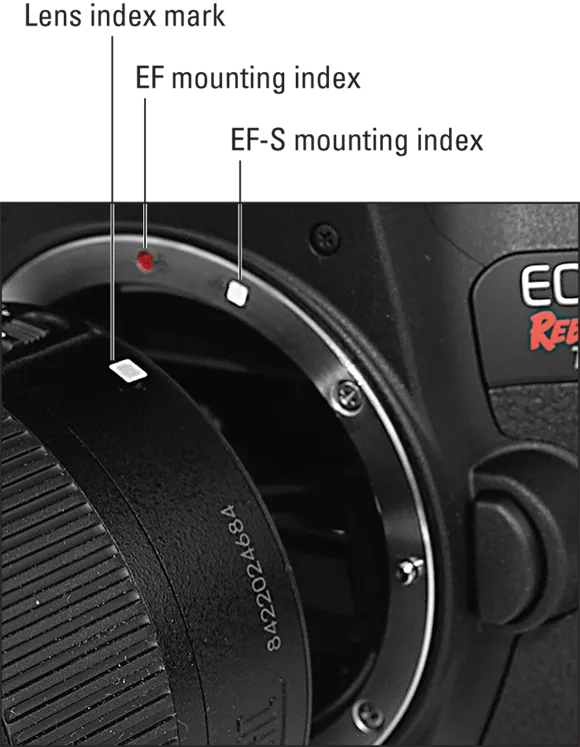 FIGURE 1-1: Align the mounting index on the lens with the one on the camera body.
 - Install the battery.The battery compartment is on the bottom of the camera. When inserting the battery, hold it with the contacts down and the Canon imprint facing the right side of the camera grip (where the memory-card cover, shown in Figure 1-2, is located). Gently push the battery in until the gray lock clicks into place and then close the battery-cover door.
- Insert a memory card.Open the memory-card door and orient the card so that the label faces the back of the camera, as shown in Figure 1-2. (If you look closely at the silver panel on the inside of the card door, you see a diagram that indicates the proper card orientation.) Push the card gently into the slot and close the card door.The memory-card access lamp, labeled in Figure 1-2, blinks for few seconds to let you know that the camera recognizes the card. (The light appears even when the camera is turned off.)

 FIGURE 1-2: Insert the memory card with the label facing the back of the camera.
 - Rotate the monitor to the desired viewing position.When you first take the camera out of its box, the monitor is positioned with the screen facing inward, protecting the screen from scratches and smudges. Gently lift the right side of the monitor up and away from the camera back. You can then rotate the monitor to move it into the traditional position on the camera back, as shown on the left in Figure 1-3, or swing the monitor out to get a different viewing angle, as shown on the right.
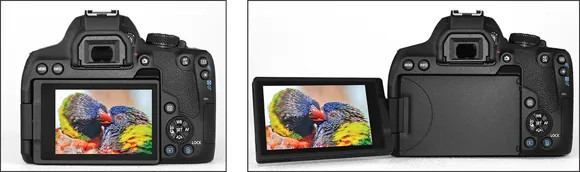 FIGURE 1-3: Here are two possible monitor positions.
 - Move the On/Off switch to the On position.Okay, that’s an odd way to say “turn on the camera,” right? Agreed, but there’s good reason for it: This particular On/Off switch, shown in Figure 1-4, has three positions. When you rotate the switch to On, the camera comes to life and is ready to take still photos. If you move the switch one step further, to the movie-camera symbol, the camera turns on and sets itself to Movie mode. You can’t take a still photograph in Movie mode; it’s good for recording video only.
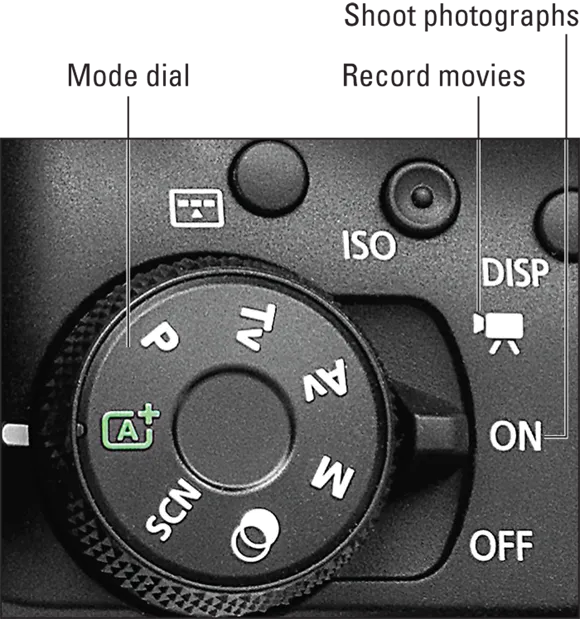 FIGURE 1-4: Rotate the switch to On to shoot photographs; move the switch one step further to set the camera to movie-recording mode.
 - Set the language, time zone, and date.When you power up the camera for the first time, the monitor displays a screen asking you to set the date, time, and time zone. The easiest way to adjust these settings is to use the touchscreen, which is enabled by default. Just tap an option to select it. Small triangles appear above and below the option to let you know that it’s active, but you don’t tap those triangles the change the value. Instead, look for the up and down triangles in the lower-left corner of the screen, and tap those arrows to set the value. Lather, rinse, and repeat until you complete all the adjustments you want to make. Finally, tap OK to exit the screen.If you prefer not to use the touchscreen, you can adjust settings by using the Quick Control dial, which is the combination dial/toggle switch that surrounds the Set button. Rotate the dial or press the left or right edges of the dial to highlight the option you want to adjust; press the Set button to activate it. Again, triangles appear above and below the active option. Rotate the dial or press up or down on the top or bottom of the dial to change the value. Press Set again to lock in the new value. (I provide more information about using the Quick Control dial later in the chapter.)The date/time information is included as metadata (hidden data) in the picture file. You can view metadata in some playback display modes (see Chapter 9) and in certain photo programs, including Canon Digital Photo Professional 4. (Refer to Chapter 10.) Also note the sun symbol to the left of the Time Zone option. That symbol represents the option that automatically adjusts the camera’s clock when Daylight Saving Time begins and ends, if that’s a thing in your part ...
