Java EE 8 Development with Eclipse
eBook - ePub

Java EE 8 Development with Eclipse

Develop, test, and troubleshoot Java Enterprise applications rapidly with Eclipse, 3rd Edition

Ram Kulkarni

Condividi libro
  1. 596 pagine
  2. English
  3. ePUB (disponibile sull'app)
  4. Disponibile su iOS e Android
eBook - ePub

Java EE 8 Development with Eclipse

Develop, test, and troubleshoot Java Enterprise applications rapidly with Eclipse, 3rd Edition

Ram Kulkarni

Dettagli del libro
Anteprima del libro
Indice dei contenuti
Citazioni

Informazioni sul libro

Develop and deploy fully functional applications and microservices utilising Tomcat, Glassfish servers, Cloud and docker in Java EE 8About This Book• Explore the complete workflow of developing enterprise Java applications• Develop microservices with Docker Container and deploy it in cloud• Simplify Java EE application developmentWho This Book Is ForIf you are a Java developer with little or no experience in Java EE application development, or if you have experience in Java EE technology but are looking for tips to simplify and accelerate your development process, then this book is for you.What You Will Learn• Set up Eclipse, Tomcat, and Glassfish servers for Java EE application development• Use JSP, Servlet, JSF, and EJBs to create a user interface and write business logic• Create Java EE database applications using JDBC and JPA• Handle asynchronous messages using MDBs for better scalability• Deploy and debug Java EE applications and create SOAP and REST web services• Write unit tests and calculate code coverage• Use Eclipse MAT (Memory Analysis Tool) to debug memory issues• Create and deploy microservicesIn DetailJava EE is one of the most popular tools for enterprise application design and development. With recent changes to Java EE 8 specifications, Java EE application development has become a lot simpler with the new specifications, some of which compete with the existing specifications. This guide provides a complete overview of developing highly performant, robust and secure enterprise applications with Java EE with Eclipse.The book begins by exploring different Java EE technologies and how to use them (JSP, JSF, JPA, JDBC, EJB, and more), along with suitable technologies for different scenarios. You will learn how to set up the development environment for Java EE applications and understand Java EE specifications in detail, with an emphasis on examples. The book takes you through deployment of an application in Tomcat, GlassFish Servers, and also in the cloud. It goes beyond the basics and covers topics like debugging, testing, deployment, and securing your Java EE applications. You'll also get to know techniques to develop cloud-ready microservices in Java EE.Style and approachThis guide takes a step-by-step approach to developing, testing, debugging, and troubleshooting Java EE applications, complete with examples and tips.

Domande frequenti

Come faccio ad annullare l'abbonamento?
È semplicissimo: basta accedere alla sezione Account nelle Impostazioni e cliccare su "Annulla abbonamento". Dopo la cancellazione, l'abbonamento rimarrà attivo per il periodo rimanente già pagato. Per maggiori informazioni, clicca qui
È possibile scaricare libri? Se sì, come?
Al momento è possibile scaricare tramite l'app tutti i nostri libri ePub mobile-friendly. Anche la maggior parte dei nostri PDF è scaricabile e stiamo lavorando per rendere disponibile quanto prima il download di tutti gli altri file. Per maggiori informazioni, clicca qui
Che differenza c'è tra i piani?
Entrambi i piani ti danno accesso illimitato alla libreria e a tutte le funzionalità di Perlego. Le uniche differenze sono il prezzo e il periodo di abbonamento: con il piano annuale risparmierai circa il 30% rispetto a 12 rate con quello mensile.
Cos'è Perlego?
Perlego è un servizio di abbonamento a testi accademici, che ti permette di accedere a un'intera libreria online a un prezzo inferiore rispetto a quello che pagheresti per acquistare un singolo libro al mese. Con oltre 1 milione di testi suddivisi in più di 1.000 categorie, troverai sicuramente ciò che fa per te! Per maggiori informazioni, clicca qui.
Perlego supporta la sintesi vocale?
Cerca l'icona Sintesi vocale nel prossimo libro che leggerai per verificare se è possibile riprodurre l'audio. Questo strumento permette di leggere il testo a voce alta, evidenziandolo man mano che la lettura procede. Puoi aumentare o diminuire la velocità della sintesi vocale, oppure sospendere la riproduzione. Per maggiori informazioni, clicca qui.
Java EE 8 Development with Eclipse è disponibile online in formato PDF/ePub?
Sì, puoi accedere a Java EE 8 Development with Eclipse di Ram Kulkarni in formato PDF e/o ePub, così come ad altri libri molto apprezzati nelle sezioni relative a Computer Science e Programming in Java. Scopri oltre 1 milione di libri disponibili nel nostro catalogo.

Informazioni

Anno
2018
ISBN
9781788833882
Edizione
3

Creating JEE Database Applications

In the previous chapter, we learned how to use source control management software from Eclipse. Specifically, we learned how to use SVN and Git from Eclipse. In this chapter, we will get back to discussing JEE application development. Most web applications today require access to the database. In this chapter, we will learn two ways to access databases from JEE web applications: using JDBC APIs, and using JPA APIs.
JDBC4 has been part of JDK since version 1.1. It provides uniform APIs to access different relational databases. Between JDBC APIs and the database sits the JDBC driver for that database (either provided by the vendor of the database or a third-party vendor). JDBC translates common API calls to database-specific calls. The results returned from the database are also converted into objects of common data access classes. Although JDBC APIs require you to write a lot more code to access the database, it is still popular in JEE web applications because of its simplicity, flexibility of using database-specific SQL statements, and low learning curve.
JPA is the result of Java Specification Request 220 (which stands for JSR). One of the problems of using JDBC APIs directly is converting object representation of data to relation data. Object representation is in your JEE application, which needs to be mapped to tables and columns in the relational database. The process is reversed when handling data returned from the relational database. If there is a way to automatically map object-oriented representation of data in web applications to relational data, it would save a lot of developer time. This is also called object-relational mapping (ORM). Hibernate (http://hibernate.org/) is a very popular framework for ORM in Java applications.
Many of the concepts of such popular third-party ORM frameworks were incorporated in JPA. Just as JDBC provides uniform APIs for accessing relational databases, JPA provides uniform APIs for accessing ORM libraries. Third-party ORM frameworks provide implementations of JPA on top of their own framework. The JPA implementation may use the JDBC APIs underneath.
We will explore many features of JDBC and JPA in this chapter as we build applications using these frameworks. In fact, we will build the same application, once using JDBC and then using JPA.
The application that we are going to build is for student-course management. The goal is to take an example that can show how to model relationships between tables and use them in JEE applications. We will use a MySQL database and Tomcat web application container. Although this chapter is about database programming in JEE, we will revisit some of the things we learned about JSTL and JSF in Chapter 2, Creating a Simple JEE Web Application. We will use them to create user interfaces for our database web application. Make sure that you have configured Tomcat in Eclipse as described in Chapter 2, Creating a Simple JEE Web Application.
We will cover the following topics:
  • Core JDBC concepts
  • Using JDBC to access the database
  • Using JDBC connection pool
  • Core JPA concepts
  • Using JPA to map entities (classes) to tables in the database
  • Configuring relationships between JPA entities
Let's first create a database and tables for this application.

Creating database schema

There are many ways of creating database tables and relationships in MySQL:
  • You can use data description language (DDL) statements directly at MySQL Command Prompt from the Terminal
  • You can use MySQL Workbench and create tables directly
  • You can create an entity-relationship diagram in MySQL Workbench, export it to create a DDL script, and then run this script to create tables and relationships
We will use the third option. If you just want to get the script to create tables and want to skip creating the ER diagram, then jump to the Script to create tables and relationships section of this chapter.
If you have not already installed MySQL and MySQL Workbench, then refer to Chapter 1, Introducing JEE and Eclipse, for instructions:
  1. Open MySQL Workbench. Select the File | New Model menu. A blank model will be created with the option to create ER diagrams:
Figure 4.1: Creating a new MySQL Workbench model
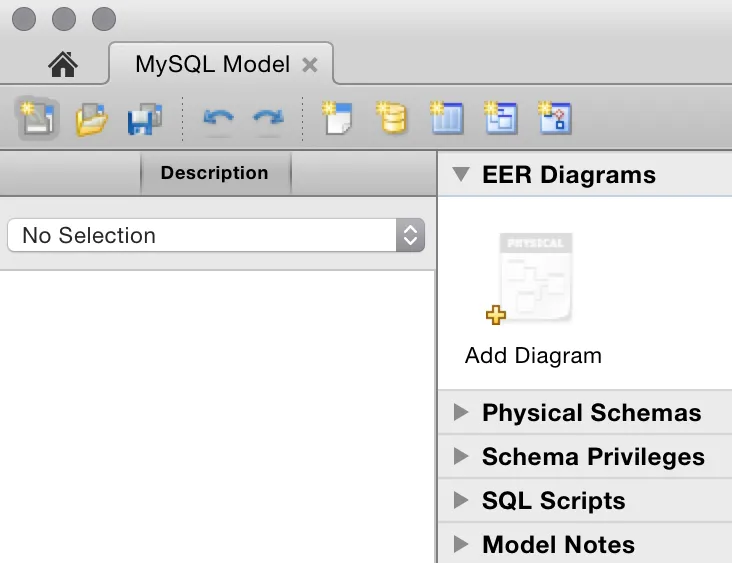
  1. Double-click the Add Diagram icon; a blank ER diagram will be opened:
Figure 4.2: Creating a new ER diagram
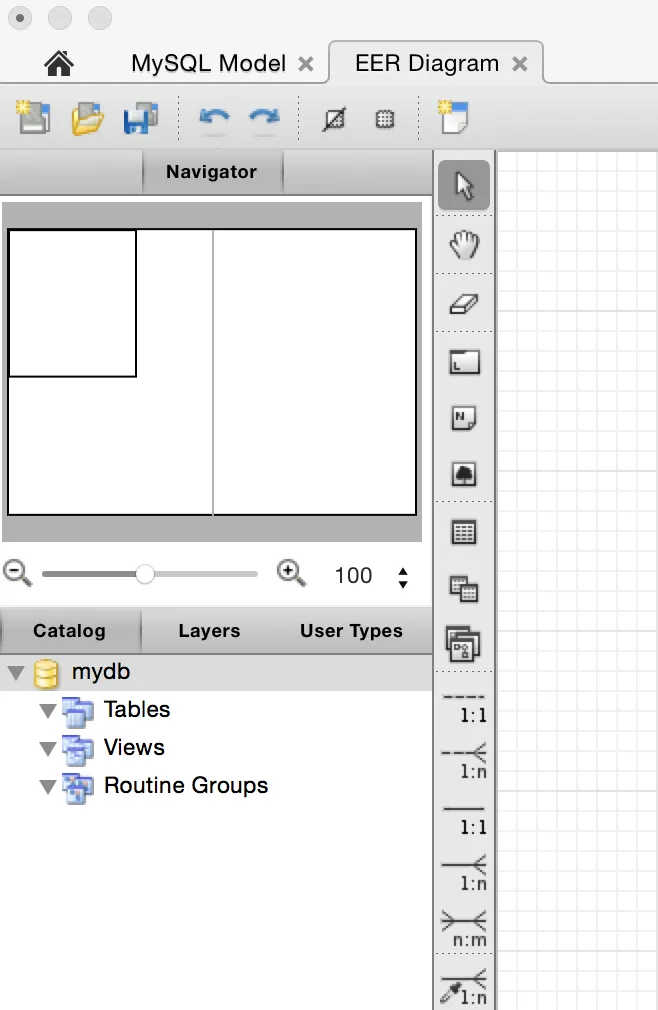
  1. By default, the new schema is named mydb. Double-click on it to open properties of the schema. Rename the schemacourse_management:
    Figure 4.3: Renaming the schema
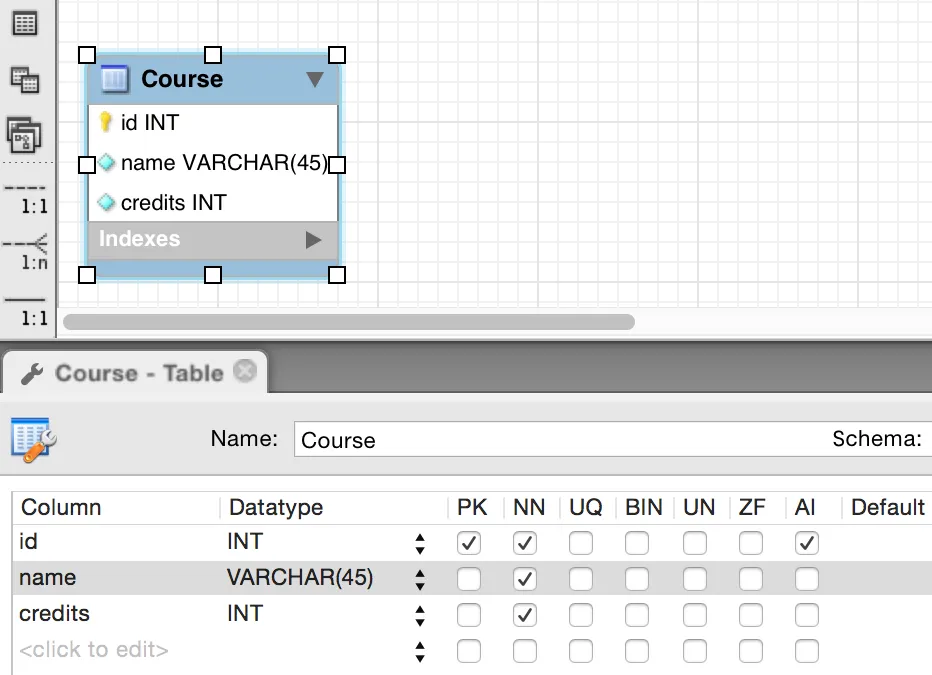
    1. Hover over the toolbar buttons on the left-hand side of the page, and you will see tool tips about their functions. Click on the button for a new table and then click on the blank page. This will insert a new table with the name table1. Double-click the table icon to open the Properties page of the table. In the Properties page, change the name of the table to Course:
      Figure 4.4: Creating a table in ER diagram
      1. We will now create columns of the table. Double-click on the first column and name it id. Check the PK (primary key), NN (not null), and AI (auto increment) checkboxes. Add other columns as shown in the following screenshot:
        Figure 4.5: Creating columns in a table in the ER diagram
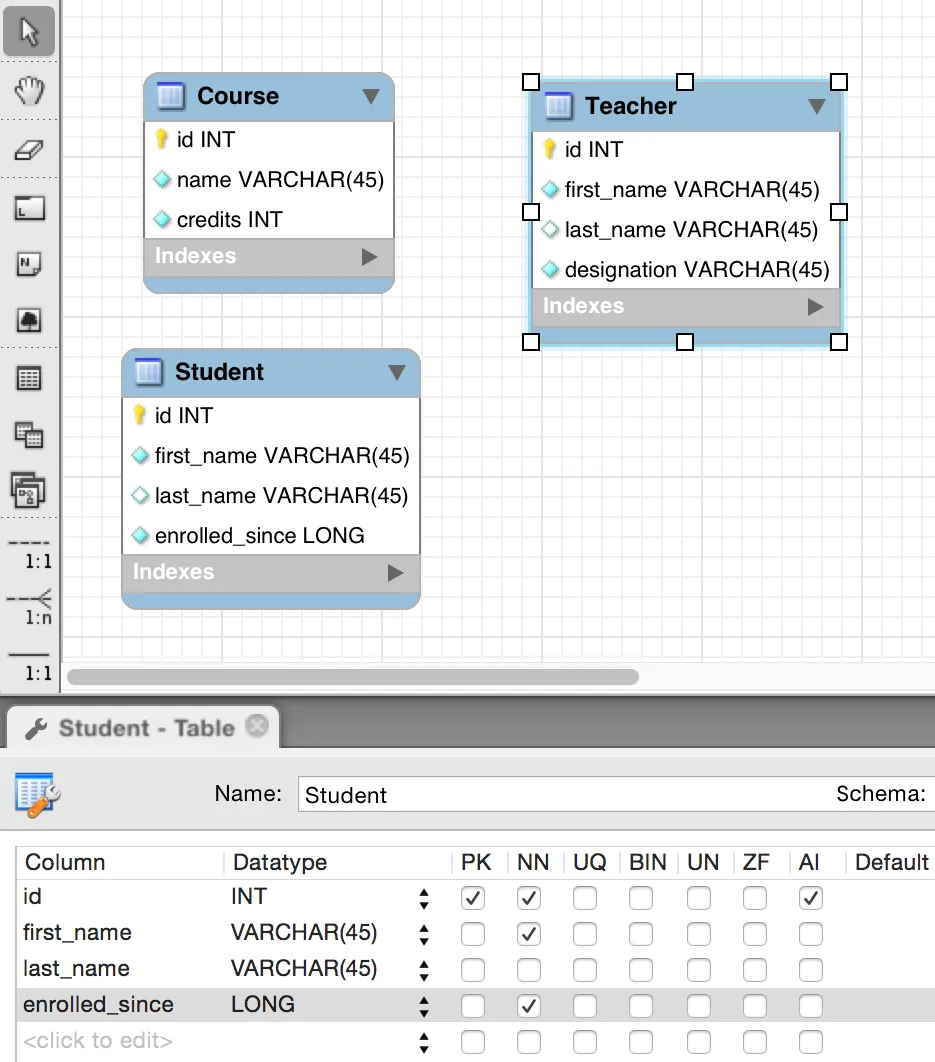
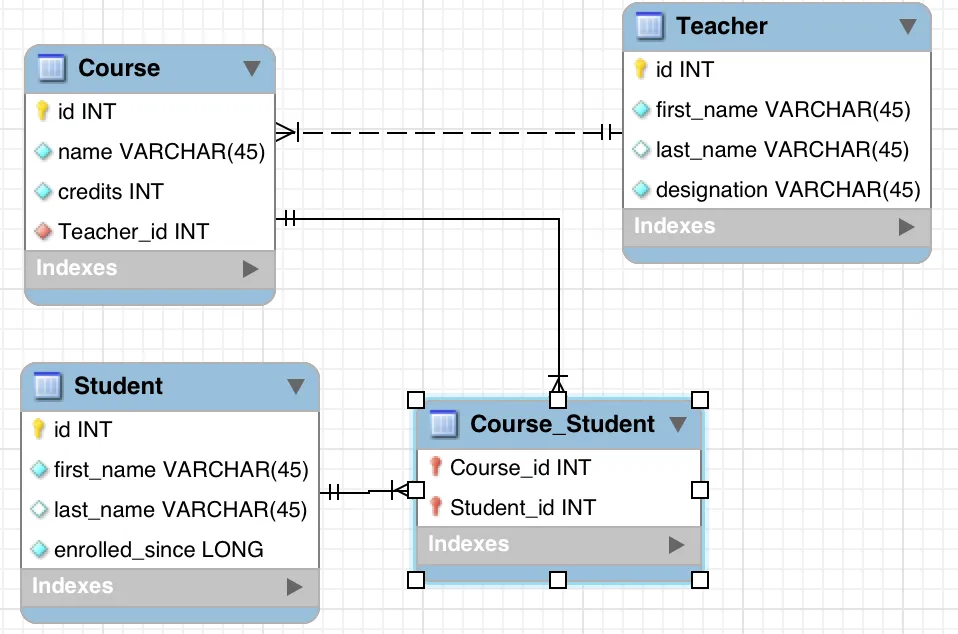
        1. Create other tables, namely Student and Teacher, as shown in the following screenshot:
          Figure 4.6: Creating additional tables
          Note that if you want to edit column properties of any table, then double-click the table in the ER diagram. Just selecting a table by a single click would not change the table selection in the Properties page. All columns in all tables are required (not null), except the last_name column in Student and Teacher tables.
          We will now create relationships between the tables. One course can have many students, and students can take many courses. So, there is a many-to-many relationship between Course and Student.
          We will assume that one course is taught by only one teacher. However, a teacher can teach more than one course. Therefore, there is a many-to-one relationship between Course and Teacher.
          Let's now model these relationships in the ER diagram:
          1. First, we will create a non-identifying relationship between Course and Teacher.
          2. Click on the non-identifying one-to-many button in the toolbar (dotted lines and 1:n).
          3. Then, click on the Course table first and then on the Teacher table. It will create a relationship as shown in Figure 4.7. Note that a foreign key Teacher_id is created in the Course table. We don't want to make a Teacher_id field required in Course. A course can exist without a teacher in our application. Therefore, double-click on the link joining Course and Teacher tables.
          4. Then, click on the Foreign Key tab.
          1. On the Referenced Table side, uncheck the Mandatory checkbox:
            Figure 4.7: Creating a one-to-many relationship between tables
            Creation of a many-to-many relationship requires a link table to be created. To create a many-to-many relationship between Course and Student, click on the icon for many-to-many (n:m) and then click on the Course table and Student table. This will create a third table (link table) called Course_has_Student. We will rename this table Course_Student. The final diagram is as shown in the following screenshot:
            Figure 4.8: ER diagram for the course management example
            Follow these steps to create DDL scripts from the ER diagram:
            1. Select the File | Export | Forward Engineer SQL Create Script... menu.
            2. On the SQL Export Options page, select checkboxes for two options:
              • Generate DROP Statements Before Each CREATE Statement
              • Generate DROP SCHEMA
            3. Specify the Output SQL Script File path if you want to save the script.
            4. On the last page of the Export wizard, you will see the script generated by MySQL Workbench. Copy this script by clicking the Copy to Clipboard button.

            Script to create tables and relationships

            The following is the DDL script to create tables and relationships for the course management example:
            -- MySQL Script generated by MySQL Workbench -- Sun Mar 8 18:17:07 2015 -- Model: New Model Version: 1.0 -- MySQL Workbench Forward Engineering SET @OLD_UNIQUE_CHECKS=@@UNIQUE_CHECKS, UNIQUE_CHECKS=0; SET @OLD_FOREIGN_KEY_CHECKS=@@FOREIGN_KEY_CHECKS, FOREIGN_KEY_CHECKS=0; SET @OLD_SQL_MODE=@@SQL_MODE, SQL_MODE='TRADITIONAL,ALLOW_INVALID_DATES'; -- ----------------------------------------------------- -- Schema course_management -- ----------------------------------------------------- DROP SCHEMA IF EXISTS `course_management` ; -- ----------------------------------------------------- -- Schema course_management -- ----------------------------------------------------- CREATE SCHEMA IF NOT EXISTS `course_management` DEFAULT CHARACTER SET utf8 COLLATE utf8_general_ci ; USE `course_management` ; -- ----------------------------------------------------- -- Table `course_management`.`Teacher` -- ----------------------------------------------------- DROP TABLE IF EXISTS `course_management`.`...

            Indice dei contenuti