![]()
Chapter 1
Getting Started
As you begin this book on the AutoCAD® program, I’m reminded of a quote by Chinese philosopher Lao-Tzu: “A journey of a thousand miles begins with a single step.” In much the same way, learning AutoCAD is something anyone can do by taking it one step at a time. And I promise that AutoCAD is much easier than walking a thousand miles!
By buying this book, you have already taken the first step in this journey. When you finish, you will have a solid understanding of AutoCAD.
- Exploring the AutoCAD 2014 for Windows user interface
- Setting drawing units
Exploring the AutoCAD 2014 for Windows User Interface
Autodesk has recently released new versions of AutoCAD, including AutoCAD® 2014 and AutoCAD LT® 2014. The two Windows versions look nearly identical and function in almost the same way. The main difference between them is that AutoCAD LT doesn’t support automation and some of the advanced 3D functions. The Mac version looks a bit different than its Windows cousins, but it functions nearly identically to AutoCAD for Windows, albeit with a slightly reduced set of features. Although this book was written using AutoCAD 2014 running on Windows XP Professional, you can use it to learn any of the current versions of AutoCAD.
start feature
AutoCAD for Mac has a user interface that is customized to the Mac experience. Although the Mac user interface is not covered in this book, its commands and capabilities are similar to those in AutoCAD for Windows.
Exploring the Graphical User Interface
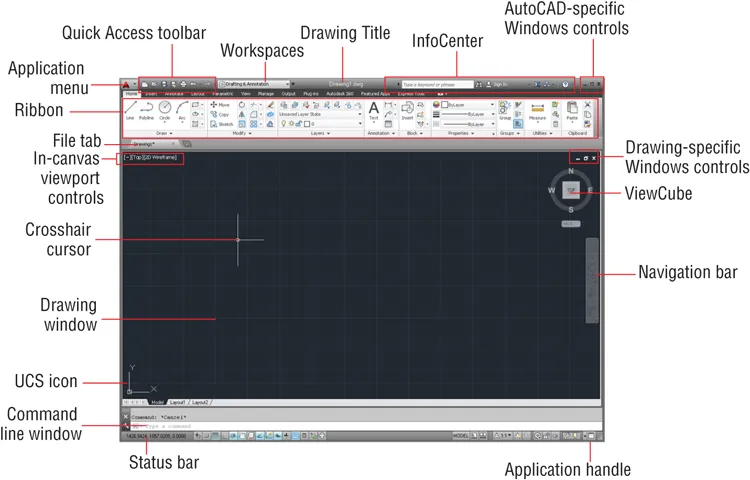
Before you can use AutoCAD, you’ll need to familiarize yourself thoroughly with its graphical user interface (GUI). The AutoCAD 2014 (for Windows) user interface is shown in Figure 1-1.
start figure end figure Let’s now step through the basic user interface for AutoCAD:
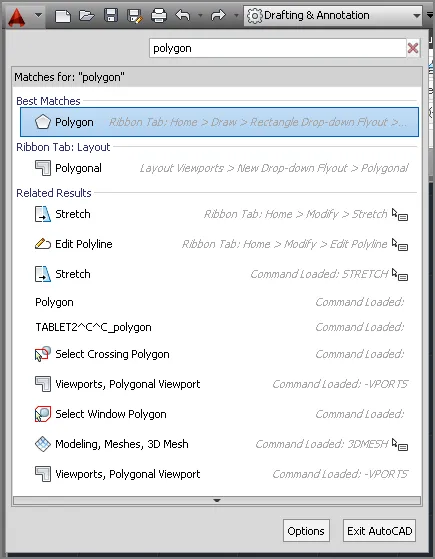
1. Click the Application menu. Type polygon, and observe that the text appears in the search box at the top of the Application menu. The search results (see Figure 1-2) list many related AutoCAD commands. Search is useful when you’re not sure how to access a command in the interface or what its exact name is.
/Level1 start figure end figure 2. Click the red X at the extreme right edge of the search box to make the initial Application menu interface reappear. Here you can create new or open existing drawings, export or print drawings, and more. Hover the cursor over Open, and then click Drawing (Figure 1-3).
/Level1 start figure end figure 3. Select the following sample file, and click Open in the Select File dialog box:
C:\Program Files\Autodesk\AutoCAD 2014\Sample\ Sheet Sets\Manufacturing\VW252-02-0142.dwg
/Level1 start feature
Sheet sets are not available in AutoCAD LT, and they are an optional feature in AutoCAD.
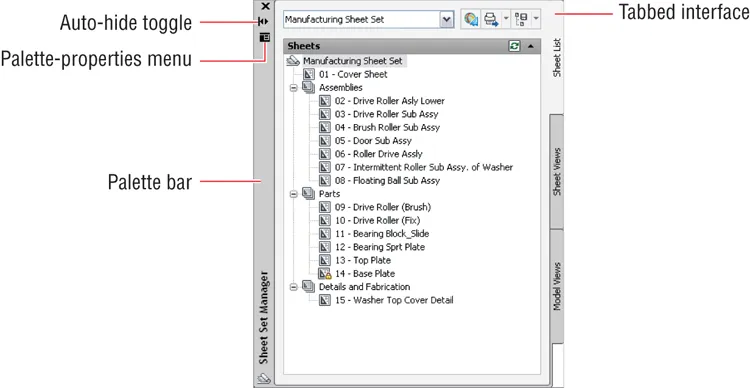
If you are using AutoCAD LT, open any of the sample files located under C:\Program Files\Autodesk\AutoCAD LT 2014\Sample. The Sheet Set Manager palette appears when the sample file is opened (see Figure 1-4). This palette automatically appears when you open any drawing that’s a part of a sheet set. AutoCAD has many palettes to organize tools and reusable drawing content.
/Level1 start figure end figure 4. Click the Sheet Views tab along the right edge of the Sheet Set Manager, and observe that tabs provide a means of accessing additional interface content. In its present state, the Sheet Set Manager is a floating palette. Drag its palette bar, and relocate it on screen.
/Level1 start feature
Drag floating palettes to a secondary monitor to maximize the drawing area on your primary monitor.
5. Click the Auto-hide toggle, and watch the palette collapse to its vertical palette bar; this saves space on screen. Hover the cursor over the palette bar, and watch the whole palette reappear so that you can access its content. Now toggle Auto-hide off.
6. Click the Palette-properties menu and select Anchor Left. The Sheet Set Manager palette is docked along the left edge of the user interface. There are many options you can use to organize the user interface to match the way you work.
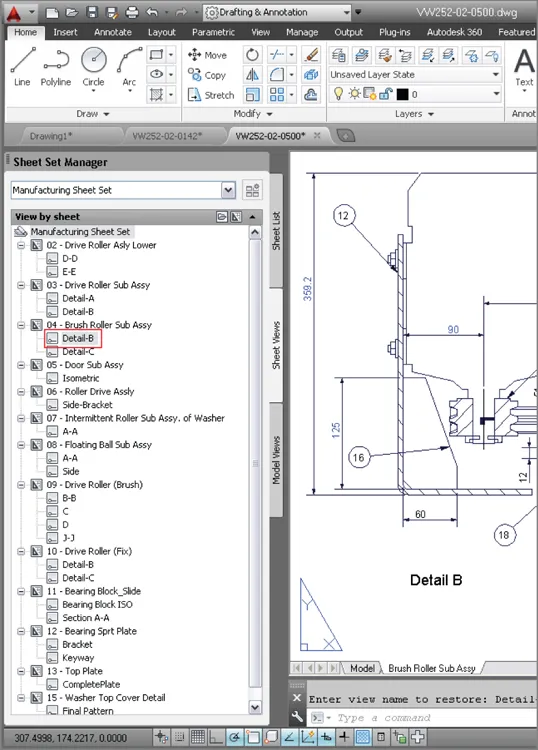
7. Double-click Detail-B under 04 – Brush Roller Sub Assy in the Manufacturing sheet set (see Figure 1-5). A new drawing appears in the drawing window.
/Level1 start figure end figure 8. Click the Open button in the Quick Access toolbar. Select any drawing in the Manufacturing folder and click Open. If you are using AutoCAD LT, open any other sample file.
/Level1 start feature
The Quick Access toolbar is a convenient way to open drawings, especially when you’re not using the Sheet Set Manager.
9. Click the Quick View Drawings button in the application status bar (see Figure 1-6). Move the cursor over ...