Let’s look at the human body and break it down. At first glance, though we might each focus on different aspects, the average person tends to look at the body as one unit. But as photographers and artists, it’s essential for us to concentrate on the components that make, move, and create form within the human body. You need to think of yourself more as a sculptor or architect. From that perspective, for the purposes of posing, the primary parts of the human body on which you need to focus are the skeletal and muscular system. You must understand these elements and how they work or you will never master your craft. After understanding how the skeletal and muscular systems work together, next you need to focus on the joints and weight to learn how they work in conjunction with these two primary elements.
And here you thought that anatomy class would have nothing to do with photography!
You want to pose and move your models in specific ways to portray a certain attitude. To achieve this, you have to take into account that you are operating three major body components: bones, muscles, and joints. Posing isn’t just a about moving an arm or leg here or there—you need to understand why you want to move that arm or leg.
By following some fundamental rules of the human figure, in this chapter I will explain how and why we move specific parts of the body in particular ways by activating or deactivating certain muscles, all toward the goal of either centering the weight or pushing it away.
The Human Figure as a Diagram
Because photography is a two-dimensional medium, one fundamental rule would seem to be that the closer an object is to the lens, the bigger it appears, right? Thus, the logic then follows that the farther away from the lens the object is, the smaller it appears.
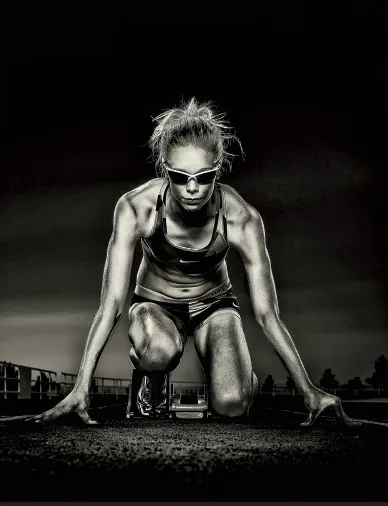
A general rule of thumb, as shown in Figure 1.1, is you want to present men most often facing straight to the camera, which gives the illusion of being bigger, broader, and more statuesque. Whereas with women, you want to drop all the weight and make them look thin like a pencil. You achieve this by positioning their bodies at an angle and pushing their weight away from the camera. You don’t want to capture images that make your female models look big or heavy, so you want to avoid posing them straight to the camera. I’ll show you how to never hear “I look fat in that photo” again.
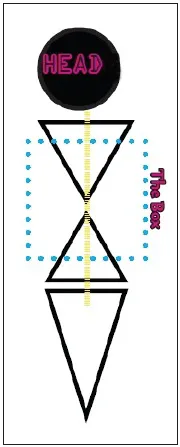
After years of teaching posing, I had an epiphany and came up with the diagrams shown in Figure 1.2. These diagrams are the simplest way to dissect the human body and use it for your modeling purposes. The block circle represents the head; the first upside-down diamond triangle represents the shoulders to the belly button; the diamond below that represents the belly button to the waist; and the elongated triangle represents the waist down to the feet.
Notice the yellow line drawn directly down the middle of all three triangles. That line represents the spinal column. Next, locate the dotted-blue box. This represents the chest area, which includes everything from the clavicle bone to the belly button—an area I refer to as The Box. I always tell people, “rule number one is Don’t block The Box.” What that means is, do not put the model’s arms or hands inside that region. It adds weight and usually looks awkward or just plain bad. Of course, there are exceptions, which I’ll go over later, but when starting out, keep this rule in mind.
With the yellow line re...