Chapter 1
Quick Image Makeovers
In This Chapter
Using one-step auto-fixes Healing wrinkles, spots, and blemishes One of Elements’ strongest assets is its ability to fix images quickly, painlessly, and effectively. When you work with digital imaging, cloning an image with a shadow, adjusting the color or contrast of a photo, or eliminating flaws from that otherwise perfect portrait are all fixes that you can do successfully, whatever your skill level. With these simple image-makeover tools, Elements makes these tasks as easy to perform as clicking a button or making a few swipes with a brush.
But before you dive into this chapter of fixer-uppers, be sure to size, crop, and straighten your image to its final desired dimensions and resolution. To find out how, check out Book III, Chapter
2.
Applying One-Step Auto-fixes
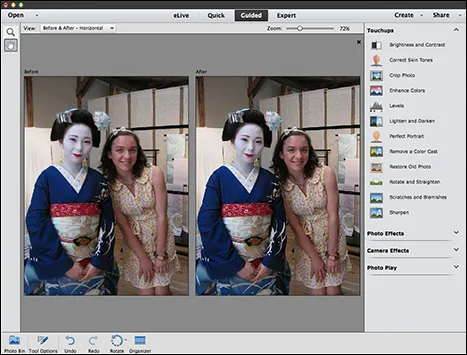
Elements has seven automatic lighting-, contrast-, and color-correction tools that can quickly improve the look of your images with a single menu command. These commands are available in either Expert or Quick mode, and they’re all on the Enhance menu.
What’s great about these auto-fixes is that they’re very easy to use. You don’t need to know a heck of a lot about color or contrast to use them. The not-so-good news is that the result of these auto-fixes often isn’t as good as you could get via a manual color-correction method. And sometimes these fixes may even make your image look worse than before by giving you strange shifts in color. But, because these correctors are quick and easy — and easily undone — they’re worth a try. Usually, you don’t want to apply more than one of the auto-fixes. If one doesn’t work on your image, just remember that you can undo the fix and try another. If you still don’t like the result, move on to one of the manual methods that we describe in Chapter 2 of this minibook.
Auto Smart Tone
This auto-fix is designed to adjust the tonal values (the range of tones or shades from black to white) in your image.
Follow these steps to check out this new command:
- In either Expert or Quick mode, with your image open, select Enhance⇒Auto Smart Tone.
Elements automatically applies a default correction.
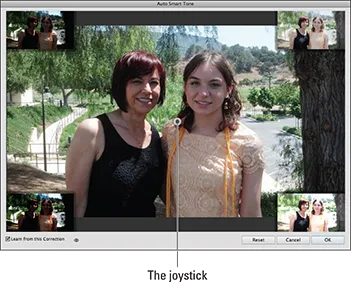
- Moving the controller joystick, the small double circle icon, as shown in Figure 1-1, fine-tune your correction.
The thumbnail previews in each corner give you an idea of how the image will look when you move the joystick in that particular direction.
- Select the Learn from This Correction option (the arrow with lines icon) in the lower left of the dialog box to have Elements “learn” from this editing session.
If you select this option, Elements remembers what corrections you made on this image and positions the joystick on the basis of that correction on the next image you open and correct. The more images that are corrected, the smarter the Auto Smart Tone corrections become. This intelligent algorithm is able to distinguish between various types (based on the tonal characteristics) of images and remembers the adjustment for that particular type of image.
Move the Before and After toggle to see the before and after of the adjustment previews.
If your adjustments are starting to get way out of whack and you feel that you need to reset the learning archive, choose Edit⇒Preferences⇒General⇒Reset Auto Smart Tone Learning (Adobe Photoshop Elements Editor⇒Preferences⇒General⇒Reset Auto Smart Tone Learning on the Mac).
- When you’re satisfied with the adjustment, click OK.
If you want to start over, click the Reset button.
Auto Smart Fix
This all-in-one command attempts to adjust it all. Auto Smart Fix is designed to improve lighting, improve the details in shadow and highlight areas, and correct the color balance, as shown in Figure 1-2. The overexposed image on the left was improved with the Auto Smart Fix command.
The Auto Smart Fix command, as well as the Auto Color, Auto Levels, Auto Contrast, Auto Sharpen, and Auto Red Eye Fix commands, are available in the Organizer in the panel on the right, where you can apply the commands to several selected images simultaneously.
If Auto Smart Fix didn’t quite cut it, you can ramp it up and try Adjust Smart Fix. This command is similar to Auto Smart Fix, but it gives you a slider that allows you to control the amount of correction applied to the image.
Auto Levels
The Auto Levels command adjusts the overall contrast of an image. This command works best on images that have pretty good contrast (detail in the shadow, highlight, and midtone areas) to begin with and just need a little adjustment, but it can also work wonders for seemingly unsalvageable images, as shown in Figure 1-3. Auto Levels works by mapping, or converting, the lightest and darkest pixels in your image to white and black, which makes highlights appear lighter and shadows appear darker.
Although Auto Levels can improve your contrast, it may also produce an unwanted
color cast (a slight trace of color). If a color cast happens, undo the command and try the Auto Contrast command instead. If that still doesn’t improve the contrast, try the Levels command that we describe in Chapter
2 of this minibook.
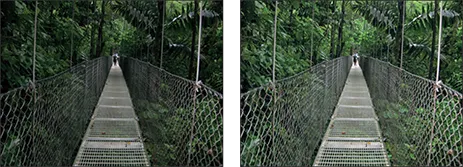
Auto Contrast
The Auto Contrast command is designed to adjust the overall contrast in an image without adjusting its color. This command may not do as good a job of improving contrast as the Auto Levels command, but it does a better job of retaining the color balance of an image. Auto Contrast usually doesn’t cause the strange color casts that can occur when you’re using Auto Levels. This command works really well on images with a haze, as shown in Figure 1-4.
Auto Color Correction
The Auto Color Correction command adjusts both the color and contrast of an image, based on the shadows, midtones, and highlights it finds in the image and a default set of values. These values adjust the number of black and white pixels that Elements removes from the darkest and ...