Quick Start: Adding a Crowd to the City Center
In This Chapter
Planning the production
Creating and positioning objects
Adding materials and lights
Rendering a preview
Adding people
Rendering the final animation
When you first sat down to use the Autodesk® 3ds Max® 2014 software, you were probably focused on one goal—creating cool 3D images and animations. I know that many of you bought 3ds Max to make money, claim a tax write-off, earn a way to Hollywood, or impress your girlfriend or boyfriend, but I'll just ignore those reasons for now. The goal is to create something cool.
If you've perused this book's Table of Contents or thumbed through its many pages, you've seen sections on modeling, materials, dynamics, and other topics. But if you're like me, you don't want to wade through tons of material before you have something to show off to Mom. (Actually, if you're like me, you opened straight to the special-effects section, in which case you won't be reading this.)
The purpose of this Quick Start is to give you a taste of what 3ds Max can do. This soaring view of the software from 20,000 feet is intended to show you the big picture before you delve into the details. It exposes you to some of the most common features and, I hope, whets your appetite for the more in-depth chapters to follow.
This part of the book is intended for those new to the software. If you're an experienced user, your mom no doubt is already impressed with your work, so you can happily advance to whichever chapter appeals to you. (Forgive me for catering to the newbie, but we were all beginners once.)
Planning the Production
For this Quick Start, we'll take a trip to a busy city center where a clock tower sits majestically. In this example, you use the Populate feature to make the clock tower a busy, bustling place. This gives you a chance to set up a scene, create and position some primitive objects and lights, and work with the Populate system to animate crowds of characters.
The first thing to consider is setting up the scene. For this sequence, we need to load the clock tower model. Luckily for us, it is already modeled and ready to go, but we'll want to dress it up with stairs, some trees, and other objects. We don't need to worry about modeling or even animating the people because the Populate system takes care of all that for us. By using this powerful system, we can concentrate on making the scene look good.
On the Website
After each of the following tutorials, I saved the scene file. You can find these files in the Quick Start zip file on the book's website.
Setting Up the Scene
This section on setting up is divided into several simple tutorials. The first step in the production is to create all the objects we need. Then we can position them where we need them.
After the models are in place, we can create the ground plane, and then we're ready to add a camera and light.
Tutorial: Loading the Clock Tower
Your first step begins with loading and positioning the clock tower model. To load and position the clock tower, follow these steps:
1. Reset the interface with the Application Button⇒Reset menu command. Answer Yes in the warning box that appears.
2. Select the Application Button⇒Open menu command, and locate the Clock tower.max file from the Chap QS zip file on the website. The clock tower looks good except for the missing stairs at either side, but these can be merged in from another file.
Note
This chapter uses Generic Units. You can change the units using the Units Setup dialog box, which you open using the Customize⇒Customization⇒Units Setup menu command.
3. Select the Application Button⇒Import⇒Merge menu command, and locate the Stairs.max file from the Chap QS zip file on the website. This opens the Merge dialog box, which lists all the objects in the selected file. Select the StraightStair objects, and click the OK button. The stairs were actually taken from this model and moved to a different file so they should fit perfectly and don't need to be moved into place.
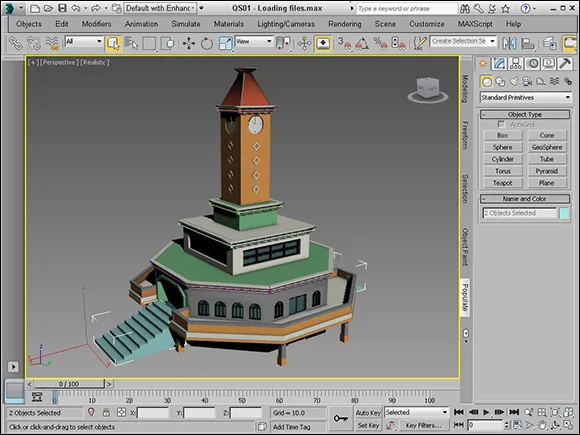
The two models are combined into a single scene, the clock tower is resized, and the stairs are positioned, as shown in Figure QS.1.
Figure QS.1
The models are merged, and the stairs are positioned.
Tutorial: Adding a ground plane and some trees
The clock tower looks fine, but we need to add a ground plane and some vegetation around the clock tower.
1. Minimize the viewport so that all four views are visible, and zoom out of the Top viewport.
2. Select all scene objects with the Edit⇒Select⇒Select All menu command. Then drag the building upward in the Front viewport until the base of the stairs is aligned with the grid line. This centers the building on the default home grid.
3. In the Command Panel, click the Plane button and drag in the Top viewport to create a rectangular base that is centered on the clock tower building.
4. In the Command Panel, select the AEC Extended category from the drop-down list at the top of the Create panel. Then click the Foliage button, select the Scotch Pine tree from the Favorite Plants rollout, and click in the Top viewport to the right of the clock tower to add a tree to the scene.
5. The tree is large compared to the building, so use the Select and Scale tool and size the tree down until it's shorter than the stairs.
6. Open the Hierarchy panel in the Command Panel, and click the Affect Pivot Only button. Then move the pivot in the Top viewport to the center of the clock tower, and click the Affect Pivot Only button again to exit Move Pivot mode.
7. With the tree still selected, choose the Edit⇒Duplicate⇒Array menu command. Enter 20 for the 1D count, click the arrow to the right of the Rotate label, and enter 360 in the Z-axis column. This creates a circular array of 20 trees that encircle the clock tower. Click OK to exit the Array dialog box.
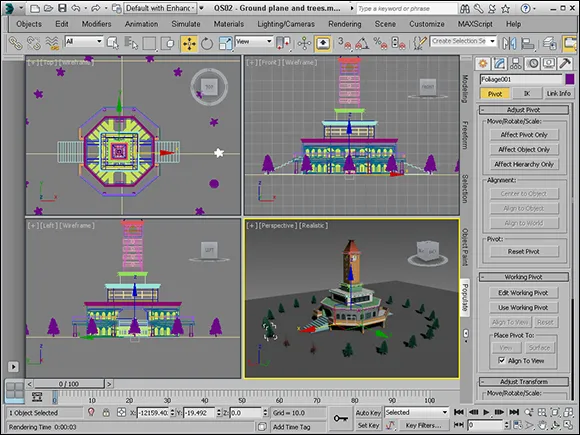
The ground plane and trees are positioned, as shown in Figure QS.2.
Figure QS.2
Trees now surround the clock tower.
Adding Materials and Lights
The modeling phase, which is usually quite time-consuming, went really quickly when we used existing models. The next phase is to add materials to the models and lights to the scene. Because our models have applied materials already, this phase also goes pretty quickly.
One key change to make is to switch the default Scanline rendering engine to the mental ray rendering engine. This makes available a wider assortment of materials and improves the subtle details of reflections and refractions in the scene. It also improves our lighting.
For lighting, we'll use the Sun & Sky system that mental ray makes available for us. This provides excellent outdoor lighting and is just what we need.
Tutorial: Adding materials
After the modeling is complete, you can add materials to the objects to improve their look. You add materials using the Material Editor, which you open using the Materials⇒Create/Edit Materials⇒Slate Material Editor menu command.
3ds Max includes a special set of materials that are used to dress up buildings and architectural designs, but they require that the mental ray render engine be enabled. After the mental ray render engine is enabled using the Render Setup dialog box, you can access the materials in the...