eBook - ePub
Professional Visual Studio 2010
- English
- ePUB (mobile friendly)
- Available on iOS & Android
eBook - ePub
Professional Visual Studio 2010
About this book
In Professional Visual Studio 2010, developers will find a fast route to IDE programming success. The authors zero in on advanced topics and demonstrate the new features of the IDE, including code snippets, refactoring, and patterns. Covering the latest .NET Framework 4 and Visual Studio 2010 with a unique IDE-centric approach, the book has been revised to include a discussion of Visual Studio's recent major overhaul. The illustrative examples included will help bring both novice and experienced developers up to speed quickly.
Trusted by 375,005 students
Access to over 1.5 million titles for a fair monthly price.
Study more efficiently using our study tools.
Information
PART I
Integrated Development Environment
- CHAPTER 1: A Quick Tour
- CHAPTER 2: The Solution Explorer, Toolbox, and Properties
- CHAPTER 3: Options and Customizations
- CHAPTER 4: The Visual Studio Workspace
- CHAPTER 5: Find and Replace and Help
1
A Quick Tour
WHAT’S IN THIS CHAPTER?
- Installing and getting started with Visual Studio 2010
- Creating and running your first application
- Debugging and deploying an application
Ever since we have been developing software, there has been a need for tools to help us write, compile, debug, and deploy our applications. Microsoft Visual Studio 2010 is the next iteration in the continual evolution of a best-of-breed integrated development environment (IDE).
This chapter introduces the Visual Studio 2010 user experience and shows you how to work with the various menus, toolbars, and windows. It serves as a quick tour of the IDE, and as such it doesn’t go into detail about what settings can be changed or how to go about customizing the layout, because these topics are explored in the following chapters.
GETTING STARTED
With each iteration of the Visual Studio product, the installation process has been incrementally improved, meaning that you can now get up and running with Visual Studio 2010 with minimal fuss. This section walks you through the installation process and getting started with the IDE.
Installing Visual Studio 2010
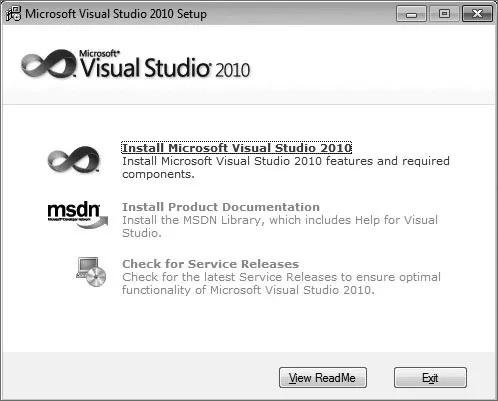
When you launch Visual Studio 2010 setup, you see the dialog in Figure 1-1 showing you the three product installation stages. As you would imagine, the first stage is to install the product itself. The other two stages are optional. You can either install the product documentation locally, or use the online (and typically more up-to-date) version. It is recommended that you do search for service releases because it ensures you are working with the most recent version of the product and associated tools.
FIGURE 1-1
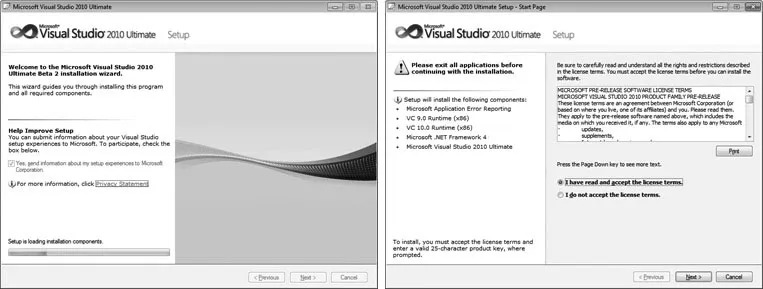
As you progress through the setup process you are prompted to provide feedback to Microsoft (left image, Figure 1-2) and agree to the licensing terms for the product (right image, Figure 1-2).
FIGURE 1-2
The Visual Studio 2010 setup process has been optimized for two general categories of developers: those writing managed, or .NET, applications, and those writing native, or C++, applications (left image, Figure 1-3). The Customize button allows you to select components from the full component tree as shown in the right image of Figure 1-3.
FIGURE 1-3

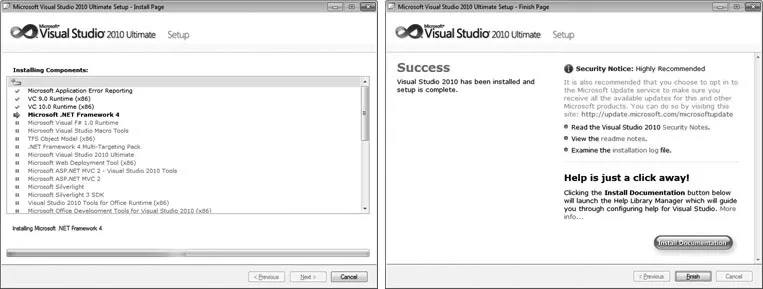
Once you have selected the components you want to install, you see the updated progress dialog in the left image of Figure 1-4. Depending on which components you already have installed on your computer, you may be prompted to restart your computer midway through the installation process. When all the components have been installed, you see the setup summary dialog in the right image of Figure 1-4. You should review this to ensure that no errors were encountered during installation.
FIGURE 1-4
Running Visual Studio 2010
When you launch Visual Studio the Microsoft Visual Studio 2010 splash screen appears. Like a lot of splash screens, it provides information about the version of the product and to whom it has been licensed, as shown in Figure 1-5.
FIGURE 1-5
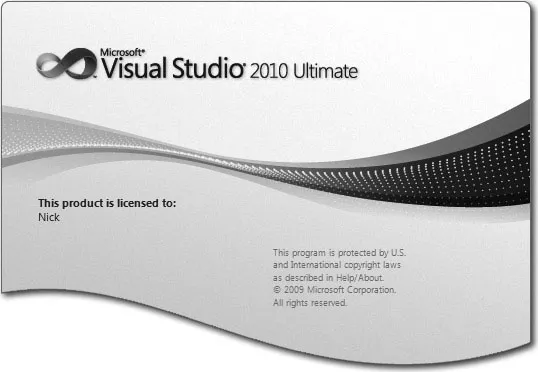

An interesting fact about the splash screen is that while a large portion of Visual Studio now uses WPF to display its content, the new splash screen in Visual Studio 2010 is still done in native code so that it displays as soon as possible after you start Visual Studio. A significant amount of time went into hand crafting the wave at the bottom of the splash screen, so make sure you marvel at it whenever you’re sitting there patiently waiting for Visual Studio to load.
The first time you run Visual Studio 2010, you see the splash screen only for a short period before you are prompted to select the default environment settings. It may seem unusual to ask those who haven’t used a product before how they imagine themselves using it. Because Microsoft has consolidated a number of languages and technologies into a single IDE, that IDE must account for the subtle (and sometimes not so subtle) differences in the way developers work.
If you take a moment to review the various options in this list, as shown in Figure 1-6, you’ll find that the environment settings that are affected include the position and visibility of various windows, menus, and toolbars, and even keyboard shortcuts. For example, if you select the General Development Settings option as your default preference, this screen describes the changes that will be applied. Chapter 3 covers how you can change your default environment settings at a later stage.
FIGURE 1-6
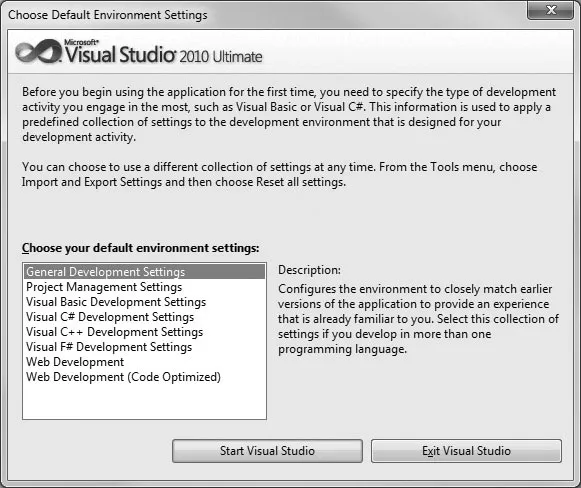
A tip for Visual Basic .NET developers coming from previous versions of Visual Studio is that they should not use the Visual Basic Development Settings option. This option has been configured for VB6 developers and will only infuriate Visual Basic .NET developers, because they will be used to different shortcut key mappings. We recommend that you use the general development settings, because these will use the standard keyboard mappings without being geared toward another development language.
THE VISUAL STUDIO IDE
Depending on which set of environment settings you select, when you click the Start Visual Studio button you will most likely see a dialog indicating that Visual Studio is configuring the development environment. When this process is complete, Visual Studio 2010 opens, ready for you to start work, as shown in Figure 1-7.
FIGURE 1-7
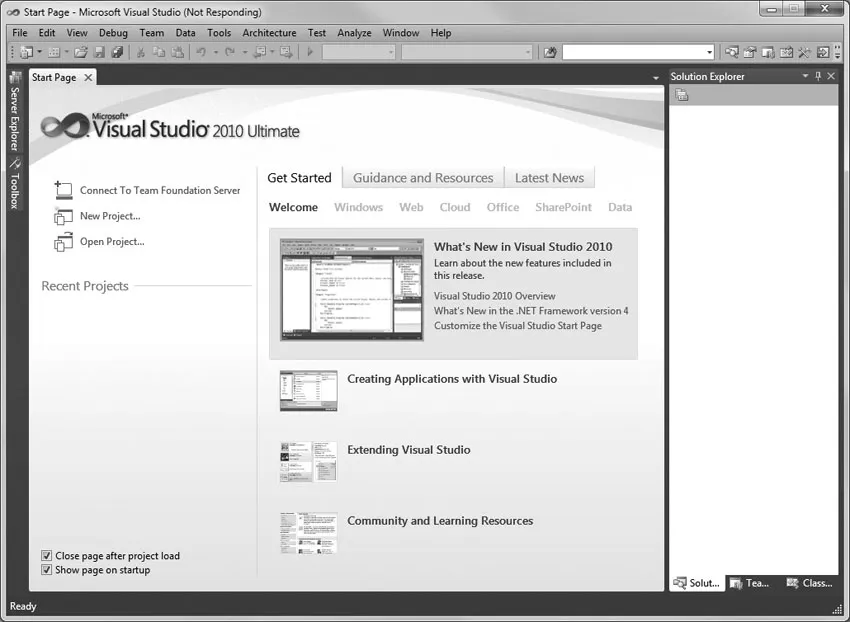
Regardless of the environment settings you selected, you see the Start Page in the center of the screen. However, the contents of the Start Page and the surrounding toolbars and tool windows can vary.
If you click the grey rounded rectangle with the text “Download the latest information for developers to the Start Page,” this pulls down news items from an RSS feed specified in the environment settings you specified. Each item is displayed in summary within the rectangle, allowing you to click through to the full article. You can customize this feed by changing the Start Page News Channel property on the Environment ⇒ Startup node of the Options dialog, accessible via the Options item on the Tools menu.
Before you launch into building your first application, it’s important to take a step back and look at the components that make up the Visual Studio 2010 IDE. Menus and toolbars are positioned along the top of the environment, and a selection of subwindows, or panes, appears on the left, right, and bottom of the main window area. In the center is the main editor space: whenever you open a code file, an XML document, a form, or some other file, it appears in this space for editing. With each file you open, a new tab is created so that you can toggle among opened files.
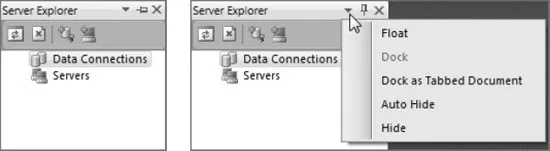
On either side of the editor space is a set of tool windows: these areas provide additional contextual information and functionality. In the case of the general developer settings, the default layout includes the Solution Explorer and Class View on the right, and the Server Explorer and Toolbox on the left. The tool windows on the left are in their collapsed, or unpinned, state. If you click a tool window’s title, it expands; it collapses again when it no longer has focus or you move the cursor to another area of the screen. When a tool window is expanded, you see a series of three icons at the top right of the window, similar to those shown in the left image of Figure 1-8.
FIGURE 1-8
If you wan...
Table of contents
- Cover
- Title
- Copyright
- Dedication
- Credits
- About the Authors
- Acknowledgments
- Introduction
- Part I: Integrated Development Environment
- Part II: Getting Started
- Part III: Digging Deeper
- Part IV: Rich Client Applications
- Part V: Web Applications
- Part VI: Data
- Part VII: Application Services
- Part VIII: Configuration and Resources
- Part IX: Debugging
- Part X: Build and Deployment
- Part XI: Customizing and Extending Visual Studio
- Part XII: Visual Studio Ultimate (Available Online)
- Index
Frequently asked questions
Yes, you can cancel anytime from the Subscription tab in your account settings on the Perlego website. Your subscription will stay active until the end of your current billing period. Learn how to cancel your subscription
No, books cannot be downloaded as external files, such as PDFs, for use outside of Perlego. However, you can download books within the Perlego app for offline reading on mobile or tablet. Learn how to download books offline
Perlego offers two plans: Essential and Complete
- Essential is ideal for learners and professionals who enjoy exploring a wide range of subjects. Access the Essential Library with 800,000+ trusted titles and best-sellers across business, personal growth, and the humanities. Includes unlimited reading time and Standard Read Aloud voice.
- Complete: Perfect for advanced learners and researchers needing full, unrestricted access. Unlock 1.5M+ books across hundreds of subjects, including academic and specialized titles. The Complete Plan also includes advanced features like Premium Read Aloud and Research Assistant.
We are an online textbook subscription service, where you can get access to an entire online library for less than the price of a single book per month. With over 1.5 million books across 990+ topics, we’ve got you covered! Learn about our mission
Look out for the read-aloud symbol on your next book to see if you can listen to it. The read-aloud tool reads text aloud for you, highlighting the text as it is being read. You can pause it, speed it up and slow it down. Learn more about Read Aloud
Yes! You can use the Perlego app on both iOS and Android devices to read anytime, anywhere — even offline. Perfect for commutes or when you’re on the go.
Please note we cannot support devices running on iOS 13 and Android 7 or earlier. Learn more about using the app
Please note we cannot support devices running on iOS 13 and Android 7 or earlier. Learn more about using the app
Yes, you can access Professional Visual Studio 2010 by Nick Randolph,David Gardner,Chris Anderson,Michael Minutillo in PDF and/or ePUB format, as well as other popular books in Computer Science & Software Development. We have over 1.5 million books available in our catalogue for you to explore.