A rigorous practical guide to photographic lighting techniques, complete with hands-on assignments
Offering digital photographers a complete course in photographic lighting, this book covers everything from using flash systems and studio lights to working outdoors in bright or low-light conditions. Full-color examples show how the right lighting can enhance color, improve contrast, and open the door to new creative possibilities.
- English
- ePUB (mobile friendly)
- Available on iOS & Android
eBook - ePub
Lighting Photo Workshop
About this book
Trusted by 375,005 students
Access to over 1.5 million titles for a fair monthly price.
Study more efficiently using our study tools.
Information
Chapter 1: Elements of Light
Understanding the Three Elements of Exposure
Dealing with Color Temperature
Setting White Balance
Using Contrast to Create Mood
Working with the Quality of Light
In some ways, photography is analogous to cooking: a certain temperature for a certain amount of time. So how is that like photography? If you substitute light for temperature, you have your answer. In this chapter, I tell you how light affects your camera and images.
Understanding the Three Elements of Exposure
Exposure is the balance of the amount of light allowed to fall on the photographic medium (digital sensor, film, glass plate, and so on). I use the word balance because you use many things to capture the correct exposure. You use three variables to create your exposure:
• ISO. The light sensitivity of the film or digital sensor.
• Aperture. A moving diaphragm within the lens that controls the amount of light passing through the lens and into the camera. F-stops are the numeric designations referring to the size of the aperture.
• Shutter. A mechanical device that opens and closes very quickly, letting light into the camera and in contact with the digital sensor (or film). The length of time the shutter is open is known as shutter speed.
Each incremental change in the exposure of any of these three things is measured in f-stops. A 1 stop difference in any of these three things either halves or doubles the amount of light for the exposure. For example, if you change your ISO from 100 to 200, you have increased your sensitivity 1 stop. If you adjust your shutter speed from 1/125 to 1/250, that is a 1 stop difference as well. Changing your aperture from f/8 to f/11 is also a change of 1 stop.
Read on to learn about these three aspects of exposure in greater detail and discover how changing things 1 stop or more affects your photographs.
ISO
ISO (International Organization for Standardization) is a body that sets international and commercial standards. In digital photography, the ISO is the measure of the digital sensor’s light sensitivity. Digital sensitivity correlates to film speed in traditional cameras. Digital cameras can have ISO settings from 50 through 3200. The standard ISO settings that you use most of the time are 100, 200, and 400. A lower number and sensitivity, 50 to 200, requires more light and, thus, is called slow, but an ISO that is larger, 400 to 1600, needs less light, can shoot the same scene with a faster exposure, and is considered a faster ISO. Adjusting the ISO higher increases the sensitivity when subjects are in lower light situations like shade, as in 1-1.
With each 1 f-stop change higher in the ISO, you effectively double the sensitivity of the film or digital sensor. As you raise the ISO sensitivity each stop, 100 to 200 to 400, the sensor becomes more light-sensitive, and you need less light to get your exposure.
The lower the number, the less light sensitive the digital sensor is. Less light sensitivity means that you need more light to achieve the correct exposure. At the lower ISOs, 50 and 100, you achieve the highest image quality in both film and digital. For example, assuming that the amount of light does not change, if you go from 100 to 200, you need to either use 1 f-stop smaller of an aperture or 1 f-stop faster of a shutter speed. As you use faster films or turn the ISO up on your digital camera, you increase its light sensitivity, but you also see increases in grain in film and noise in your digital photos.
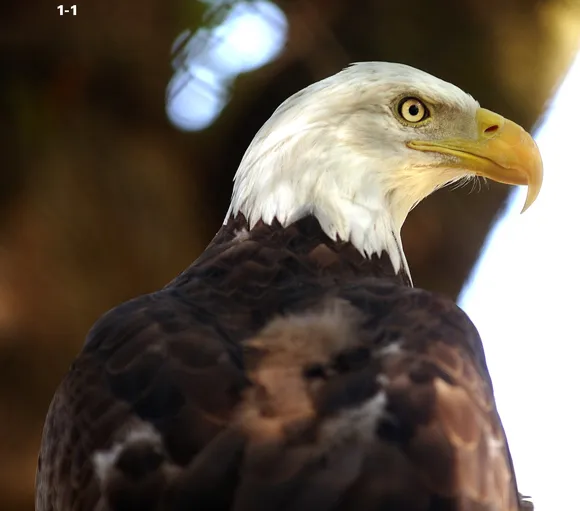
1-1: Because this Bald Eagle was in deep shade, I set the ISO to 200, so that the digital sensor captured enough light on this beautiful bird. 1/90 sec. at f/2.8, using a Nikon 80-200mm f/2.8 zoom lens.

Even though you need less light to achieve the correct exposure, higher ISOs increase digital noise and decrease contrast. As the light level begins to drop, or as the speed of the action increases, you can increase your ISO to stop the action and avoid blurring the image.
With the high quality of digital sensors and film today, going to 200 or as high as 400 only increases the noise and grain minimally, but I still recommend using the lowest possible ISO for the situation at hand.
If the highest image quality is achieved at ISO 100, why wouldn’t you just use that setting all the time? This is where the other factors in exposure, such as grain and noise, start to weigh in.
The Aperture
The lens aperture is a moving diaphragm within the barrel of the lens; it determines how much light passes through the lens and into the camera. The designation for each step in the aperture is called the f-stop. A smaller f-stop or f number means that the actual opening of the aperture is larger, and the higher numbered f-stops designate smaller apertures, letting in less light. The f number is the ratio of focal length to effective aperture diameter. The relative size of the changing aperture and corresponding f-stops are shown in 1-2.
Your lenses’ f-stops were traditionally changed by a ring around the outside of the lens that would change the diameter of the diaphragm. On today’s cameras, especially digital cameras, the f-stop is usually changed with a turn of the thumb wheel or forefinger dial. The diaphragm’s diameter changes in the same manner as it always did; it is now controlled electronically rather than manually. In 1-3 you can see the aperture blades moving in and out.
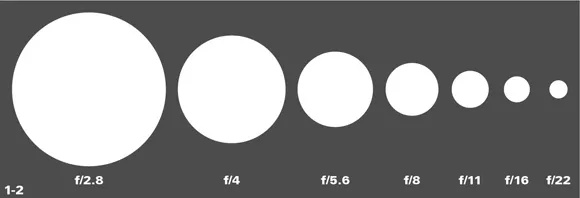
1-2: Each aperture decreases in full 1 f-stop increments. The corresponding f-stops get higher in number. Notice each aperture opening is half as large as the preceding, letting in half as much light.
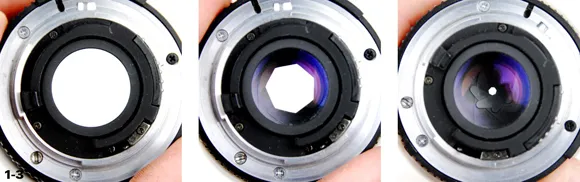
1-3: This series of photos shows the aperture blades and how they open and close. From the left, f/1.8, f/8, and f/22.
Besides determining the amount of light that passes through to the camera, the aperture has one very important function and photographic effect. The size of the aperture determines the depth of field for the photograph. The easiest way to describe depth of field is as the amount of a photograph that is in focus. A smaller f-stop and larger aperture, such as 2.8, has less depth of field than a larger f-stop and smaller aperture, such as f/22, which has more depth of field. Using smaller apertures creates larger depths of field; images with greater depth of field have more sharpness from the front to the back. Smaller apertures and larger depths of field are used more for subjects like landscapes, when you want to see sharpness in an entire scene, than for portraits, when you focus on just the subject of an image.
It isn’t as complicated as it seems. An easy way to remember this is to think “the higher the f-stop numbers, the higher the depth of field” and “the lower the numbers, the lower the depth of field.” So at f/22 nearly everything in the photograph is sharp and in focus, but at f/2.8, only the subject is in focus, and the background and foreground are blurry. Your eyes work the same way. In the middle of the day, nearly everything that you see is in focus because the aperture of your iris is effectively stopped down and its aperture is very small, but when you are driving at night in low light, it takes a moment to change your focus from the road to the speedometer because your irises are dilated, giving you less depth of field.
How does depth of field really affect your photographs? In 1-4, you can see shallow depth of field as the microphone is sharp and ...
Table of contents
- Cover
- Table of Contents
- Title Page
- Foreword
- Chapter 1: Elements of Light
- Chapter 2: Understanding Your Equipment's Role in Lighting
- Chapter 3: Working with Outdoor Natural Light
- Chapter 4: Working with Interior Light
- Chapter 5: Lighting for Portraits and People
- Chapter 6: Action, Sports, Motion, Blur
- Chapter 7: Lighting Scenarios in Landscape Photography
- Chapter 8: Dealing with Change: Travel and Adventure Photography
- Chapter 9: Still Life and Macro Lighting
- Chapter 10: Mastering Night and Low Light Photography
- Glossary
Frequently asked questions
Yes, you can cancel anytime from the Subscription tab in your account settings on the Perlego website. Your subscription will stay active until the end of your current billing period. Learn how to cancel your subscription
No, books cannot be downloaded as external files, such as PDFs, for use outside of Perlego. However, you can download books within the Perlego app for offline reading on mobile or tablet. Learn how to download books offline
Perlego offers two plans: Essential and Complete
- Essential is ideal for learners and professionals who enjoy exploring a wide range of subjects. Access the Essential Library with 800,000+ trusted titles and best-sellers across business, personal growth, and the humanities. Includes unlimited reading time and Standard Read Aloud voice.
- Complete: Perfect for advanced learners and researchers needing full, unrestricted access. Unlock 1.5M+ books across hundreds of subjects, including academic and specialized titles. The Complete Plan also includes advanced features like Premium Read Aloud and Research Assistant.
We are an online textbook subscription service, where you can get access to an entire online library for less than the price of a single book per month. With over 1.5 million books across 990+ topics, we’ve got you covered! Learn about our mission
Look out for the read-aloud symbol on your next book to see if you can listen to it. The read-aloud tool reads text aloud for you, highlighting the text as it is being read. You can pause it, speed it up and slow it down. Learn more about Read Aloud
Yes! You can use the Perlego app on both iOS and Android devices to read anytime, anywhere — even offline. Perfect for commutes or when you’re on the go.
Please note we cannot support devices running on iOS 13 and Android 7 or earlier. Learn more about using the app
Please note we cannot support devices running on iOS 13 and Android 7 or earlier. Learn more about using the app
Yes, you can access Lighting Photo Workshop by Chris Bucher in PDF and/or ePUB format, as well as other popular books in Media & Performing Arts & Digital Media. We have over 1.5 million books available in our catalogue for you to explore.