![]()
Chapter 1: Working in Maya
Maya’s working environment has evolved to accommodate both the individual artist as well as a team of artists working in a production pipeline. The interface in Maya 2011 has changed significantly from previous versions of the program to reflect this evolution. The interface presents tools, controls, and data in an organized fashion to easily allow you to bring your fantastic creations to life.
Understanding the way Maya organizes data about the objects, animation, textures, lights, dynamics, and all the other elements contained within the 3D environment of a scene is essential to understanding how the interface is organized. Maya uses what’s known as the Dependency Graph to keep track of the various packets of data, known as nodes, and how they affect each other. Any single element of a Maya scene consists of multiple nodes connected in a web, and each of these nodes is dependent on another. Maya’s interface consists of editing windows that allow you to connect these nodes in an intuitive way and edit the information contained within each node.
There is usually more than one way to accomplish a task in Maya. As you grow comfortable with the interface, you’ll discover which editing windows best suit your working style.
This chapter is a brief overview of what professionals need to understand when working in Maya. You’ll learn what types of nodes you’ll be working with and how they can be created and edited in Maya. You’ll also learn how to work with projects and scene data as well as the various windows, panels, and controls that make up the interface. This will help you whether you are working alone or as part of a team of artists.
If you’ve never used Maya before, we strongly encourage you to read the Maya documentation as well as Introducing Maya 2011 by Dariush Derakhshani (Sybex, 2010). This chapter is about working with nodes, but it is not meant to be a comprehensive guide to each and every control within Maya. That information is contained within the Maya documentation.
In this chapter, you will learn to:
- Understand transform and shape nodes
- Create a project
- Use assets
- Create file references
Creating and Editing Maya Nodes
A Maya scene is a system of interconnected nodes that are packets of data about what exists within the world of a Maya scene. The nodes are the building blocks you, as the artist, put together to create the 3D scene and animation that will finally be rendered for the world to see. So if you can think of the objects in your scene, their motion, and appearance as nodes, think of the Maya interface as the tools and controls you use to connect those nodes. The relationship between these nodes is organized by the Dependency Graph, which describes the hierarchical relationship between connected nodes. The interface provides many ways to view the graph, and these methods are described in this chapter.
Any given workflow in Maya is much like a route on a city map. There are usually many ways to get to your destination, and some of these make more sense than others depending on where you’re going. In Maya, the best workflow depends on what you’re trying to achieve, and there is usually more than one possible ideal workflow.
There are many types of nodes in Maya that serve any number of different functions. All the nodes in Maya are considered Dependency Graph (DG) nodes. Let’s say you have a simple cube and you subdivide it once, thus quadrupling the number of faces that make up the cube. The information concerning how the cube has been subdivided is contained within a DG node that is connected to the cube node.
A special type of DG node is the Directed Acyclic Graph (DAG) node. These nodes are actually made of two specific types of connected nodes: transform and shape. The arrangement of DAG nodes consists of a hierarchy in which the shape node is a child of the transform node. Most of the objects you work with in the Maya viewport, such as surface geometry (cubes, spheres, planes, and so on), are DAG nodes.
To understand the difference between the transform and shape node types, think of a transform node as describing where an object is located and a shape node as describing what an object is.
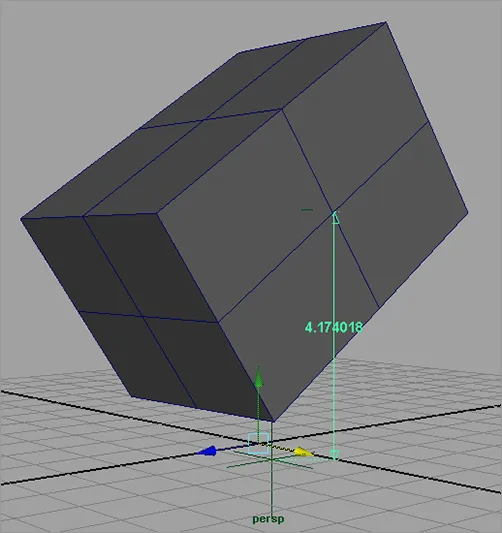
The simple polygon cube in Figure 1-1 consists of six flat squares attached at the edges to form a box. Each side of the cube is subdivided twice, creating four polygons per side. That basically describes what the object is, and the description of the object would be contained in the shape node. This simple polygon cube may be 4.174 centimeters above the grid, rotated 35 degrees on the x-axis, and scaled four times its original size based on the cube’s local x- and y-axes and six times its original size in the cube’s local z-axis. That description would be in the transform node (see Figure 1-1).
Maya has a number of workspaces that enable you to visualize and work with the nodes and their connections. The following sections describe how these workspaces work together when building a node network in a Maya scene.
Using the Hypergraph
The Hypergraph is a picture of the nodes and their connections in Maya. A complex scene can look like a very intricate web of these connections. When you really need to know how a network of nodes is connected, the Hypergraph gives you the most detailed view. There are two ways to view the Hypergraph, the hierarchy view and the connections view:
- The hierarchy view shows the relationships between nodes as a tree structure.
- The connections view shows how the nodes are connected as a web.
You can have more than one Hypergraph window open at the same time, but you are still looking at the same scene with the same nodes and connections.
This short exercise gives you a sense of how you would typically use the Hypergraph:
1. Create a new Maya scene.
2. Create a polygon cube by choosing Create Polygon Primitives Cube.
3. You will be prompted to draw a polygon on the grid by dragging on the surface. Drag a square on the grid, release the cursor, and then drag upward on the square to turn it into a three-dimensional cube (see Figure 1-2). Release the mouse button to complete the cube. At this point, feel free to make your own decisions about the size and position of the cube on the grid.
4. Select the cube in the viewport, and choose Window Hypergraph Hierarchy to open the Hypergraph in hierarchy mode. You’ll see a yellow rectangle on a black field labeled pCube1. The rectangle turns gray when deselected.
Interactive Creation
By default Maya creates objects using the Interactive Creation method, which allows you to draw on the canvas as you create your geometry. To turn this feature off, choose the Create Polygon Primitives menu, and deselect the Interactive Creation option at the bottom of the menu.
While the Interactive Creation mode is on, you can deselect the Exit On Completion method; this means that each time you draw on the grid, you will continue to create cubes until you switch to ano...