Chapter 1: Introducing Excel
This chapter serves as an introductory overview of Excel 2007. If you’re already familiar with a previous version of Excel, reading this chapter is still a good idea. Excel 2007 is different from every previous version—very different.
What Is Excel Good For?
Excel, as you probably know, is the world’s most widely-used spreadsheet program, and is part of the Microsoft Office suite. Other spreadsheet programs are available, but Excel is by far the most popular and has become the world standard.
Much of the appeal of Excel is due to the fact that it’s so versatile. Excel’s forte, of course, is performing numerical calculations, but Excel is also very useful for non-numerical applications. Here are just a few of the uses for Excel:
• Number crunching: Create budgets, analyze survey results, and perform just about any type of financial analysis you can think of.
• Creating charts: Create a wide variety of highly customizable charts.
• Organizing lists: Use the row-and-column layout to store lists efficiently.
• Accessing other data: Import data from a wide variety of sources.
• Creating graphics and diagrams: Use Shapes and the new SmartArt to create professional-looking diagrams.
• Automating complex tasks: Perform a tedious task with a single mouse click with Excel’s macro capabilities.
Understanding Workbooks and Worksheets
The work you do in Excel is performed in a workbook file, which appears in its own window. You can have as many workbooks open as you need. By default, Excel 2007 workbooks use an XLSX file extension.
Each workbook is comprised of one or more worksheets, and each worksheet is made up of individual cells. Each cell contains a value, a formula, or text. A worksheet also has an invisible draw layer, which holds charts, images, and diagrams. Each worksheet in a workbook is accessible by clicking the tab at the bottom of the workbook window. In addition, workbooks can store chart sheets. A chart sheet displays a single chart and is also accessible by clicking a tab.
Newcomers to Excel are often intimidated by all the different elements that appear within Excel’s window. Once you become familiar with the various parts, it all starts to make sense.
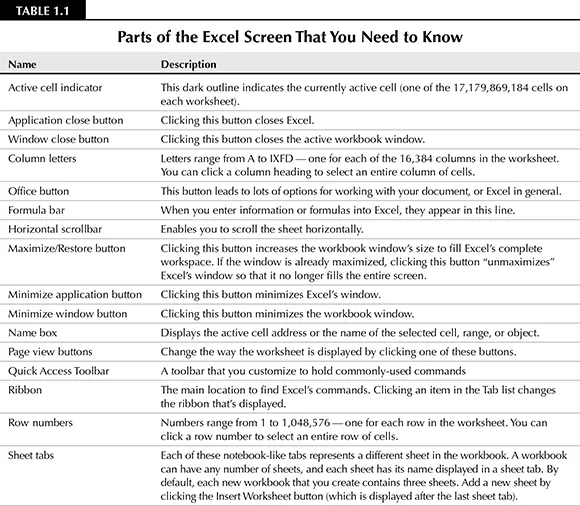
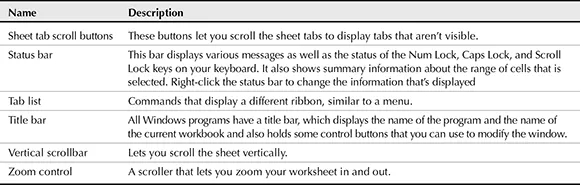
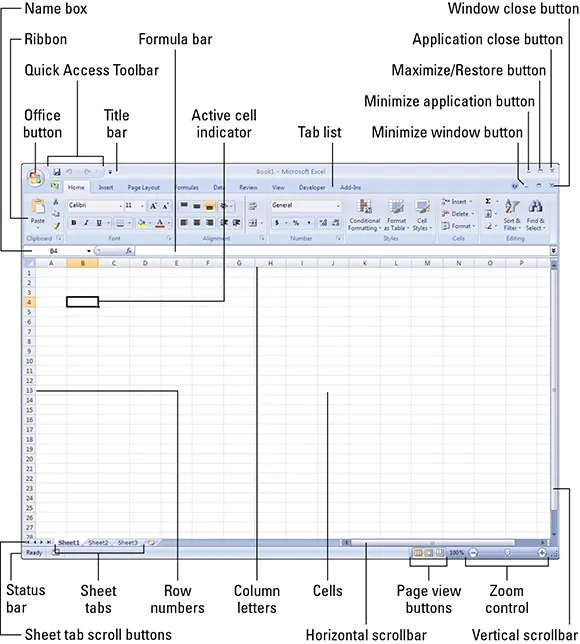
Figure 1.1 shows you the more important bits and pieces of Excel. As you look at the figure, refer to Table 1.1 for a brief explanation of the items shown in the figure.
Figure 1.1
The Excel screen has many useful elements that you will use often.
Moving Around a Worksheet
This section describes various ways to navigate through the cells in a worksheet. Every worksheet consists of rows (numbered 1 through 1,048,576) and columns (labeled A through XFD). After column Z comes column AA, which is followed by AB, AC, and so on. After column AZ comes BA, BB, and so on. After column ZZ is AAA, AAB, and so on.
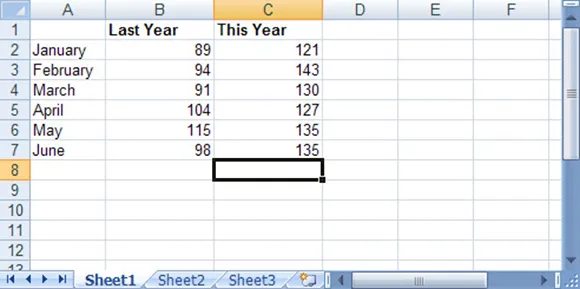
The intersection of a row and a column is a single cell. At any given time, one cell is the active cell. You can identify the active cell by its darker border, as shown in Figure 1.2. Its address (its column letter and row number) appears in the Name box. Depending on the technique that you use to navigate through a workbook, you may or may not change the active cell when you navigate.
Notice that the row and column headings of the active cell appear in different colors to make it easier to identify the row and column of the active cell.
Figure 1.2
The active cell is the cell with the dark border—in this case, cell C8.
Navigating with your keyboard
As you probably already know, you can use the standard navigational keys on your keyboard to move around a worksheet. These keys work just as you’d expect: The down arrow moves the active cell down one row, the right arrow moves it one column to the right, and so on. PgUp and PgDn move the active cell up or down one full window. (The actual number of rows moved depends on the number of rows displayed in the window.)
You can use the keyboard to scroll through the worksheet without changing the active cell by turning on Scroll Lock, which is useful if you need to view another area of your worksheet and then quickly return to your original location. Just press Scroll Lock and use the direction keys to scroll through the worksheet. When you want to return to the original position (the active cell), press Ctrl+Backsp...