
- English
- ePUB (mobile friendly)
- Available on iOS & Android
eBook - ePub
Rick Sammon's Digital Photography Secrets
About this book
Learn the tips and tricks used by a top photographer in the digital photography industry in Rick Sammon's Top Digital Photography Secrets. Filled with beautiful photographs and the techniques Rick Sammon used to capture them, this book offers you motivation to capture stunning photographs and the tools and tricks you need to capture them. With more than 100 techniques for use behind the camera, this book will improve the camera skills of both amateur and experienced photographers. Additionally, this book includes a chapter on post-production secrets, and a Rick Sammon DVD Guide lighting, camera, and digital photography basics. In this 1-hour DVD, Rick shows you how to get great photos using a variety of lighting sources, camera-specific techniques, and basic rules of photography.
Trusted by 375,005 students
Access to over 1.5 million titles for a fair monthly price.
Study more efficiently using our study tools.
Information
Part I
Digital SLR Must-Know Info
Gain an understanding of your camera’s image sensor, shutter, LCD monitor, camera settings, memory cards, custom functions and what you see versus what your camera sees. You’ll be in the know after reading this chapter.
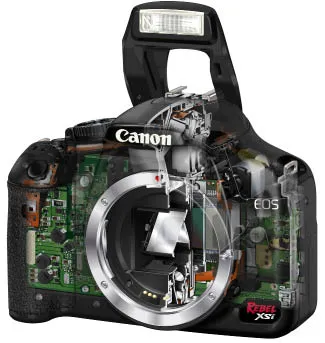
Data Contacts and Mirror
Your lens and camera “talk” to each other – communicating f-stop, focal length, focus and exposure information – via the electrical contacts on the lens mount and camera mount.
Keep these contacts clean and avoid touching them to keep the communication channels open. If you get a focus, f-stop or other error messages on your LCD monitor, try cleaning the contacts with a microfiber cloth (available at camera and eyeglass stores).
When it comes to the mirror, never touch it with anything. You can use a low-volume photo blower (available at camera stores) to remove dust from the mirror, which does not show up in your pictures but does appear in your viewfinder. However, never use compressed air, because it contains propellants that may stain and ruin your mirror. If you do get hard-to-remove marks on the mirror, it’s best to have it professionally cleaned.
Illustration: courtesy Canon USA.

Auto Focus vs. Manual Focus
In most cases, your auto-focus camera can focus faster than you can. Auto-focus units use contrast in the scene to set the focus. In low light and low contrast situations, you may need to switch to manual focus because the AF system will “hunt” for perfect focus. You’ll also want to switch to manual focus when shooting through a chain link fence, through leaves and branches and when shooting through glass, as I did to capture this rainy day scene in a small, roadside town outside of Mexico City.
On some entry-level digital SLRs, some auto-focus lenses will not auto focus properly, so you will need to focus manually. In addition, some brands of tele-converters may prevent auto focusing when used on entry-level digital SLRs. Off-brand lenses and tele-converters also may affect auto-focusing function, accuracy and speed.
Illustration: courtesy Canon USA.

Be Sensitive to Your Image Sensor
Later in this section I talk about different size image sensors and their advantages and disadvantages. For now, I just want to give you a look at the image sensor setup so you’re not afraid to clean the sensor to prevent black specks and blobs from appearing on your images. You see, when you clean the sensor, you are not really cleaning the sensor, but rather the low-pass filter that covers and protects it. The specks are shadows caused by dust and other particles appearing on the filter. When you clean this filter, be sure to use only products designed specifically for photo sensor cleaning, and follow the instructions very, very carefully.
When I shoot in dusty conditions, such as when I was photographing the sand dunes in Namibia, I clean my sensor every night. Better safe than sorry is my motto.
Illustration: courtesy Canon USA.
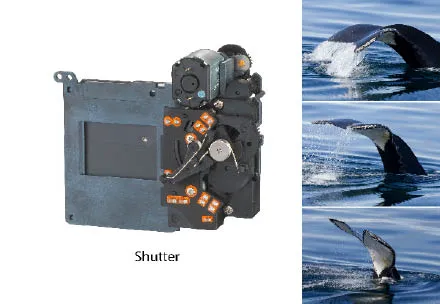
A Shutter’s “Mileage”
Would you buy a used car without knowing the mileage? Of course not.
When it comes to buying a used camera, it’s also important to know its “mileage”; that is, the number of shutter activations. And if you are buying a new camera and plan to take a ton of pictures, it’s important to know the estimated “mileage” (again in shutter activations). For example, Canon’s EOS 40D has an estimated number of shutter activations of about 100,000. That may sound like more images than you’ll ever take, but a sports photographer could take that many pictures in a year – or less. Higher-end digital SLR cameras have more durable shutters. The shutter in my Canon EOS 1D Mark III, which I used to photograph this series of whale tail photographs in Antarctica, has a life expediency of about 300,000 activations.
Before you head out on the road with a new or used camera, check its mileage. Some cameras offer counters. For those that don’t, you have to rely on the previous owner’s honesty. And speaking of honesty, “driving conditions,” or what kind of use the previous owner put the camera through, are also a factor when considering purchasing a used digital SLR.
Don’t panic if you plan to shoot hundreds of thousands of pictures. Shutter replacements cost between $250 and $500, which is not bad when you own a high-end digital SLR that cost more than $5,000.
Illustration: courtesy Canon USA.

Your Eyes vs. Your Camera’s “Eye”
Our eyes are incredible light sensitive devices. We can see a dynamic range of about 11 f-stops. That’s why in a scene like this Mongolian landscape, I could see into the shadows and the highlights in the bright clouds were not washed out.
Our digital cameras can see about five or six f-stops. Therefore, it’s our job as photographers to produce images that look like the scenes we see – or look like we want them to look.
The key is to realize that what we see with our eyes is not what the camera sees with its “eye.” Learning how to see the contrast range of a scene – and knowing how to compress it with accessories like diffusers, reflectors, filters and flash units, and how to control light in the digital darkroom – will make us better photographers.
In addition, seeing the light will help keep us from being disappointed when what we see in real life is not what we see on our camera’s LCD monitor – perhaps saving us from deleting “outtakes” that can be turned into “keepers.”

Brightness Values and the +/– Exposure Compensation Control
Here are two pictures I took during Carnevale in Venice. One person is wearing a black costume and one is wearing a white costume.
Get this. With my camera set on any of the automatic exposure modes and the exposure compensation set at zero, the picture of the person wearing the black costume would have come out too light, and the picture of the person wearing the white costume would have come out too dark. Here’s why.
In the photograph of the person wearing the dark costume, all that black would have fooled the camera’s meter into thinking that the scene was darker than it was, therefore increasing the exposure to a point where the image would have been slightly overexposed. The same thing would have happened when photographing any very dark subject – say the dark bark of a tree.
Likewise, in the photograph of the person wearing the white costume, all that white would have fooled the camera’s meter into thinking that the scene was brighter than it was, therefore decreasing the exposure to a point where the image would have been slightly underexposed. The same thing would have happened when shooting at the beach on a bright, sunny day or when shooting in the snow.
Now I know it will sound backward, but what you need to do is this: When photographing very light subjects, set your exposure compensation at +1 (as a starting point); when photographing very dark subjects, set your exposure compensation at – 1 (again as a starting point).
If you are not sure about the exposure, bracket your exposures, and then take additional pictures over and under the recommended exposure setting.
Once again, learning how to see the light is the key to getting a good in-camera exposure.
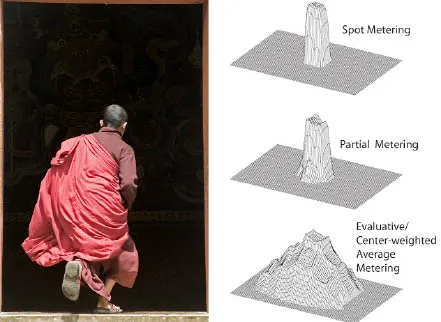
Control What Your Exposure Meter “Sees”
Here’s another important thing to think about when comes to seeing the light: You can control what your camera’s meter “sees.”
Basically, digital SLR cameras, and even some digital compact cameras, have three metering modes: spot metering, which measures the center spot of the viewfinder; partial metering, which measures the central area of the frame; and evaluative/center-weighted average metering, which measures most of the frame but puts the emphasis on the center part of the image.
For my monk photograph, I chose the partial metering mode because the monk was surrounded by a large, dark area – which would have fooled the camera’s meter into overexposing the monk had I chosen the evaluative/center-weighted average metering mode.
Check out the metering patterns on this page and keep them in mind when you are composing your pictures. Choosing the correct metering mode could make the difference between a righton exposure and a poor exposure.
Illustration: courtesy Canon USA.
LCD Monitor Info
When I teach a photography workshop, one of the first points I stress is the importance of checking the histogram (a graph that shows the distribution of the light values in an image) on the camera’s LCD monitor. The idea is to check to see if the shadows are blocked up (indicated by a spike on the left side of the histogram) and if the highlights are overexposed (indicated by a spike on the right side of the histogram). I talk about the importance of checking the overexposure warning on the camera’s LCD monitor, which blinks to show overexposed areas.

I also point out the importance of shooting RAW files, which are more forgiving when it comes to exposure than JPEG files, which toss away information during the compression process. In fact, on some of my workshops, I wear my “RAW Rules” t-shirt. There’s more to come on shooting RAW files on the following pages.
But here’s the thing. The histogram and the overexposure warning on the camera’s LCD monitor are not for the RAW file of an imag...
Table of contents
- About the Author
- Credits
- Acknowledgments
- Foreword
- Preface
- Intro
- Part I: Digital SLR Must-Know Info
- Part II: Landscape and Scenic Photography
- Part III: Photographing People
- Part IV: Picturing Animals
- part V: Exposure Fusion with Photomatix
- Part VI: Get the Best Image Quality: RAW and JPEG
- Part VII: A Case for White Balance
- Part VIII: Flash Settings: On, Off and Partial
- Part IX: The Zoom Lens Advantage
- Part X: Setting the Mode
- Part XI: The Wonders of Infrared Imaging
- Part XII: Photoshop Elements Confessions
- Part XIII: Expand Your Vision with HDR Imaging
- Part XIV: Shooting Panoramas
- Part XV: HDR + Panos = Way-Cool Imaging Fun
- Part XVI: Make a Better Print
Frequently asked questions
Yes, you can cancel anytime from the Subscription tab in your account settings on the Perlego website. Your subscription will stay active until the end of your current billing period. Learn how to cancel your subscription
No, books cannot be downloaded as external files, such as PDFs, for use outside of Perlego. However, you can download books within the Perlego app for offline reading on mobile or tablet. Learn how to download books offline
Perlego offers two plans: Essential and Complete
- Essential is ideal for learners and professionals who enjoy exploring a wide range of subjects. Access the Essential Library with 800,000+ trusted titles and best-sellers across business, personal growth, and the humanities. Includes unlimited reading time and Standard Read Aloud voice.
- Complete: Perfect for advanced learners and researchers needing full, unrestricted access. Unlock 1.5M+ books across hundreds of subjects, including academic and specialized titles. The Complete Plan also includes advanced features like Premium Read Aloud and Research Assistant.
We are an online textbook subscription service, where you can get access to an entire online library for less than the price of a single book per month. With over 1.5 million books across 990+ topics, we’ve got you covered! Learn about our mission
Look out for the read-aloud symbol on your next book to see if you can listen to it. The read-aloud tool reads text aloud for you, highlighting the text as it is being read. You can pause it, speed it up and slow it down. Learn more about Read Aloud
Yes! You can use the Perlego app on both iOS and Android devices to read anytime, anywhere — even offline. Perfect for commutes or when you’re on the go.
Please note we cannot support devices running on iOS 13 and Android 7 or earlier. Learn more about using the app
Please note we cannot support devices running on iOS 13 and Android 7 or earlier. Learn more about using the app
Yes, you can access Rick Sammon's Digital Photography Secrets by Rick Sammon in PDF and/or ePUB format, as well as other popular books in Media & Performing Arts & Digital Media. We have over 1.5 million books available in our catalogue for you to explore.