Part I
Breezing through Basic Training
A solid understanding of certain basic concepts and techniques makes learning Photoshop much easier. Heck, it’s difficult to understand a discussion of feathered selections when you don’t know your pixels from a hole in the ground, right?
In Chapter 1, I introduce you to Adobe Photoshop. Chapter 2 focuses on the basic concepts of digital imaging and offers a look at the primary file formats in which you save Photoshop images. Chapter 3 makes sure we’re all reading from the same menu as we discuss Photoshop’s various commands, tools, and features — and provides some critical troubleshooting procedures. Finally, Chapter 4 covers bringing images into Photoshop from digital cameras or scanners, organizing those files, and basic output through printing.
Chapter 1
Welcome to Photoshop!
In This Chapter
What Photoshop does very well, kind of well, and just sort of, well . . .
What you need to know to work with Photoshop
What you need to know about installing Photoshop
Adobe Photoshop is, without question, the leading image-editing program in the world. Photoshop has even become somewhat of a cultural icon. It’s not uncommon to hear Photoshop used as a verb (“That picture is obviously Photoshopped!”), and you’ll even see references to Photoshop in the daily comics and cartoon strips. And now you’re part of this whole gigantic phenomenon called Photoshop.
Before I take you on this journey through the intricacies of Photoshop, I want to introduce you to Photoshop in a more general way. In this chapter, I tell you what Photoshop is designed to do, what it can do (although not as capably as job-specific software), and what you can get it to do if you try really, really hard. I also review some basic computer operation concepts and point out a couple of places where Photoshop is a little different than most other programs. At the end of the chapter, I have a few tips for you on installing Photoshop to ensure that it runs properly.
Exploring Adobe Photoshop
Photoshop is used for an incredible range of projects, from editing and correcting digital photos to preparing images for magazines and newspapers to creating graphics for the web. You can also find Photoshop in the forensics departments of law-enforcement agencies, scientific labs and research facilities, and dental and medical offices, as well as in classrooms, offices, studios, and homes around the world. As the Help Desk Director for the National Association of Photoshop Professionals (NAPP), my team and I solve problems and provide solutions for Photoshop users from every corner of the computer graphics field and from every corner of the world. People are doing some pretty amazing things with Photoshop, many of which are so far from the program’s original roots that it boggles the mind!
What Photoshop is designed to do
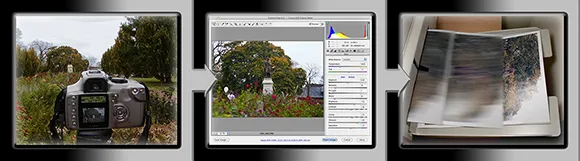
Adobe Photoshop is an image-editing program. It’s designed to help you edit images — digital or digitized images, photographs, and otherwise. This is the core purpose of Photoshop. Over the years, Photoshop has grown and developed, adding features that supplement its basic operations. But at its heart, Photoshop is an image editor. At its most basic, Photoshop’s workflow goes something like this: You take a picture, you edit the picture, and you print the picture (as illustrated in Figure 1-1).
Figure 1-1: Basic Photoshop: Take photo, edit photo, print photo. Drink coffee (optional).
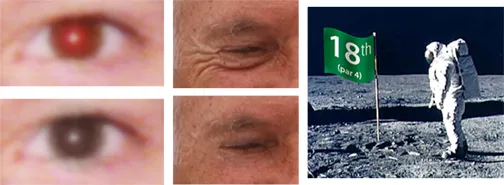
Whether captured with a digital camera, scanned into the computer, or created from scratch in Photoshop, your artwork consists of tiny squares of color, which are picture elements called pixels. (I explore pixels and the nature of digital imaging in-depth in Chapter 2.) Photoshop is all about changing and adjusting the colors of those pixels — collectively, in groups, or one at a time — to make your artwork look precisely how you want it to look. (Photo-shop, by the way, has no Good Taste or Quality Art button. It’s up to you to decide what suits your artistic or personal vision and what meets your professional requirements.) Some very common Photoshop image-editing tasks are shown in Figure 1-2: namely, correcting red-eye and minimizing wrinkles (both discussed in Chapter 9); and compositing images (see Chapter 10).
New features to help you do those jobs
The new version of Photoshop has lots of new features to help you perform those tasks more efficiently and more easily. For example, the non-Extended version of Photoshop can also work with video (Chapter 17), Color Range now offers Skin Tones in the Select menu with a Detect Faces option, working with type now includes both character and paragraph styles (Chapter 13), and you now have the option to enable Automatically Save Recovery Information, which protects your work in case Photoshop crashes.
Astronaut image courtesy of NASA
Figure 1-2: Some common Photoshop tasks.
For photographers, perhaps the biggest new thing is the addition of content-aware technology to the Patch tool and the new Content-Aware Move tool. Content-aware patching is perhaps even more powerful than Content-Aware Fill, thanks to five levels of adaptation, which is how much free rein you offer the program to replicate the surrounding area.
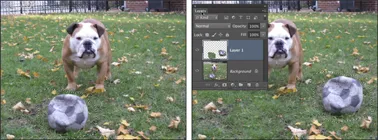
The Content-Aware Move tool (nested with the Patch tool, the Healing Brush, and the Spot Healing Brush) works its magic in two ways, with a Move mode and an Extend mode. Make a selection and drag in Move mode, and the area from which you moved is filled (content-aware style) to match the surrounding image detail and color. The area to which you drag gets the selected pixels, blending into the new surrounding. In Figure 1-3, you can see the original to the left and the result of using the Content-Aware Move tool in Move mode on the right. As you can see in the Layers panel, I first added an empty layer for non-destructive editing — I’ve put both the moved pixels and the replacement pixels on their own layer, just in case I need to touch up or even delete the change. The Extend mode is great for flattening bellies or making buildings taller and other such tasks. Make a selection of the pixels you want to extend (or contract) and drag up or down, in or out.
You don’t need to make the selection with the Content-Aware Move tool — you might, for example, get a better initial selection with the Magnetic Lasso tool — you just need to do the dragging with the Content-Aware Move tool. In the example shown in Figure 1-3, I painted the selection as an alpha channel and used the Select⇒Load Selection command before dragging with the Content-Aware Move tool. (Selections and alpha channels are discussed in Chapter 10.)
Figure 1-3: The Content-Aw...