![]()
1
drawing materials
A drawing material can be made from anything you can dip into paint, ink, or dye. A drawing material is anything which leaves a mark when you drag it across paper, wood, cardboard, clay, or other surfaces.
When we think of drawing, we generally think of pencils, pens, and brushes; however, it’s possible to use many other materials, each of which can be exploited for its own unique qualities. Marcel Duchamp, in the accompanying portrait, used not only his fingers as drawing instruments, but also a typewriter!
Twigs of various sizes will produce interesting lines. You can dip tennis balls into paint or ink to achieve a big, bold line or to smear a large area of tone into a composition. Rope and string will produce a wiggly, nervous effect, because the ends cannot be controlled in the same tight way as those of a pencil or pen point. Crumpled tinfoil, dipped into ink, can be used like a rubber stamp to lay in a tonal area and create an unusual texture simultaneously. Likewise, corn cobs, sponges, or other highly textured materials can give interesting tonal effects.
With pipe cleaners, you can make lines with the tip or you can drag the side across the page to get a rich, striated effect. You can achieve a similar effect with a toothbrush or a comb. Razor blades can be dragged across a wet area of ink or paint and, depending on the rhythm of the movements, they can be used to create endless variety of lines, tones, and textures. Razor blades can also be used to scratch into tonal areas after they are dry. Saliva might be the handiest source of moisture when you want to smudge an ink or pencil line in your sketchbook. And to these materials, I could also add paper straws, clothespins, tongue depressors, feathers, vegetables, sand, and orangesticks.
Although these suggestions may seem a little strange, I’ve seen all the materials used at one time or another. Actually, I feel that materials in and of themselves are very unimportant. Nevertheless, your attitude toward the materials is important, having a profound effect on your approach to drawing,
ATTITUDE TOWARD YOUR TOOLS
All too often, materials become an inhibiting factor for the beginning student. Instead of “bending with the material,” instead of seizing upon the terrific potential inherent in the materials, the beginner too often allows the materials to create a wall between himself and the paper.
Oh, that paper! That beautiful, spotless, white sheet of paper! It’s so unfair to destroy it, to make a mark on it! To smudge it! I’ve heard of one drawing teacher who makes his beginning students crumple and step on their drawing paper before they start to draw. What’s the point? Being free and unafraid is the point; his method helps to smash the inhibiting barrier of the beginner’s precious attitude toward the tools. After all, they are only tools, an extension of your hand, a means of making tangible what you are, think, feel, and see!
For many years, I had my students do most of their work on newsprint, giving them an occasional exercise to do on a better grade of drawing paper. Invariably, when they switched from the newsprint, their drawings would become tight, stiff, cramped, and precious. Recently, I’ve insisted that they do all their work on an inexpensive bond paper, not quite as inferior as newsprint. This request has produced a remarkable change in their attitude. They continue to understand that each drawing is merely an exercise, an experience, and perhaps a discovery. The transition from working on a cheap, inferior paper to one with some quality has been made less of a gap and their attitude is much freer.
RESPECT AND CRAFTSMANSHIP
By saying these things, I don’t want to imply that I lack respect for materials, or that I have a sloppy attitude toward craftsmanship. On the contrary, I’m encouraging a drive for greater respect and craftsmanship which springs from a deep knowledge and sympathy for the possibilities and limitations inherent in all materials, whether they are scraps, free, cheap, or extremely expensive.
USE THE WHOLE ORCHESTRA
So, I ask you not to worry too much about materials — at least in the beginning. Below is a list of materials I suggest to my students and which, much to their chagrin, I require them to bring to each class. You never know when you’ll want to hit another note on the violin and no string should be missing when you reach for it.
PAPER
The variety of papers available is practically endless. It’s an important factor, since the type of paper you use affects the character of your drawing just as much as the tool you draw with. The character of a pen line is entirely different on a hard, smooth paper from that on a soft, rough surface. Experiment with as wide a range of papers as you can obtain.
I generally recommend an 18 x 24 bond paper pad which has a fairly smooth surface and is satisfactory for pencil, Conté, pen, and brush drawings. Charcoal paper in approximately 18 x 24 sheets or pads has a rough or grained surface and is excellent for charcoal, pastel, and chalk drawings. You can buy charcoal paper in a variety of colors in addition to white. Furthermore, you should have a medium weight, all-purpose drawing paper with a medium surface, paper which can be used with almost any material suggested. I find 19 x 24 sheets of Strathmore Alexis quite satisfactory for this purpose.
It’s more economical to buy paper in bulk rather than in pad form or by the single sheet. Some papers are offered in packages of one hundred sheets, but more often paper is sold by the ream (500 sheets). Paper is graded by its weight per ream. A 60 lb. drawing paper means that a ream should weigh 60 lbs., a fairly lightweight paper. A sheet of 140 lb. paper is almost like a lightweight cardboard.
SKETCHBOOK
Sketchbooks are available in all sizes with either spiral or sewn bindings. I like my students to use a 9 x 12 sketchbook or larger since the smaller sketchbooks seem restricting. You should have your sketchbook with you at all times; it should become a part of you; in fact, you should feel “undressed” without it.
PENS AND INK
There are a number of good drawing inks available. Perhaps the most widely used is black India ink, which is waterproof and therefore excellent for wash drawings in which you build up layer on layer of tone. Although standard black and sepia (a brown tone) are the most popular, drawing inks come in a wide range of colors.
Pen points come in a vast array of widths, shapes, and flexibilities. They demand experimentation though I usually recommend a crowquill pen which is delicate and flexible. I also recommend Gillott #290 and Speedball lettering pens numbered A-5, A-3, A-1, B-6, B-3, C-6, C-3, C-1.
There are at least several dozen varieties of felt or nylon tip marking pens on the market, all of which seem to produce a slightly different line. They now come with both waterproof and water soluble ink. I personally prefer the water soluble variety since you can produce a variety of tones by smudging a line with a little water.
Bamboo pens, which are literally what the name implies, produce a very beautiful line. They are inexpensive, so I suggest you purchase several different sizes.
There are several artist’s fountain pens on the market which use either regular writing ink or India ink. Since these pens have a flexible point which allows for a wide variation in line quality, I recommend them over the popular Rapidograph, a fountain pen with a variety of different points. If you want a wide line with the Rapidograph, you have to change points.
PENCILS AND GRAPHITE
Drawing pencils are manufactured in eighteen different degrees, ranging from 9H (the hardest point which produces the lightest line) to 7B (the softest point which produces the darkest tones). You might start by purchasing a 6B, 4B, 2B, HB, 2H, 4H, and 6H.
Chisel-pointed sketching pencils also produce an interesting line and I recommend a 2B, 4B, and a 6B.
Graphite also comes in solid, rectangular sticks measuring about ½ x ¼ x 3”. You can use the edge of graphite sticks to produce wide tones and the tip to produce lines.
CHALK AND CHARCOAL
Charcoal is produced in three forms: a natural vine form; a compressed chalk-like form; and in the form of a wooden pencil. All charcoals come in soft, medium, and hard. Personally, I don’t find the vine variety as useful as the other two.
Layout chalk is useful for developing a variety of middle tones in your drawings because the chalks come in both warm and cool grays. They are commonly sold in a box of eight shades.
Colored chalk and pastel are sold in sets ranging from a twelve-color assortment to one hundred fifty-color assortments. They may also be purchased individually in large art supply stores. Purchase whatever you can afford.
CRAYONS
School-type wax crayons are useful, but I believe they have been largely superseded by oil base crayons, such as Cray-Pas or Sketcho, which can be mixed, smudged, and blended to achieve a variety of new colors and textures. The larger the set you purchase, the greater the range of possible expression.
Conté crayons produce a line and tonal quality lying halfway between charcoal and crayons. Conté crayons are produced in hard, medium, and soft, and in black, sanguine, and white.
Lithographic crayons are a grease crayon used mainly for producing graphic prints on stone or zinc plates. They are also fine for drawing on paper and I suggest that you experiment with #0, #2, and #3.
ERASERS
There are three basic types of erasers: the gum eraser, very soft and pliable, will not damage the surface of the paper; the kneaded eraser, also soft and pliable, can be molded like clay into any point or shape and is especially useful for erasing chalk, pastel, or charcoal; the soft pink pencil eraser erases regular pencil lines.
BRUSHES
It’s extremely difficult to recommend specific brushes since any wide assortment of soft camel hair brushes and stiff bristle brushes is really adequate. Sable brushes are preferable to camel hair brushes but extremely expensive. Most of my students use medium priced camel hair brushes with satisfactory results. In your initial equipment, I suggest you include one inch and two inch varnish or enamel brushes of the dime store variety; #3 and #7 flat, white bristle brushes; #3, 7, 9, and 12 red sable or camel hair brushes; and a #11 bamboo brush which is the type that the Japanese use to produce their beautiful calligraphy.
MISCELLANEOUS
Here are some additional items of equipment that I’m sure will be valuable to you.
Drawing paper which comes in rolls of ten yards by 42 inches is marvelous for loosening up and doing really large drawings. Black and white tempera or show-card color is useful. Newsprint paper, which comes in 18 x 24 pads or packages, is the most inexpensive paper available and you might want to use it for your rapid gesture drawings.
A drawing board large enough to accommodate your 18 x 24 paper is a convenient item. Since the regular, manufactured drawing board is fairly expensive, I recommend a piece of Masonite or plywood (from the lumber yard) as a sufficient substitute.
Masking tape always comes in handy.
Plastic fixative spray, which comes in 12 oz. spray cans, is convenient for fixing (making permanent) chalk, charcoal, and pastel drawings.
Razor blades are necessary for sharpening your pencils, which are “eaten up” in regular pencil sharpeners.
Used as a container for water, a coffee can is perfect.
A large mixing tray or palette is a vital piece of equipment for certain media. Cookie tins serve this purpose very well.
The best means of storing all the above equipment is in a good-sized fishing tackle box.
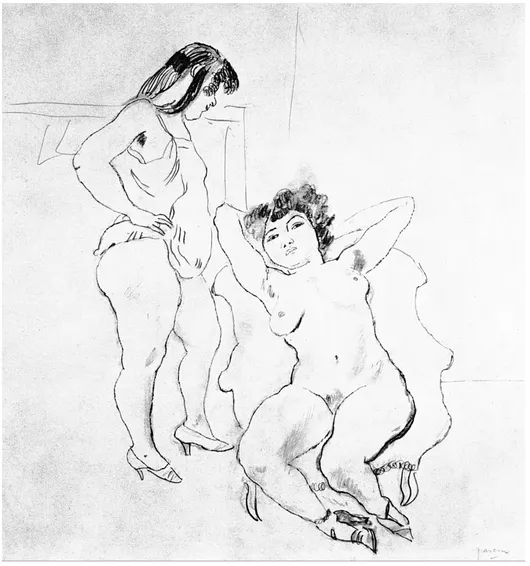
JULES PASCIN
Two Nudes
Pencil
19-1/2” x 18”
Philadelphia Museum of Art.
These women are hardly what you’d call “ideal beauties!” Pascin’s line, like that of George Grosz, is as sharp as a dull razor and can cut with a vengeance. Are these “accurate” drawings? They ...