- 182 pages
- English
- ePUB (mobile friendly)
- Available on iOS & Android
eBook - ePub
Marine Painter's Guide
About this book
Ships and the sea have been an inspiration to artists since the earliest of times, as paintings by ancient Egyptians, Greeks, and Romans testify. This book by a noted maritime artist and teacher will serve as an excellent guide for beginners and intermediate painters. And for would-be artists interested in going beyond the painting of ships, there are other subjects to consider: beaches, fishing villages, the surf, a rocky coastline, and the open sea.
The first painter's manual to cover such a wide variety of maritime subjects, this volume offers something for everyone—some technical details and ideas as well as what to do and what not to do. There's an abundance of practical advice on portraying a vast number of subjects—from docks, sea gulls, fishermen and their vessels to close-ups of ships' hulls, masts, and rigging. Useful tips on perspective, composition, and reflections (the hardest element in a marine setting to reproduce) are accompanied by diagrams and drawings, while step-by-step guidelines help artists capture the essence of an ocean scene and inject more realism into their work.
The first painter's manual to cover such a wide variety of maritime subjects, this volume offers something for everyone—some technical details and ideas as well as what to do and what not to do. There's an abundance of practical advice on portraying a vast number of subjects—from docks, sea gulls, fishermen and their vessels to close-ups of ships' hulls, masts, and rigging. Useful tips on perspective, composition, and reflections (the hardest element in a marine setting to reproduce) are accompanied by diagrams and drawings, while step-by-step guidelines help artists capture the essence of an ocean scene and inject more realism into their work.
Tools to learn more effectively

Saving Books

Keyword Search

Annotating Text

Listen to it instead
Information
Topic
ArtSubtopic
Art Techniques
1
Materials
There is no special equipment for marine painting—only what is necessary for any other subject matter. As in any form of art or craft, it pays to use the best materials. Unlike most manufactured articles, the cost of paint and canvas compared to the value of the finished product is minuscule. Time, skill, and knowledge are the big factors. So don’t waste effort by using poor supplies. The quick sketch done in haste on a piece of cardboard may turn out to be a little gem—and afterwards you may wish you had used better stuff to work on. Workers in wood and metal and other craftsmen insist on good tools and materials, and so should you.
These days oil paints are almost all of a good grade and meet the requirements of the Artist Oil Color Standard issued by the National Bureau of Standards of the U.S. government. Where they differ most is in the percentage, if any, of fillers mixed in with the pure pigment. The fillers are neutral substances that are mixed in (coprecipitated) with the pigment to give more bulk. There is nothing wrong with such paints; they just are not as strong—they don’t have as much tinting power when mixed with white as paints composed of pure pigment. They are also not as expensive. Labels on tubes of paint must tell you the composition. The vehicle—the liquid mixed with the dry pigment—is usually linseed oil and probably varies little in quality from one maker to another. What often does vary is the amount of vehicle. Some paints are definitely mushier than others. Usually the more expensive brands are firmer.
Some pigments are more permanent, are less likely to fade or blacken, than others, and these gradations of permanency are shown in the color charts of most recognized color makers. Colors differ slightly from one manufacturer to another. Find the ones you like and stick with them.
So much for the colors themselves. Now for what you put them on. Let’s get a couple of terms straight first. The canvas, board, panel, or whatever, is the support; the coating of white lead or gesso is the ground. Commercially primed canvas is usually tacked on wooden frames, or stretchers, so called because the interlocking ends provide room for little wooden wedges or keys. When tapped in place, they can, if desired, stretch a canvas drum tight.
Most artists seem to prefer the bounce that they get when painting on a stretched canvas. As it happens, I don’t, so I glue my canvas on Masonite or smooth quarter-inch mahogany plywood. Prepared canvas boards, mostly cotton covered, I avoid, because the cardboard on which they are mounted is not made with permanence in mind. They are fine for students, though, who often wipe off a painting at the end of the day’s session and reuse the board several times.
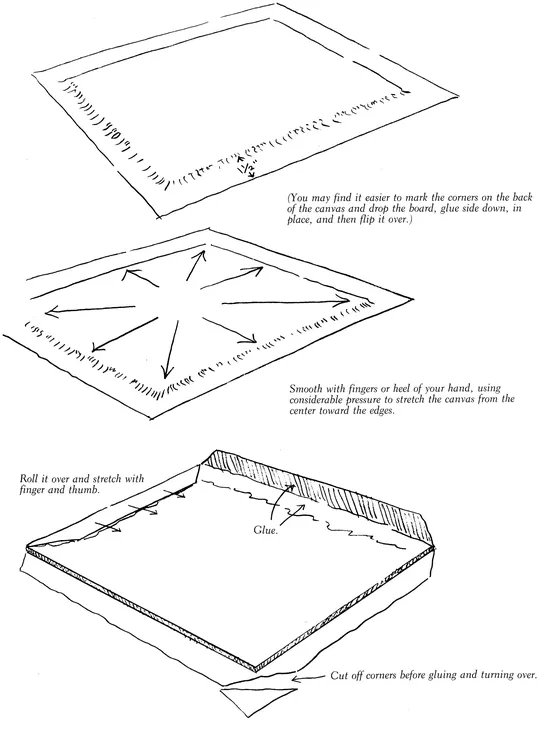
I usually buy unprimed linen, which has a more varied and interesting texture than cotton, and size it after it is glued to the board. If you want to try this, roughen the surface of the Masonite (don’t use the tempered variety) with sandpaper, then give it a generous coat of rabbit-skin glue dissolved in hot (not boiling) water. A cheap egg beater does a good job of stirring it up so that there are no lumps. While working with rabbit-skin glue, keep it warm in a double boiler. After the first coat is dry, cut the canvas an inch and a half larger than the board on all sides, give the board another good coating of glue, then lay the canvas in place in the center and smooth it out, starting from the middle and working toward the edges. Turn the canvas face down, make a diagonal cut across each corner, apply glue liberally to the edges, and fold over. Put a weight in the middle to hold the board flat while the glue is drying.
The priming is a matter of choice. White lead, thinned a bit with turpentine, can be used, or a prepared gesso. I use acrylic gesso (it isn’t really gesso, but it’s pretty thick). Thin the first coat a bit (follow the directions on the can) and paint the back of the board as well as the canvas. Work it into the weave of the canvas with a stiffish brush. When it’s dry, sand the canvas side very lightly with fine sandpaper and apply a second coat without thinning. If you like a tinted canvas, mix some acrylic paint—maybe burnt umber and a little black—with the second coat.
Sometimes I prefer a smooth surface and paint directly on a Masonite panel, priming it with at least two coats of acrylic gesso sanded slightly after each coat.
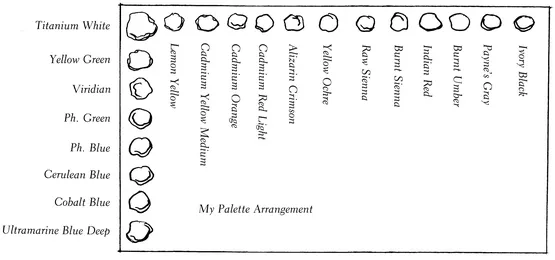
The choice of colors is up to the individual artist. I use ultramarine blue, cobalt blue, cerulean blue, phthalocyanine blue, phthalocyanine green—these last two are sometimes sold under a maker’s brand name—viridian and a yellow green such as Grumbacher’s Thalo Yellow Green, lemon yellow, cadmium yellow medium, cadmium orange, cadmium scarlet or cadmium red light, alizarin crimson, yellow ochre, raw sienna, burnt sienna, Indian red, burnt umber, Payne’s gray, and ivory black. To these I may add other colors, depending on the painting. I always arrange my colors on the palette in the order given above, starting in the lower left-hand corner. White goes in between the yellowish green and the greenish yellow. Whatever order you use, stick to it so that you automatically reach for the same spot when you want a color.
When painting outside, which I seldom do, use the palette which fits in your sketch box. In the studio I use a sizeable piece of heavy glass painted light gray on the underside. If I forget to clean it after a day’s painting, a very sharp putty knife or a razor blade in a holder will do a good job. If some small bits of dried paint remain, I scrub it with a little steel wool dipped in turpentine.
For sketching outside there are some very fancy (and expensive) collapsible easels on the market. Sliding a canvas board, though, into the slots provided in the lid of the sketch box and sitting on the ground with the box between the knees works quite well. As I never do more than sketch outdoors, this method works for me, but those who prefer to work on a stretched canvas or on a prepared board larger than the box will need something more elaborate.
I made my easel, but you don’t really need anything as heavy or as complicated as what I have. There are many good easels on the market. My wife prefers one of the aluminum types, very light yet sturdy and easily transportable.
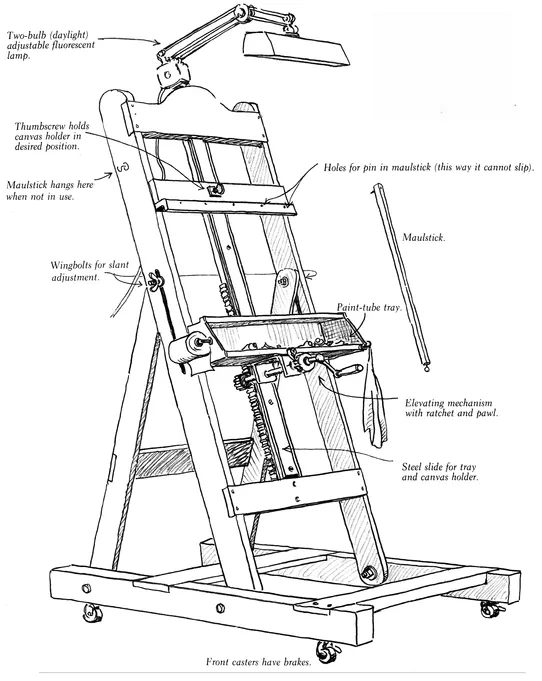
My studio easel is of the crank-up variety, with a shelf for tubes of paint, a hook or two for rag or paper cleaners—I like the heavy-duty type used in garages and machine shops—and on one side a holder for a roll of toilet paper (very useful for wiping knives and small but messy cleanup jobs).
Paints may be thinned with a medium. Depending on the nature of the support I am working on and the effect I am trying to get, I often do not use any medium at all. Most paints are mushy enough without adding medium. Usually when working with a painting knife, I use the paint as it comes out of the tube. When I do want to thin paints, I use a mixture of five parts turpentine and one part copal varnish or stand oil. There are many mediums on the market, as well as the old standby, half linseed oil, half turpentine. The main thing to remember is to work fat over lean—that is, to use medium with less oil in proportion to turpentine in the underpainting. When that is thoroughly dry, you can safely overpaint with a fatter mixture. Of course, this doesn’t apply when painting alla prima (wet into wet).
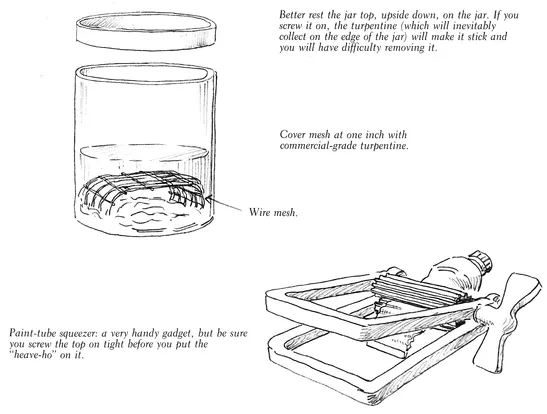
Keep a separate container for your cleaning turpentine and use it often. Dirty brushes produce dirty colors. There are several brush cleaning gadgets on the market, but one of the most efficient and certainly the most inexpensive is a widemouthed jar—a large-size peanut butter container is a natural—and either an open-mesh strainer with the handle removed or a piece of quarter inch mesh wire in the bottom. Keep enough turpentine—not the rectified kind sold in art stores; the commercial variety from a hardware store is cheaper—in the jar to cover the wire by at least an inch. When a brush is gently rubbed over the mesh, the gunk will settle to the bottom and can be easily cleaned out at intervals.
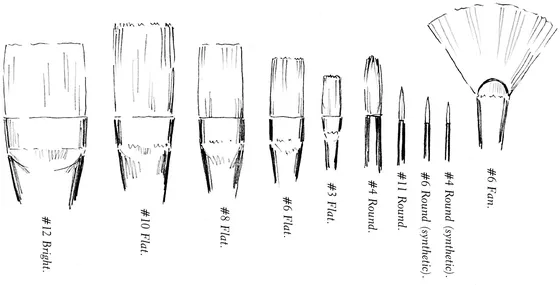
Brushes are important to me and I’m not happy painting with any but the best. Bargain brushes seldom hold their shape and are a definite handicap. With this assortment (bristle, unless otherwise noted) you can paint just about anything. You will surely accumulate more brushes in time. Just for fun I counted mine: 273, not including dozens of watercolor brushes! Some of them are pretty ancient, but still useful. Synthetics have to a great degree replaced sables although the latter are softer. Brights give narrow sharp edges, which are very useful for painting rigging and certain details.
I have not shown a filbert (longer and more flexible than a flat, but not an egbert, which is longer still). These latter are useful for dragging wet across wet, as are the fans. I use egberts sometimes when pulling foam streaks down a wave, but don’t put them on your “must” list. Lots of painters have never even heard of them.
A tip on brushwork: don’t let paint accumulate on your brush. Keep it reasonably clean with your rag and when you go to load it, pick up a good dab on the tip. A mess of paint half-way down to the ferrule won’t get you anywhere. For that reason I do a lot of mixing on my palette with a knife and use the brush mainly for applying it.
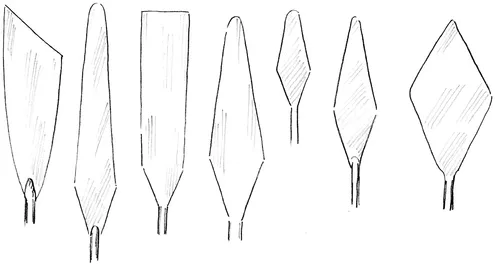
Some painting knives—actual size. I find the one second from right paticularly useful.
Another gadget I prize is a tube squeezer or roller. Insert the end of the tube between the rollers, close, turn the knob, and presto! The paint is forced up the tube toward the top where it belongs, and the bottom—usually a tube’s weak spot—can be rolled up neatly. This method is good for toothpaste, too.
The well-equipped sketchbox should also contain a small pair of pliers (cheap ones will do) for removing recalcitrant tube caps. If the pliers don’t do the job easily, don’t use brute force—you may tear the whole top off the tube. Carry matches in your box as well, and “toast” the cap until the pliers can remove it easily.
There are numerous comforts that add to the pleasure of painting outdoors—stools, umbrellas, hampers of refreshments. Unfortunately, the most scenic spots are often the most inaccessible, and unless you plan a safari, complete with bearers for your gear, my advice is to travel as light as possible. A waterproof cushion or small groundsheet—(ground is often damper than it looks)—is a good idea and so is a spray can of bug repellent.
Returning from a painting session outdoors, you will need some way of carrying your wet canvas. Canvas separator clips are available. These will hold two canvases face to face without letting them touch. Also available are canvas pins—double-pointed pins in a plastic or wood base—but with these you must use a strap to hold the canvases together. Clips are better.
Last, but decidedly not least, let’s talk about brushes. I can paint on practically anything, using almost any kind of paint, but if I don’t have a really good brush, I’m lost. A good brush (and sad to say, even the best aren’t as good as they used to be) should be resilient and keep its shape well and should be able to deposit the required quantity of paint on the canvas exactly as and where you wish.
One develops one’s preferences over the years, and of the bristle brushes I happen to like those made by Simmons. For laying in I usually use a large bright (brights are short bristled, thinnish, and flat). For the actual painting I find flats (thicker and longer) serve best, and I often supplement these with filberts, which are a little longer and more flexible than flats and have oval-shaped tips. For small paintings on fine-tooth canvas or panels (eight by ten inches, nine by twelve, eleven by fifteen), I often use soft brushes, rounds as well as flats, of either sable or the new synthetics. Only experience will show you which sizes, shapes, and brands will suit your particular style of working. But be sure you buy the best. Despite the lists of equipment, including brushes, that are furnished each new student in my classes, several inevitably show up with the sorriest affairs, mostly in the wrong sizes and with tips already splayed out like a worn house painter’s brush. It is quite impossible for the average student to accomplish anything with tools like these, and the end result is frustration and disappointment. Fortunately, many of the people who appear with these monstrosities don’t heed my brush-cleaning drill, either, so in a very short time the brushes harden into chisels and have to be thrown away. A first cleaning with rag and turpentine, followed by thorough but gentle washing with mild soap and warm water will preserve a well-made brush for a long time.
Despite possessing large pots full of a variety of brushes, acquired over a considerable period...
Table of contents
- Title Page
- Dedication
- Copyright Page
- Table of Contents
- Introduction
- 1 - Materials
- 2 - Hulls
- 3 - Masts and Rigging
- 4 - Sails
- 5 - Painting Water
- 6 - Skies
- 7 - Freighters and Tugs
- 8 - Fishing—Vessels, Methods, and Men
- 9 - Docks, Piers, and Pilings
- 10 - Signposts of the Sea
- 11 - Peopling Your Pictures
- 12 - Gulls
- 13 - Picture Planning
- Index
Frequently asked questions
Yes, you can cancel anytime from the Subscription tab in your account settings on the Perlego website. Your subscription will stay active until the end of your current billing period. Learn how to cancel your subscription
No, books cannot be downloaded as external files, such as PDFs, for use outside of Perlego. However, you can download books within the Perlego app for offline reading on mobile or tablet. Learn how to download books offline
Perlego offers two plans: Essential and Complete
- Essential is ideal for learners and professionals who enjoy exploring a wide range of subjects. Access the Essential Library with 800,000+ trusted titles and best-sellers across business, personal growth, and the humanities. Includes unlimited reading time and Standard Read Aloud voice.
- Complete: Perfect for advanced learners and researchers needing full, unrestricted access. Unlock 1.4M+ books across hundreds of subjects, including academic and specialized titles. The Complete Plan also includes advanced features like Premium Read Aloud and Research Assistant.
We are an online textbook subscription service, where you can get access to an entire online library for less than the price of a single book per month. With over 1 million books across 990+ topics, we’ve got you covered! Learn about our mission
Look out for the read-aloud symbol on your next book to see if you can listen to it. The read-aloud tool reads text aloud for you, highlighting the text as it is being read. You can pause it, speed it up and slow it down. Learn more about Read Aloud
Yes! You can use the Perlego app on both iOS and Android devices to read anytime, anywhere — even offline. Perfect for commutes or when you’re on the go.
Please note we cannot support devices running on iOS 13 and Android 7 or earlier. Learn more about using the app
Please note we cannot support devices running on iOS 13 and Android 7 or earlier. Learn more about using the app
Yes, you can access Marine Painter's Guide by Jack Coggins in PDF and/or ePUB format, as well as other popular books in Art & Art Techniques. We have over one million books available in our catalogue for you to explore.