- 192 pages
- English
- ePUB (mobile friendly)
- Available on iOS & Android
eBook - ePub
Freehand Perspective and Sketching
About this book
The essential guide to rendering perspective, Freehand Perspective and Sketching uses a series of illustrated exercises and explanations to help artists master one of art's greatest challenges. Generations of art students and amateurs have found it an indispensable resource of the time-honored principles and methods that empower artists to express themselves.
More than 260 figures offer precise demonstrations in the representation of shapes, shadows, angles, and proportion. Author Dora Miriam Norton discusses how to combine these elements to create realistic-looking compositions, focusing primarily on the techniques of proportion and foreshortening. Freehand sketching, she explains, means drawing by the trained eye and judgment. This book provides a foundation of definite knowledge that enables artists to draw items individually or in groups without needing to see actual models.
More than 260 figures offer precise demonstrations in the representation of shapes, shadows, angles, and proportion. Author Dora Miriam Norton discusses how to combine these elements to create realistic-looking compositions, focusing primarily on the techniques of proportion and foreshortening. Freehand sketching, she explains, means drawing by the trained eye and judgment. This book provides a foundation of definite knowledge that enables artists to draw items individually or in groups without needing to see actual models.
Frequently asked questions
Yes, you can cancel anytime from the Subscription tab in your account settings on the Perlego website. Your subscription will stay active until the end of your current billing period. Learn how to cancel your subscription.
No, books cannot be downloaded as external files, such as PDFs, for use outside of Perlego. However, you can download books within the Perlego app for offline reading on mobile or tablet. Learn more here.
Perlego offers two plans: Essential and Complete
- Essential is ideal for learners and professionals who enjoy exploring a wide range of subjects. Access the Essential Library with 800,000+ trusted titles and best-sellers across business, personal growth, and the humanities. Includes unlimited reading time and Standard Read Aloud voice.
- Complete: Perfect for advanced learners and researchers needing full, unrestricted access. Unlock 1.4M+ books across hundreds of subjects, including academic and specialized titles. The Complete Plan also includes advanced features like Premium Read Aloud and Research Assistant.
We are an online textbook subscription service, where you can get access to an entire online library for less than the price of a single book per month. With over 1 million books across 1000+ topics, we’ve got you covered! Learn more here.
Look out for the read-aloud symbol on your next book to see if you can listen to it. The read-aloud tool reads text aloud for you, highlighting the text as it is being read. You can pause it, speed it up and slow it down. Learn more here.
Yes! You can use the Perlego app on both iOS or Android devices to read anytime, anywhere — even offline. Perfect for commutes or when you’re on the go.
Please note we cannot support devices running on iOS 13 and Android 7 or earlier. Learn more about using the app.
Please note we cannot support devices running on iOS 13 and Android 7 or earlier. Learn more about using the app.
Yes, you can access Freehand Perspective and Sketching by Dora Miriam Norton in PDF and/or ePUB format, as well as other popular books in Art & Art Techniques. We have over one million books available in our catalogue for you to explore.
Information
Chapter I
GENERAL DIRECTIONS
MATERIALS. — Any paper having a fine and fairly soft texture can be used. It should produce an even grain in both vertical and horizontal pencil strokes. Pencil exercises such as those reproduced in this book are usually drawn on paper of quarter imperial size (11” x 15”), on which at least an inch and a half of margin is allowed. This is a good size for the student’s drawings, whether copied from these exercises or drawn from objects. Have two pencils, one fairly soft (as No. 2 Faber, SM Dixon, or 2 B Koh-i-noor), and a harder one; also a good eraser.

FIG. 3
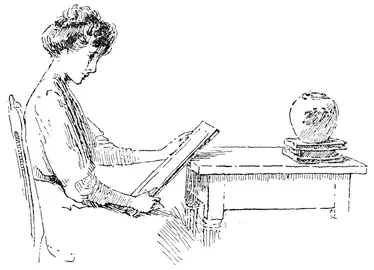
FIG. 4
Line Practice. — Cut the pencil like the illustration (Fig. 3), and rub on practice paper1 till a broad line, firm at the edges and transparent (that is, with the grain of the paper slightly showing through it) can be made. Sit erect, with the paper directly in front, and have the desk top inclined, or use a drawing board (Fig. 4), that the paper may be as nearly as possible parallel with the face. Hold the pencil almost flat, as in the illustration (Fig. 5), and as loosely as is consistent with a steady control. For horizontal lines use position A, Fig. 5, moving the pencil from left to right; for vertical lines use position B, moving from the top downward. Practice vertical, horizontal, or oblique lines persistently; moving the hand freely from the shoulder, not resting it on the wrist or elbow. If the muscles acquire an unpleasant tension, relax by dropping the hands at the sides and loosely shaking them. Unfamiliar or difficult exercises should be first carefully sketched with a thin, light line. If wrong, draw over without erasing until a satisfactory form is obtained. Erase the incorrect part, and render expressively (Ch. IV). But after the composition of the exercise is planned, such straight lines as margins, cylinder sides, and many ellipses may be drawn in full at once. And as the student gains in skill, more and more of the work should at the first touch be put on the paper as it is intended to remain. Exact knowledge is to be acquired only that artistic interpretations may be expressed with ease and certainty.
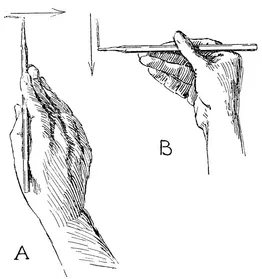
FIG. 5
Models for Work. — Objects in common use have been chosen for most of these exercises. Geometric solids are assigned only as needed for the clearer elucidation of perspective truths. Necessary models, as the cylinder, the cube, and others, should be made by the student as directed. For forms (as the hexagonal frame) too complicated to be easily made, the well-known wooden models have been used. But after thorough mastery of the simpler forms, most of the later lessons can be understood without models.
Placing of Models. — All objects for study should be placed so as to present their vertical surfaces in nearly their true shape to the student. Thus if the model is to be near, as on the table at which the student sits, it is better to raise it a few inches (Fig. 4). This will not be necessary if it can be placed four or five feet distant. If the study is seen too much from the top, the perspective will be unpleasantly violent, as in a photograph where the camera has been pointed too much downward.
The Table Line. — To indicate a supporting surface under the objects a horizontal line (A, B in Fig. 6) is used. It stands for the back edge of the table or other horizontal supporting surface, and is called the Table Line. It should be represented as further back than any portion of the study. As will be observed later, it need not be used if the supporting surface is otherwise suggested, as by a cast shadow (Fig. 34).

FIG. 6
All Work Freehand. — All work is to be done freehand, that is, with no ruling, and no measuring other than by the eye and pencil.
Chapter II
PENCIL MEASUREMENT AND THE PICTURE PLANE
PENCIL Measurement. — Before studying the exercises which follow, the beginner should become familiar with Pencil Measurement. Place a book upright directly in front of the eye. With one eye shut and the arm at full length (to ensure a uniform distance from the eye) measure on the pencil held horizontally the apparent width of the book. Then turning the pen-cil, compare this distance with its height (Fig. 7). (It is better to take the smaller distance first, and to measure it into the larger.) Compare the proportions so found with those obtained by actual measurement of the book. But always get the pencil measurement first, for this compels the eye to do all that it can unaided before showing by actual measurement how much better it can learn to do.
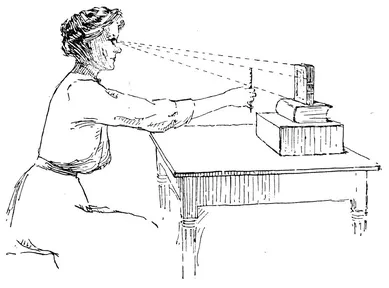
FIG. 7
Now turn the book away a little, and compare this new appearance of the width with the height (Fig. 12).
The Picture Plane. — Here we must learn to keep the pencil parallel with the face in order that the pencil measurement may be reliable. For this, go to the window, and stand facing the glass, so the face is parallel with it. Choose some object seen through the window, as another house, and resting the pencil against the glass measure its width and compare that with its height (Fig. 8).
Observe that if the outline of the house could be traced by the pencil on the glass it would form correctly the apparent shape of that house.
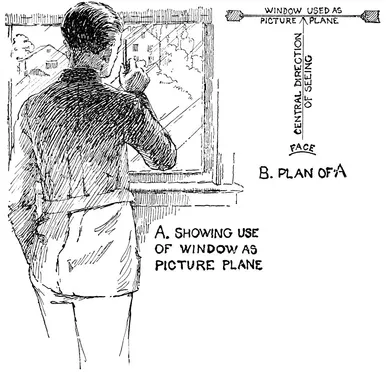
FIG. 8
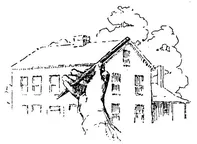
FIG. 9
This leads us to see that all perspective drawing may be regarded as placing on paper the equivalent of such a tracing on the glass. It will therefore be apparent at once that pencil measurement, to be correct, must be taken with the pencil held as if laid on such a pane of glass; or in other words, on a plane parallel with and in front of the face. This imaginary transparent plane is called the Picture Plane, and is a most important factor in all freehand drawing. Thus, by turning or revolving the pencil on the glass in front of the face, that is, by revolving the pencil in the picture plane, it can be made to cover the appearance of any possible line or direction. For example, the sloping gable edge of the outside house, though retreating from the eye and therefore foreshortened, can be covered by the revolving pencil (Fig. 9), thus giving the appearance or picture of its direction. Its apparent or foreshortened length can also be taken on the pencil and compared with any other dimension, as the height of the nearest corner. The essential requirement is that the pencil shall constantly lie flat on this pane of glass; that is, on the picture plane.
We have therefore, in the use of pencil measurement on the picture plane, a ready and accurate means of ascertaining any direction or any proportionate dimension seen by the eye. It cannot give us actual sizes, as the length of the gable in feet; but it will tell us how long the slanting line representing the gable must be drawn in proportion to other parts of the house. In this case, for instance, the sloping edge appears three-fourths of the gable width. The difficulty in using this ...
Table of contents
- Title Page
- Copyright Page
- Dedication
- Table of Contents
- INTRODUCTION
- Chapter I - GENERAL DIRECTIONS
- Chapter II - PENCIL MEASUREMENT AND THE PICTURE PLANE
- Chapter III - THE ELLIPSE
- Chapter IV - A CYLINDER AND A CYLINDRICAL OBJECT
- Chapter V - AN OBJECT ABOVE THE EYE AND THE CONE PRINCIPLE
- Chapter VI - A CREAM JUG
- Chapter VII - A TIME STUDY
- Chapter VIII - A GROUP OF CYLINDRICAL OBJECTS
- Chapter IX - CYLINDRICAL OBJECTS GROUPED WITH FRUIT
- Chapter X - A GROUP OF OBJECTS FROM MEMORY OR INVENTION
- Chapter XI - THE CYLINDER CONE AND BALL GROUPED — A PROBLEM FOR ORIGINAL STUDY
- Chapter XII - THE STUDY OF STRAIGHT-LINE OBJECTS
- Chapter XIII - DRAWING THE BOOK IN TWO POSITIONS
- Chapter XIV - THE BOOK WITH A CYLINDRICAL OBJECT
- Chapter XV - THE CYLINDER AND RECTANGULAR BLOCK — A PROBLEM FOR ORIGINAL STUDY
- Chapter XVI - THE FURTHER STUDY OF STRAIGHT-LINE OBJECTS — A CUBE AT ANGLES WITH THE PICTURE PLANE
- Chapter XVII - THE CUBE IN TWO DIFFERENT POSITIONS
- Chapter XVIII - A BOOK AT ANGLES TO THE PICTURE PLANE
- Chapter XIX - TWO BOOKS AT DIFFERENT ANGLES TO THE PICTURE PLANE
- Chapter XX - THE ACTUAL CENTER OF THE CIRCLE AND MEASUREMENT INTO THE PICTURE BY PARALLEL LINES
- Chapter XXI - BOOKS WITH A CYLINDRICAL OBJECT
- Chapter XXII - THE STUDY AND DRAWING OF A HOUSE
- Chapter XXIII - A BUILDING FROM THE PHOTOGRAPH OR A PRINT
- Chapter XXIV - TYPE FORMS HELPFUL IN UNDERSTANDING THE HOUSE — THE SQUARE FRAME
- Chapter XXV - THE SQUARE PYRAMID AND SQUARE PLINTH
- Chapter XXVI - THE SQUARE FRAME LEANING ON THE RECTANGULAR BLOCK — A PROBLEM FOR ORIGINAL STUDY
- Chapter XXVII - CYLINDRICAL OBJECTS WHEN NOT VERTICAL
- Chapter XXVIII - A GROUP OF FLOWER POTS
- Chapter XXIX - THE CIRCULAR FRAME IN A SQUARE FRAME
- Chapters XXX - A ROUND WINDOW
- Chapter XXXI - THE CLOCK A PROBLEM
- Chapter XXXII - THE ARCH
- Chapter XXXIII - INTERIORS — A ROOM PARALLEL TO THE PICTURE PLANE
- Chapter XXXIV - INTERIORS CONTINUED — A ROOM AT ANGLES TO THE PICTURE PLANE
- Chapter XXXV - FURTHER STUDIES OF INTERIORS
- Chapter XXXVI - A CHAIR
- Chapter XXXVII - THE HEXAGONAL PLINTH IN TWO POSITIONS
- Chapter XXXVIII - INTERIOR WITH A TILED FLOOR
- Chapter XXXIX - THE HEXAGONAL PRISM AND FRAME
- Chapter XL - THE TRIANGULAR PRISM AND FRAME — PROBLEM FOR ORIGINAL STUDY
- Chapter XLI - THE STUDY OF PARALLEL PERSPECTIVE
- Chapter XLII - A STREET FROM THE PHOTOGRAPH
- Chapter XLIII - EXCEPTIONS TO THE USE OF THE FLAT PICTURE PLANE
- Chapter XLIV - SHADOWS
- Chapter XLV - OUT—OF—DOORS WORK
- SOLUTIONS OF PROBLEMS
- INDEX