A sound knowledge of head and neck anatomy is essential for the safe and effective practice of clinical dentistry, and much clinically relevant and important anatomy can be learned by examining the living subject in conjunction with radiological images, especially those using CT reconstruction. This book bridges the gap between 'textbook' topographical anatomy and the anatomy of the living subject, as experienced in clinical practice. With detailed instructions on how to locate and examine anatomical structures, this practical guide encourages students to work together in small groups, examining each other and themselves as living models. As they progress through the book, students will become more confident about correlating living and radiological examination. The radiographic content utilises the latest forms of imaging and is intended to complement, where relevant, the topographical features in the living subject.
eBook - ePub
Living and radiological anatomy of the head and neck for dental students
- English
- ePUB (mobile friendly)
- Available on iOS & Android
eBook - ePub
Living and radiological anatomy of the head and neck for dental students
About this book
Trusted by 375,005 students
Access to over 1.5 million titles for a fair monthly price.
Study more efficiently using our study tools.
Information
–1–
Practical tips on head and neck examination
The subject should be seated comfortably and upright. Good general lighting and spot-lighting should be available to illuminate particular areas. A reflecting head-mirror with light source or pencil-torch will aid intra-oral inspection, and gloves should be worn for oral examination.
Palpation varies according to the structure to be examined. It can involve using only the tip of one finger; or the pads of one, two or three fingers; or the pad of the thumb. A pinch grip can be made between finger and thumb. Structures such as bony points can be palpated with a simple touch. Others, such as bony ridges, require a massage-type movement or finger pads need to be dragged across them.
Muscles are best demonstrated by putting them into action while resisting the movement they are producing. In this way, they may be seen under the skin or can be felt contracting. Small group activity is encouraged, in which one student acts as a model. However, some of the structures and procedures described can also be explored using self-examination. When examining radiographs (whether x-rays or scans), first note the plane in which they were taken; or, if 3D, the aspect taken of the head. A landmark such as a bony feature can be used to help identify further structures.
–2–
Bony landmarks
A skull (complete with mandible and cervical skeleton) should be available for frequent cross-reference to structures in the living subject as they are examined.
Anterior
The subject is seated and facing forward. The two nasal bones that form the bony bridge of the nose are felt by pinching the nose firmly between the thumb and index finger and sliding them up and down the bridge. Feel where the bridge joins the forehead, which marks the nasion. The prominence in the forehead immediately above the nasion is the glabella. Deep to this is the frontal air sinus (Figure 2.1).
The superciliary ridges extend laterally from the glabella, just above the upper margin of the orbit. To palpate the bony anterior nasal aperture, gently grip the soft tissues of the nostrils with the finger and thumb and push firmly backwards. The aperture presents as a sharp edge. If the pad of the thumb and middle finger are gently inserted into the nasal vestibules, one digit in each aperture, and then opposed, the anterior part of the nasal septum can be felt between them. It has a framework of cartilage which can be easily moved from side to side.
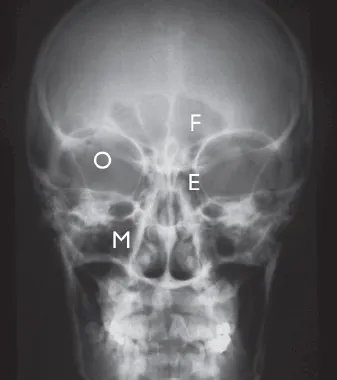
Figure 2.1 Frontal x-ray of head showing air sinuses
E = Ethmoids
F = Frontal sinus
O = Orbit
M = Maxillary sinus
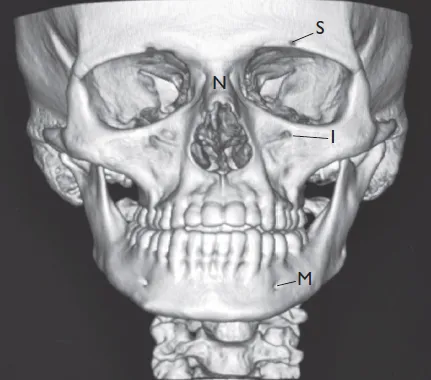
Figure 2.2 Frontal 3-dimensional CT reconstruction scan of skull
S = Supraorbital foramen
I = Infraorbital foramen
M = Mental foramen
N = Nasal bone
The whole orbital margin is sharp and can be traced using the pad of the middle finger. Starting superiorly, the frontal bone is felt, then laterally the zygoma, followed by the maxilla inferiorly. The medial margin is formed by the lacrimal bone but is less distinct. Deeper pressure here brings the fingertip close to the ethmoid air cells on the medial wall.
Foramina on the face
There are three foramina on the face (Figure 2.2) that can be palpated. They all lie on a vertical line touching the angle of the mouth. All are palpated using firm pressure with the pad of the index finger. The supraorbital foramen or notch lies on the superior orbital margin and close to the frontal air sinus. The infraorbital foramen is about 1cm below the inferior margin, on the facial surface of the maxilla. The maxillary air sinus lies immediately deep to this surface.
The mental foramen lies about 1cm above the base of the mandible. Note that a cutaneous sensory branch of each division of the trigeminal (5th cranial) nerve emerges through the respective foramina. These are: the supraorbital nerve from the ophthalmic division, the infraorbital nerve from the maxillary division, and the mental nerve from the mandibular division. These nerves are confirmed by applying very firm pressure over the appropriate foramen (Figures 2.3 and 2.4), which causes pain.
The final anterior landmark is the mental protuberance and this is palpable as a small prominence located in the midline, below the incisor teeth and adjacent gum on the body of the mandible.
Posterior
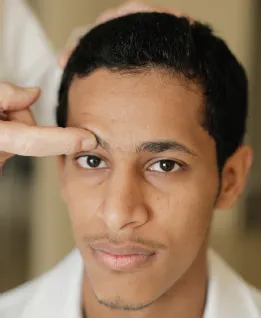
Figure 2.3 Palpating the supraorbital foramen
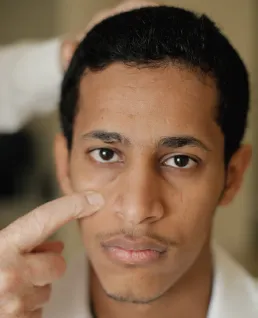
Figure 2.4 Palpating the infraorbital foramen
The subject is seated. The observer stands behind and the subject flexes the head downwards. Palpating in the midline over the occipital region using the pads of the index and middle finger, the prominence of the external occipital protuberance is located (Figure 2.7). This overlies the internal occipital protuberance and the location of the confluence of major intracranial venous sinuses.
The superior nuchal line can be traced laterally from the external protuberance, running in a gentle curve towards the prominent mastoid process (Figures 2.5 and 2.6). The mastoid process is easily palpable behind the lobule of the auricle (Figure 2.8), where the sternomastoid muscle is attached. The line itself is clearly demarcated by noting the point at which the soft tissues on the back of the neck give way to the firmness of the occipital bone above them. The lambda is a point on the vault of the skull in the midline, about 7cm above the external protuberance. It marks the junction of the two parietal bones with the occipital, and can be palpated as a small depression using firm pressure.
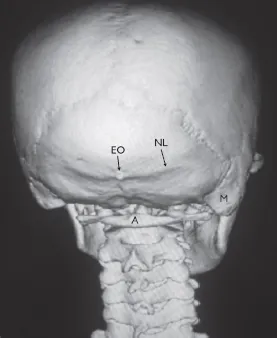
Figure 2.5 Posterior 3D CT reconstruction of skull
EO = External occipital protuberance
NL = Superior nuchal line
M = Mastoid p...
Table of contents
- Cover Page
- Title Page
- Copyright
- Contents
- List of figures
- About the authors
- Foreword
- Acknowledgements
- Introduction
- 1 Practical tips on head and neck examination
- 2 Bony landmarks
- 3 Testing the cranial nerves
- 4 Examining the buccal cavity and oropharynx
- 5 Examining the arterial pulses, salivary glands and lymph nodes
- 6 The temporomandibular joint (TMJ) and the muscles of mastication
- 7 Neck landmarks
- 8 Joints and movements of the head and neck
- 9 The scalp, ear and eye
- Further reading
- Index
Frequently asked questions
Yes, you can cancel anytime from the Subscription tab in your account settings on the Perlego website. Your subscription will stay active until the end of your current billing period. Learn how to cancel your subscription
No, books cannot be downloaded as external files, such as PDFs, for use outside of Perlego. However, you can download books within the Perlego app for offline reading on mobile or tablet. Learn how to download books offline
Perlego offers two plans: Essential and Complete
- Essential is ideal for learners and professionals who enjoy exploring a wide range of subjects. Access the Essential Library with 800,000+ trusted titles and best-sellers across business, personal growth, and the humanities. Includes unlimited reading time and Standard Read Aloud voice.
- Complete: Perfect for advanced learners and researchers needing full, unrestricted access. Unlock 1.5M+ books across hundreds of subjects, including academic and specialized titles. The Complete Plan also includes advanced features like Premium Read Aloud and Research Assistant.
We are an online textbook subscription service, where you can get access to an entire online library for less than the price of a single book per month. With over 1.5 million books across 990+ topics, we’ve got you covered! Learn about our mission
Look out for the read-aloud symbol on your next book to see if you can listen to it. The read-aloud tool reads text aloud for you, highlighting the text as it is being read. You can pause it, speed it up and slow it down. Learn more about Read Aloud
Yes! You can use the Perlego app on both iOS and Android devices to read anytime, anywhere — even offline. Perfect for commutes or when you’re on the go.
Please note we cannot support devices running on iOS 13 and Android 7 or earlier. Learn more about using the app
Please note we cannot support devices running on iOS 13 and Android 7 or earlier. Learn more about using the app
Yes, you can access Living and radiological anatomy of the head and neck for dental students by Professor P Harris, Rahul Arora, Mohammed Al-Ismally in PDF and/or ePUB format, as well as other popular books in Medicine & Dentistry. We have over 1.5 million books available in our catalogue for you to explore.