Practical Autodesk AutoCAD 2021 and AutoCAD LT 2021
eBook - ePub

Practical Autodesk AutoCAD 2021 and AutoCAD LT 2021

A no-nonsense, beginner's guide to drafting and 3D modeling with Autodesk AutoCAD

Yasser Shoukry, Jaiprakash Pandey

Share book
  1. 826 pages
  2. English
  3. ePUB (mobile friendly)
  4. Available on iOS & Android
eBook - ePub

Practical Autodesk AutoCAD 2021 and AutoCAD LT 2021

A no-nonsense, beginner's guide to drafting and 3D modeling with Autodesk AutoCAD

Yasser Shoukry, Jaiprakash Pandey

Book details
Book preview
Table of contents
Citations

About This Book

Publisher's note: This edition from 2020 is based on AutoCAD 2021 and AutoCAD LT 2021 and does not make use of the most recent AutoCAD features. A new second edition, updated for AutoCAD 2023 and AutoCAD LT 2023 including new topics, such as Floating drawing windows and the COUNT feature, has now been published.

Key Features

  • Explore the AutoCAD GUI, file format, and drawing tools to get started with CAD projects
  • Learn to use drawing management tools for working efficiently on large projects
  • Discover techniques for creating, modifying, and managing 3D models and converting 2D plans into 3D models

Book Description

AutoCAD and AutoCAD LT are one of the most versatile software applications for architectural and engineering designs and the most popular computer-aided design (CAD) platform for 2D drafting and 3D modeling. This hands-on guide will take you through everything you need to know to make the most out of this powerful tool, starting from a simple tour of the user interface through to using advanced tools.

Starting with basic drawing shapes and functions, you'll get to grips with the fundamentals of CAD designs. You'll then learn about effective drawing management using layers, dynamic blocks, and groups and discover how to add annotations and plot like professionals. The book delves into 3D modeling and helps you convert your 2D drawings into 3D models and shapes. As you progress, you'll cover advanced tools and features such as isometric drawings, drawing utilities for managing and recovering complex files, quantity surveying, and multidisciplinary drawing files using xRefs, and you'll learn how to implement them with the help of practical exercises at the end of each chapter. Finally, you'll get to grips with rendering and visualizing your designs in AutoCAD.

By the end of the book, you'll have developed a solid understanding of CAD principles and be able to work with AutoCAD software confidently to build impressive 2D and 3D drawings.

What you will learn

  • Understand CAD fundamentals using AutoCAD's basic functions, navigation, and components
  • Create complex 3d solid objects starting from the primitive shapes using the solid editing tools
  • Working with reusable objects like Blocks and collaborating using xRef
  • Explore some advanced features like external references and dynamic block
  • Get to grips with surface and mesh modeling tools such as Fillet, Trim, and Extend
  • Use the paper space layout in AutoCAD for creating professional plots for 2D and 3D models
  • Convert your 2D drawings into 3D models

Who this book is for

The book is for design engineers, mechanical engineers, architects, and anyone working in construction, manufacturing, or similar fields. Whether you're an absolute beginner, student, or professional looking to upgrade your engineering design skills, you'll find this AutoCAD book useful. No prior knowledge of CAD or AutoCAD is necessary.

Frequently asked questions

How do I cancel my subscription?
Simply head over to the account section in settings and click on ā€œCancel Subscriptionā€ - itā€™s as simple as that. After you cancel, your membership will stay active for the remainder of the time youā€™ve paid for. Learn more here.
Can/how do I download books?
At the moment all of our mobile-responsive ePub books are available to download via the app. Most of our PDFs are also available to download and we're working on making the final remaining ones downloadable now. Learn more here.
What is the difference between the pricing plans?
Both plans give you full access to the library and all of Perlegoā€™s features. The only differences are the price and subscription period: With the annual plan youā€™ll save around 30% compared to 12 months on the monthly plan.
What is Perlego?
We are an online textbook subscription service, where you can get access to an entire online library for less than the price of a single book per month. With over 1 million books across 1000+ topics, weā€™ve got you covered! Learn more here.
Do you support text-to-speech?
Look out for the read-aloud symbol on your next book to see if you can listen to it. The read-aloud tool reads text aloud for you, highlighting the text as it is being read. You can pause it, speed it up and slow it down. Learn more here.
Is Practical Autodesk AutoCAD 2021 and AutoCAD LT 2021 an online PDF/ePUB?
Yes, you can access Practical Autodesk AutoCAD 2021 and AutoCAD LT 2021 by Yasser Shoukry, Jaiprakash Pandey in PDF and/or ePUB format, as well as other popular books in Computer Science & CAD-CAM. We have over one million books available in our catalogue for you to explore.

Information

Year
2020
ISBN
9781789803761
Edition
1

Working with Hatches, Text, and Dimensions

A drawing is meaningless without annotations such as text and dimensions. So far, we have learned how to create drawings and manage large datasets using different drawing management tools, but we have not yet looked at any dimensioning tools. In this chapter, we will learn how to add annotations such as dimensions, text, and multileaders to our drawing, which make our drawing relevant. Along with annotations, we will also learn how to make Hatch patterns and colored gradients in our drawings.
By the end of this chapter, you will be able to add dimensions, text, and multileaders to any drawings, and you will have also learned how to modify them as per the drawing standards and specific requirements.
The following are the topics discussed in this chapter:
  • Filling an area with Hatches
  • Adding color gradients
  • Adding text to a drawing
  • Working with dimensions
  • Working with multileaders
So, let's begin this chapter by creating Hatches in our drawing.

Filling an area with Hatches

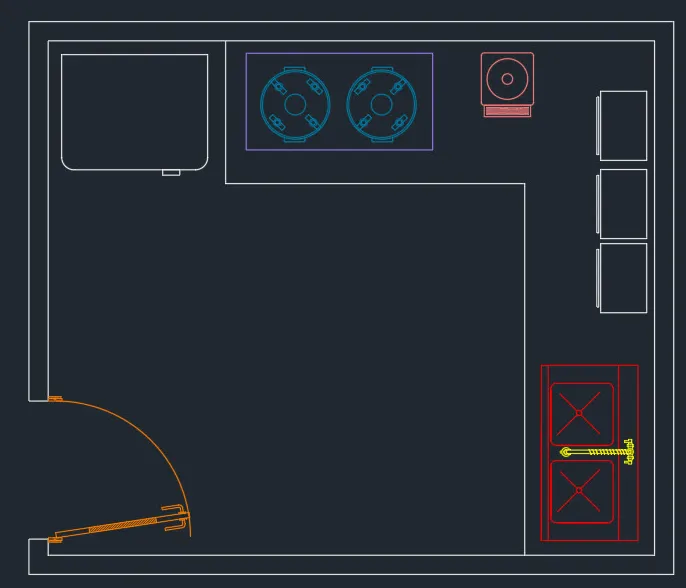
Using Hatches, you can add patterns in a closed area of a drawing. To understand the Hatch tool, I will use this sample drawing:
Fig 6.1: Sample drawing to be used for the Hatch tool
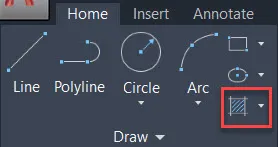
The Hatch tool is on the Draw panel of the Home tab, as shown in the following screenshot. In this case, I will apply Hatch patterns to the wall of the kitchen, the slab, and other places:
Fig 6.2: The Hatch tool on the Draw panel of the Home tab
To start the Hatch command, click on the Hatch tool from the Draw panel or use its command alias, H. Now, the command line will prompt you to specify a pick point and you will also see a temporary Hatch Creation tab, as shown in the following screenshot:
Fig 6.3: The Hatch Creation tab with Hatch tools
All the properties of the Hatch can be controlled with this Hatch Creation tab. The first panel on this tab is the Boundaries panel with two highlighted options, Pick Points and Select. The Pick Point option is selected by default and this option allows you to select a point in an area and then that enclosed area is selected. First, let's understand how pick point selection works and then we will look at the Select option in the next section.

Hatches with pick points

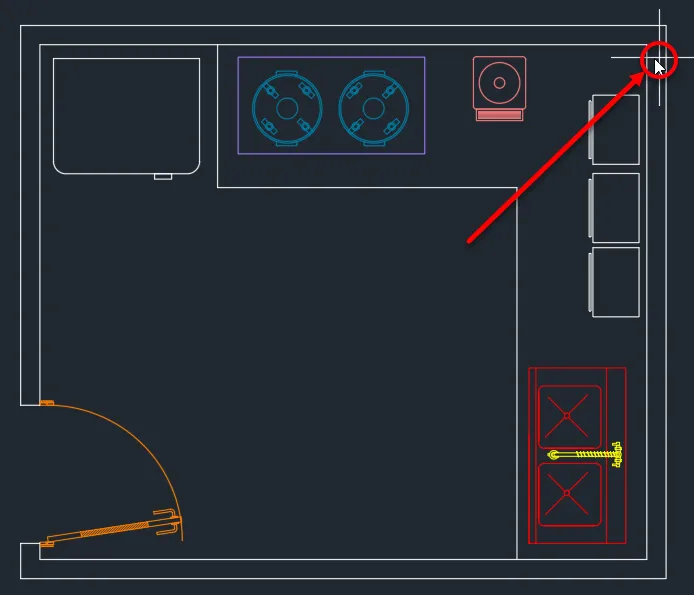
With the Hatch command active, click at a point inside the walls, as shown in the following screenshot:
Fig 6.4: Point inside the walls selected to create the Hatch pattern
You will notice that the insides of the walls are selected, and a preview will show up with the default Hatch pattern. This type of selection method is called island detection, where the Hatch command detects boundaries around the point where you click. Once you have a Hatch area selected, you can select the Hatch pattern.
All the predefined Hatch patterns are on the next panelā€”Pattern. Click the down-pointing arrow on the bottom right of the Pattern panel and the panel will expand to show the list of Hatch patterns:
Fig 6.5: The down-pointing arrow that expands the Hatch pattern panel
Click on any Hatch pattern from this list. In this case, I am selecting the ANSI31 hatch pattern from the pattern list. Now click at any point inside the walls and the ANSI31 pattern will be applied in it. If the Hatch pattern does not look right within the walls, then change the scale of the Hatch pattern to increase or decrease the gap between the ANSI31 Hatch pattern lines. The scale feature is on the Properties panel of the Hatch Creation tab, as shown in the following screenshot:
Fig 6.6: The Hatch scale field on the Properties panel
Increasing the scale will increase the gap between pattern lines and decreasing it will decrease the gap. In my drawing, I will keep the scale as 1 as it looks fine on the drawing:
Fig 6.7: Hatch pattern ANSI31 applied with a scale of 1 in drawing A and with a scale of 3 in drawing B
Once you are done making this Hatch pattern, click the Close Hatch Creation green checkmark to apply the Hatch settings and close the Hatch Creation tab. My final Hatch pattern looked like drawing A when added with a scale of 1; drawing B is the Hatch pattern with a scale of 3.
So, now you are familiar with the way pick points work, let's look at how the Select option works in Hatch creation.

Hatches with the Select option

Start the Hatch command and, this time, click on the Select option from the Boundaries panel of the Hatch Creation tab. You will notice that, now, the cursor will turn into a pick box instead of a point selection cursor, and you can now select a boundary instead of an "island." In this case, click on the boundary of one of the cabinets next to the sink and it will be selected. You can also make multiple selections for the Hatch.
So, select all three cabinet boundaries so that they are included in the selection set. If you want to remo...

Table of contents