![]()
1
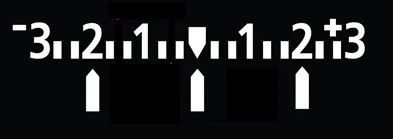
Aperture and Depth-of-Field
The aperture affects the depth-of-field, that is, what is in focus in front of and behind your focus point. At small apertures, or lens openings (illustrated by the graphic on the left of the illustration), we have more in focus than at wide apertures (illustrated by the graphic on the right).
Two other factors impact depth-of-field: One, the lens in use and the camera-to-subject distance. Two, the longer the lens and the closer you are to the subject, the shorter the depth-of-field.
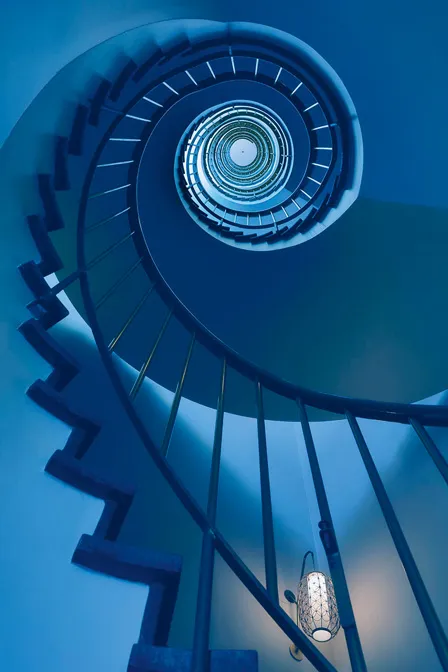
My goal here was to get the entire spiral staircase at my hotel in focus. A quick focusing tip: For maximum depth-of-field, use a wide-angle lens, small aperture, and set your focus 1/3 into the scene. [Exposure information: Canon 24–105mm IS lens set at 24mm, ISO 250, f/11, 1/10th of a second (camera mounted on a tripod).]
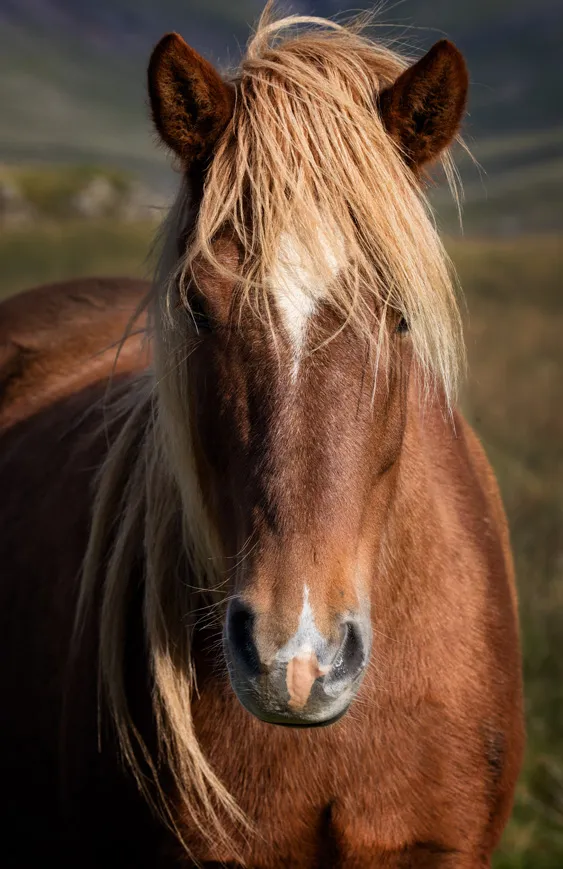
This Icelandic horse was standing about three feet away when I made this portrait. To get the horse’s head and mane in focus, and to blur his body and the distracting background, I experimented with different apertures. Experimenting with various apertures and shutter speeds on location is a good idea because sometimes you get so caught up with the moment that you don’t really know what is the best exposure for you. [Exposure information: Canon 100–400mm IS lens set at 200mm, ISO 200, f/11, 1/125th of a second.]
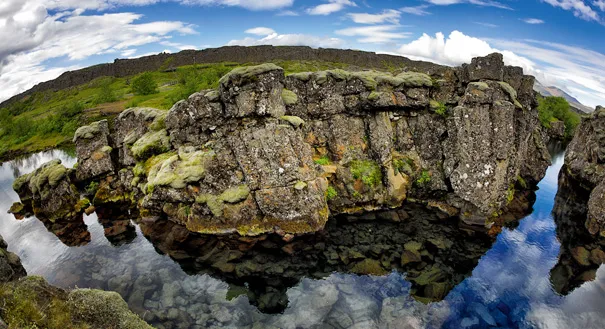
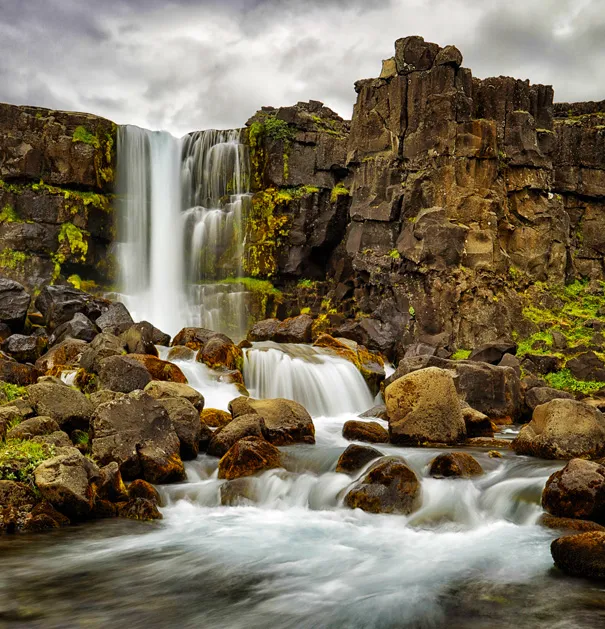
As I mentioned, wide-angle lenses offer more depth-of-field than telephoto lenses, and the wider the lens, the greater the depth-of-field. My goal here was to show the rocks, stream, foreground and background in this area of Iceland’s Thingvellir National Park all in sharp focus. Standing on a ledge just a few feet from the rock formation in the foreground I tried photographing with several different wide-angle lenses. The only lens that let me capture the entire scene was my Canon 15mm lens.
My Thingvellir National Park photograph is an in-camera HDR image. HDR was needed so I could capture detail in the shadow area in the foreground, while maintaining detail in the sky. My bracketing sequence was EV 0, EV −2, EV +2 with my starting point at the recommended exposure setting. The ISO was 320 and the aperture was f/7.
You will learn more about this process in the Exploring Exposure Modes chapter, but for now, when you choose the in-camera HDR mode you must be in the aperture priority mode so the depth-of-field remains the same throughout the HDR sequence. The camera automatically sets the EV +/− exposures by changing the shutter speeds.
Before we move on to shutter speeds I’d like to share with you an example of the importance of setting the aperture and how it relates to the focus point setting. Both pictures were taken in the aperture mode at the same setting, f/18. For the picture on the left I focused on the foreground statue. For the one on the right I focused on the background statue. Keep in mind that your focus point setting also affects what is in focus and what is not.
To check your focus, check your depth-of-field by using the depth-of-field preview button on your camera or by zooming in on the image on your camera’s LCD monitor.
A closing thought on aperture: An aperture of f/2.8 on a full frame camera is more like f/4 on a crop sensor. For example, a 50mm does indeed have the same perspective as the equivalent focal length of a 75mm lens (on a 1.5× crop sensor) assuming you don’t change position; however, the depth-of-field increases by about a stop.
![]()
2
Shutter Speed and Subject Movement
Shutter speed is about time—the time during which the shutter is open to record an image on an image sensor. That length of time affects subject movement.
Shutter speeds on digital SLRs and mirrorless cameras can range from 1/8000th of a second or so to as long as you want to leave the shutter open. Basically, you want fast shutter speeds to stop action when you or the subject are moving.
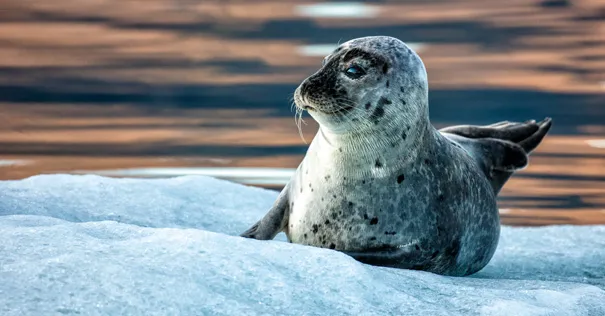
I photographed this seal in Iceland’s Jökulsárlón Glacier Lagoon while we were exploring by Zodiac. To prevent a blurry photograph caused by the movement of the boat and the telephoto lens factor (which exaggerates camera shake), I needed to set my ISO at 800 to get a shutter speed of 1/320th of a second, which is fast enough for a hand-held shot with my Canon 100–400mm IS lens set at 400mm.
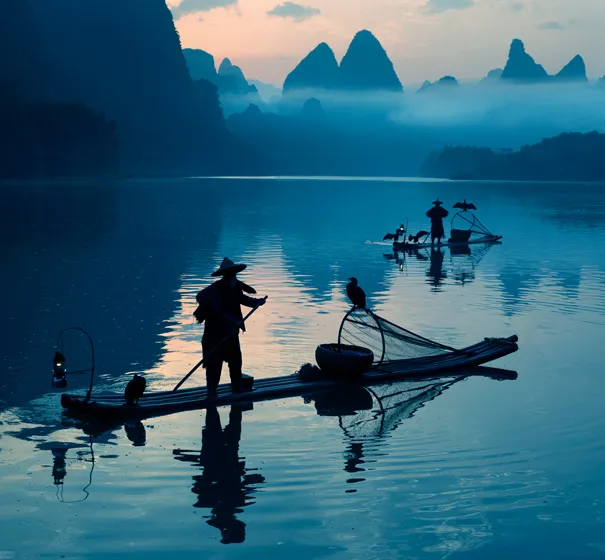
I photographed these cormorant fishermen in pre-dawn light, in remote China. Here I used a shutter speed of 1/1000th of a second to stop the movement of the fishermen. My ISO was 1000 and my aperture was set at f/7.1.
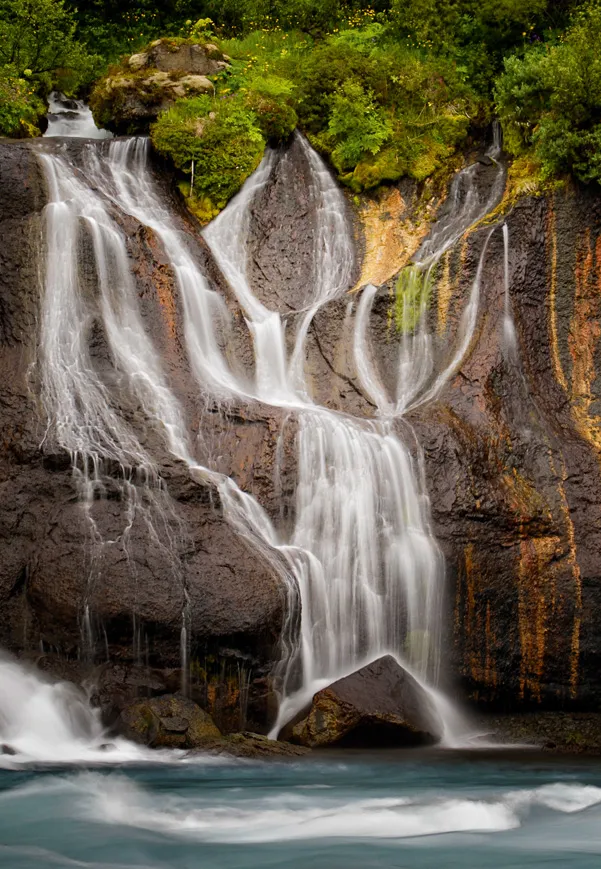
Here’s an image of the famous waterfall in Thingvellir National Park. I wanted to create a “silky water” type photograph. At this waterfall, the water was flowing faster than at Hraunfossar and I was much closer. Those two factors required a slower shutter speed to create the effect. [Exposure information: Canon 24–105mm IS lens at 105mm, ISO 100, f/22, one second. Here, too, I used a Breakthrough Photography 6-stop ND filter.]
I’d like to take a short break from talking about shutter speed because you can talk and think all you want about technology and miss a photo opportunity, or worse, not have fun. In Chapter 12 I focus on composition. Here’s a preview. If you look closely at the opening photograph in the Introduction (page 1), you’ll see what looks like an angel formed by the flowing water. That section of the waterfall is pictured here, cropped from that image. The idea is to look for pictures within pictures when you are photographing and when you are processing your images.
![]()
3
ISO and Light
One way to think about the ISO setting is that it determines the light sensitivity of the camera’s image sensor.
Traditionally, you would use a low ISO setting, such as ISO 100 or 200, in bright light and high ISO settings in low light situations. The lower the light, the higher the ISO you’d need to get a hand-held photograph. When you are using a tripod or a speedlite, ISO becomes much less of an issue.
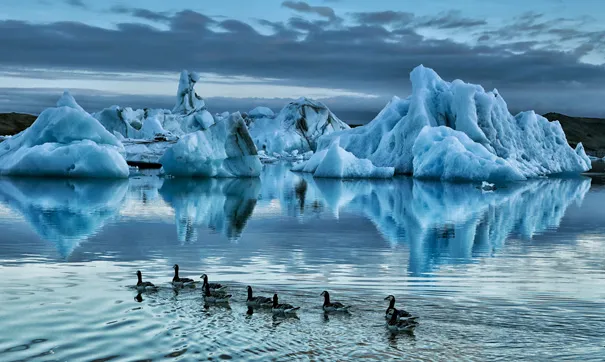
I took this hand-held image at the Jökulsárlón Glacier Lagoon after sunset. One of my goals was to stop the movement of the geese in the foreground so I knew I had to boost my ISO to get a fast enough shutter speed to stop the action and mainta...