Alternative Photographic Processes teaches techniques, both analog & digital, allowing artists to bring a personal touch through manipulation of a photograph, the negative, and the print. This book stands apart from recent publications on alternative processes by presenting a range of new approaches and methods to achieve popular techniques, as well as providing step-by-step guidance for an array of unique techniques meant to inspire artists working in various mediums. Through detailed guidance, working artist examples, and info about the contemporary use of these processes, this book will provide instruction for students, educators, and artists to expand their creative toolbox.
- 210 pages
- English
- ePUB (mobile friendly)
- Available on iOS & Android
eBook - ePub
About this book
Trusted by 375,005 students
Access to over 1.5 million titles for a fair monthly price.
Study more efficiently using our study tools.
Information
Topic
ArtSubtopic
Digital Media1
CHAPTER 1
Capture Techniques
1.1 Introduction
With today’s technology, it is easy to make photographs quickly and with great convenience. Some photographers, however, choose not to go with the easy route and instead spend time manipulating the image at time of capture.
With pre-capture manipulation comes an idealized gesture of spending time with the photograph. The more time the artist spends with the subject, the more they get to know it and the more resolved the image becomes. This is not conducive to the type of photographer that wants to shoot quickly or from the hip. Even with preconceived ideas, it is a slower process and lends itself to those that tend to work a little slower. This is further emphasized with the choice of manipulations and other decisions at time of capture.
Pre-capture manipulation can be done in a number of ways, such as distressing lenses, filters, screens, glass, lens mods, etc. Instead of shooting first and editing your image in post, you may choose one of the following processes in this chapter to add more depth and dimension to your image right from the start.
What better way to connect to your subject matter than to spend more time with it from the beginning? Through this book you will learn a number of basic techniques and how to expand on them so that you may choose the best solution for your creative workflow, be it fast or slow.
1.2 Glass Manipulation
One of the amazing things about optics in relationship to lenses is how forgiving any damaged front lens element, filter, or glass can be. You can still attain great looking images with little to no effect, even with scratches or broken glass. The trick when using distressed materials is to control its effect by adjusting the aperture (increasing the depth of field) and the distance that the distressed material is from the lens or focal plane.
NOTE
Glass manipulations include destructive and nondestructive methods. Before distressing or damaging lenses and filters, try practicing or even commit to the idea of using sheets of glass, which can be held right in front of your lens. The use of a tripod with a trigger is suggested so that the artist can hold and manipulate the glass with ease.
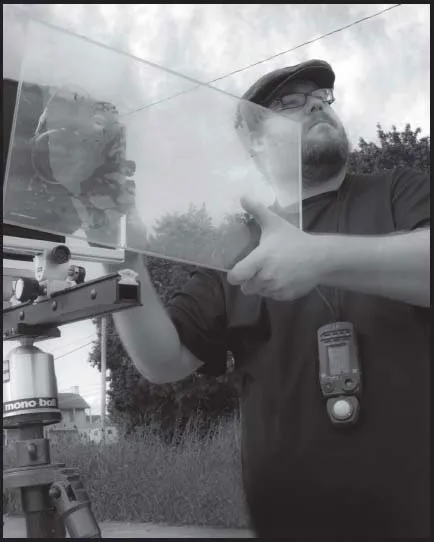
Figure 1.1 Brady Wilks using distorted glass plates held in front of a view camera. Photo by Palma Brozzetti
When using a wide-open aperture (f/2.8), you might see a very soft distortion or you may not see much of the distressing at all. Stopping down your aperture toward f/11 through f/22 and beyond will eventually bring artifacts closer into focus. With experimentation, you will quickly learn which aperture adjustment looks best for your particular method after capture.
Another amazing thing about distressing optics is the artist’s ability to let direct light affect the image through the distortions, blocking, focusing, reflecting, and refracting light. Depending on the distortions the artist chooses, it will change the direction of the light, focus the light, block or even diffuse the light in various ways. For example, if you are using a distressed filter full of chips, your aperture is set to f/16 and there is sunlight directly hitting the front of the glass element, all sorts of refractions may occur depending on the characteristics of the damaged areas and how they bend the light.
You can purchase some filter effects already premade, such as fog, soft focus, and other light modifiers, but making your own gives you control to make it exactly as you want. It can also be much more cost-effective than purchasing specialty filters. Lastly, there may be a personal satisfaction knowing that your image-making is so in-depth that you are crafting tools as well.
SPECIAL NOTE
If purchasing glass from a hardware store or frame shop, check to see if they have beveled or finished edge glass. If not, be very careful when handling the glass. Use a sharpening stone to rub along the edges of the glass on both sides to take off the sharp edge. Wear goggles, edge it while holding it over the trash to collect the dust and be careful of the sharp glass edge and dust. Glass edges, shards, and dust can be dangerous: you don’t want them in your eyes or lungs. Use a soft brush or natural fiber paintbrush to remove the dust from the glass surface before proceeding to your chosen effect. This kind of glass handling is borrowed from artists using the technique for wet plate collodion positives and negatives on glass.
FILTER STACKING
Filter stacking is done by taking multiple filters and stacking them together. An artist may play with a number of different combinations, such as color, effects, or both. For example, using a combination of warming filters not only changes the color but forces the light to pass through an increased amount of glass and can begin to start various distortions.
Polarizers are used to block certain reflections. Using two circular polarizers stacked together opposite one another and rotated will vary the degree at which light will pass. You can rotate the filters to the extent that only purple light is able to pass through resulting in a very dark image.

Figure 1.2 Stacking similar warming filters

Figure 1.3 Stacking similar cooling filters
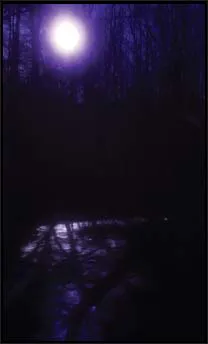
Figure 1.4a Stacked polarizing filters: before conversion to black and white
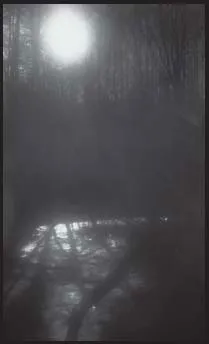
Figure 1.4b Stacked polarizing filters: after conversion to black and white
FILTER AND GLASS DISTRESSING
Scratching: scratching is done with things like diamond tools, electric etchers, and other elements strong enough to score the surface of glass. They may be seemingly random, precise and calculated, or simple patterns to create the various effects.
SPECIAL NOTE
Damaging the glass of filters is irreversible, it is important not to try any of the following directly on the glass of your lens. Use sheet glass and experiment with making your own filters as opposed to working on your original equipment.
Broken glass layers: using broken glass and epoxy or other transparent glues can allow you to make mosaics of shards distorting the image in a number of ways. This is greatly dramatized by the size of the shards, their location, the thickness of the glue in between, and the thickness of the glass. One method is to use a solid piece of glass and attach broken pieces of glass with glue around the edges so that there is some clarity in the center.
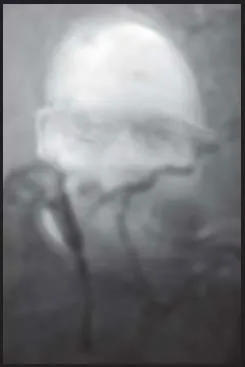
Figure 1.5 Self-portrait made using broken and distressed glass held in front of the lens
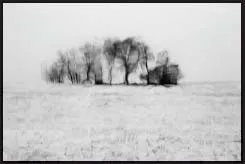
Figure 1.6 This image, titled Seen Through a Veil of Tears, was produced by using two sheets of glass with water sandwiched between the sheets and water on the face of the glass
Sanding: various sandpapers can provide different scrape patterns and intensities, especially true depending on the type of material you are using, as well as the pressure, speed, direction, and intensity of the sanding. Using a power sander, such as an orbital sander, can produce sanded distortions around the edges of glass quickly.
Frosting: using special wet pastes with various grits is not only a great method to create frosted edges or fogging filters, but it is also what some artists use to make their own ground glass for view cameras.
Gradient marks: this can be applied for a number of effects. The idea is that you change the intensity or frequency of the distortion gradually from edge to center. For example, you can make a soft focus filter with a clear center. Leaving the center untouched and gradually changing the intensity of the pressure used with paste and/or various grits. The more you rub, the frostier it gets.
Liquid suspension: this process requires two sheets of glass (big enough to hold and still cover your lens area) and some kind of fluid. Lay one sheet flat and pour on a little bit of water, tea, oil, or other fluid substance that is easily cleaned. Then place the other sheet on top. This suspends the fluid between the two sheets of glass and makes various distortions depending on the solution used. Start with very little so it doesn’t run out of the sides.
Smudging: if you don’t have a glass sheet or if you don’t want to damage filters or lenses, you can use a number of materials to smudge onto a filter as a way to create effects in a non-volatile way, saving the glass and reusing it for other things. Grease, Crisco, butter, and a number of other smudgy materials can be used, just be sure it is something you can clean off and don’t leave anything on that can go rancid or spoil. Never apply it directly to your lens. Use sheet glass or old UV filters.
Breath/fog: this is achieved by simply fogging the front element with a deep breath and wide-open mouth really close to the glass, like someone cleaning their glasses. This works better in certain atmospheric conditions where the condensed moisture on the glass takes a while to evaporate.
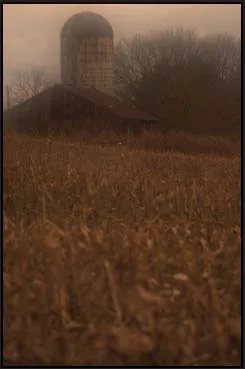
Figure 1.7 This image was made with a UV filter that was smudged
1.3 Veils and Obscuring
Glass is great but there are a dozen other things to consider if you want to manipulate your image at time of capture. The following lists, with descriptions, offer other alternatives to working with glass, filters, and lenses directly.
SCREENS AND SCREEN STACKING
Image-making with screens provides an aesthetic few others can. Screens obscure through hundreds of little fibers, be they fabric, synthetic, or metal. There are different kinds of materials th...
Table of contents
- Cover
- Half Title
- Title Page
- Copyright Page
- Dedication
- Table of Contents
- Introduction by Jill Enfield
- About This Book
- Acknowledgements
- Chapter 1: Capture Techniques
- Chapter 2: Film and Transparency Manipulation for Wet Lab Processes and Scanning
- Chapter 3: Substrate Acquisition and Considerations
- Chapter 4: Substrate Manipulation
- Chapter 5: Transfers and Lifts
- Chapter 6: Print and Image Manipulation
- Chapter 7: Appropriated Art, Collage, and Cameraless Imaging
- Chapter 8: Waxing, Encaustic, and Resins
- Chapter 9: Installation, 3D Object Photography, and the Performance
- Chapter 10: Alternatives to Finishing and Presentation
- Resources
- Process List and Practicing Artists
- Index
Frequently asked questions
Yes, you can cancel anytime from the Subscription tab in your account settings on the Perlego website. Your subscription will stay active until the end of your current billing period. Learn how to cancel your subscription
No, books cannot be downloaded as external files, such as PDFs, for use outside of Perlego. However, you can download books within the Perlego app for offline reading on mobile or tablet. Learn how to download books offline
Perlego offers two plans: Essential and Complete
- Essential is ideal for learners and professionals who enjoy exploring a wide range of subjects. Access the Essential Library with 800,000+ trusted titles and best-sellers across business, personal growth, and the humanities. Includes unlimited reading time and Standard Read Aloud voice.
- Complete: Perfect for advanced learners and researchers needing full, unrestricted access. Unlock 1.5M+ books across hundreds of subjects, including academic and specialized titles. The Complete Plan also includes advanced features like Premium Read Aloud and Research Assistant.
We are an online textbook subscription service, where you can get access to an entire online library for less than the price of a single book per month. With over 1.5 million books across 990+ topics, we’ve got you covered! Learn about our mission
Look out for the read-aloud symbol on your next book to see if you can listen to it. The read-aloud tool reads text aloud for you, highlighting the text as it is being read. You can pause it, speed it up and slow it down. Learn more about Read Aloud
Yes! You can use the Perlego app on both iOS and Android devices to read anytime, anywhere — even offline. Perfect for commutes or when you’re on the go.
Please note we cannot support devices running on iOS 13 and Android 7 or earlier. Learn more about using the app
Please note we cannot support devices running on iOS 13 and Android 7 or earlier. Learn more about using the app
Yes, you can access Alternative Photographic Processes by Brady Wilks in PDF and/or ePUB format, as well as other popular books in Art & Digital Media. We have over 1.5 million books available in our catalogue for you to explore.