![]()
CHAPTER 1
Selecting Color Spaces, Resolutions, and Frame Rates
When compositing for visual effects, it’s wise to consider color space. The color space you choose determines the number of potential colors you can work with and the overall accuracy of effect applications and transformations. By the same token, each composition you create shares two basic qualities: resolution and frame rate. Due to the wide variety of common resolutions and frame rates, decisions must be made to select appropriate resolutions and rates for the project. To complicate matters, the footage you import may carry multiple frame rates. You can also manipulate frame rates for stylistic purposes, creating “time warps” that speed up or slow down footage.
This chapter includes the following critical information:
• Selection of bit-depths and working color spaces
• Converting between color spaces on import and at render time
• Choosing and converting between different frame rates and resolutions
FIG 1.1 Footage is time warped with the CC Wide Time effect, creating a ghost trail. This project is saved as wide_time.aep in the \ProjectFiles\aeFiles\Chapter1\tutorial directory.
Choosing Bit-Depths and Color Spaces
A bit-depth determines the number of colors available to a single channel of a pixel. A channel, within a digital image, carries the values of a single component of a color model. A color model is a mathematical description of a color through specialized sets of numbers. Digital art, animation, and video use the RGB color model, where red, green, and blue channels are added to produce an image on a monitor (Figure 1.2). RGB is additive, whereby equal amounts of red, green, and blue produce white. The absence of these colors produces black. Color space represents all the colors a device can produce using a specific color model.
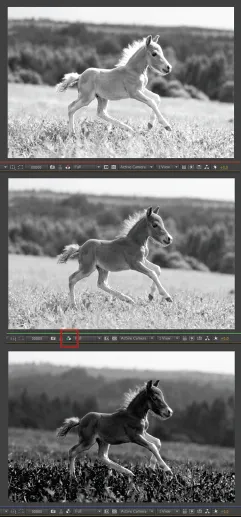
FIG 1.2 From top to bottom: The red, green, and blue channels of an image. Each channel stores intensity values for its associated color, hence each channel appears as grayscale. You can view channels in After Effects by changing the Show Channel menu button in the Composition, Layer, or Footage view panel. The menu is surrounded by a red box in this figure. Horse photo © DragoNika/Dollar Photo Club.
An Overview of Common Bit-Depths
After Effects can read a wide range of bit-depths. In addition, the program offers three specific bit-depths in which you can work. That is, all the calculations within the project are carried out at the bit-depth accuracy that you choose. The three bit-depths are 8-bit, 16-bit, and 32-bit. The number in each bit-depth signifies the number of potential colors (also referred to as tonal steps) available to each of the RGB channels. For example, 8-bit carries 28 colors per channel. To find the total color capacity of a bit-depth, multiply the channels together. Thus 8-bit RGB offers 256 × 256 × 256, or 16,777,216 colors. Note that After Effects “16-bit” color space actually uses 15 bits per channel; nevertheless, this produces trillions of colors when the channels are multiplied togther.
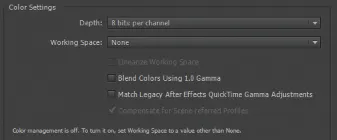
You can set the bit-depth by choosing File > Project Settings and changing the Depth menu to 8, 16, or 32 Bits Per Channel (Figure 1.3). Note that the 32-bit setting uses a floating-point architecture, which is discussed in the next section.
FIG 1.3 The Color Settings section of the Project Settings window in its default state.
When choosing a bit-depth, you can follow these general rules:
• Choose the highest bit-depth that allows you work comfortably. The higher the bit-depth, the greater the mathematical accuracy, but the longer the render times.
• Aggressive effects, such as heavy blurs, require a high bit-depth to avoid color banding (also known as posterization). Color banding appears as abrupt changes in a color gradient that should otherwise appear smooth. For example, color banding is sometimes visible in a clear sky. If you are using effects to drastically alter an image, use a 16- or 32-bit depth.
• Test your compositions at different depths. You can change the Depth menu at any time. If a lower bit-depth is sufficient to produce an acceptable quality, consider working at that depth.
Note that most computer monitors operate at an 8-bit depth. Thus, higher bit-depth quality is not necessarily visible on your monitor. This holds true for higher-quality 10-bit monitors. Nevertheless, you should strive to produce a quality image for the targeted output format. Output formats may range from HDTV (high-definition television) broadcast video to something suitable for web streaming. Note that the majority of image formats available to After Effects for rendering are 8-bit. Several formats, such as OpenEXR and TIFF, support 16- and 32-bit variants. The Raw format supports additional high bit-depth variations. For more information on the Raw format, see the “Importing Raw Files” section later in this chapter. For information on working with OpenEXR files, see Chapter 7.
Integer versus Floating-Point
8-bit and 16-bit color spaces in After Effects use integer values. That is, the color values use whole numbers and do not carry decimal places. Hence, a red channel value might be 10, 73, or 121. In contrast, the After Effects 32-bit color space utilizes a floating-point architecture. This allows the color values to be stored with decimal-place accuracy. Thus, a value might be 10.27542 instead of 10. Although you’re unable to work directly with the decimal place values, their existence ensures greater accuracy when transforming layers, adjusting effects, or changing blending operations. In addition, the 32-bit floating-point space supports superwhite values—that is, values beyond the standard 0 to 1.0 color range. This allows you to work with the large color ranges found within high-dynamic range (HDR) images.
Working with Color Management
One difficult aspect of digital image manipulation is the proper and consistent display of those images. No two monitors display digital images in the same way. Variations in engineering and manufacturing standards cause monitors to vary significantly. In addition, monitors “drift” during their life. That is, regular use of a monitor causes it to display colors differently as it ages. Hence, what may look good on your monitor may appear very different on a client’s monitor. The problem is compounded by a wide variety of non-monitor devices, including digital projection systems, television sets, computer tablets, smartphones, and so on.
The process of color management attempts to minimize these problems by using standards by which monitors and other devices can be made to match. A variety of standards are crafted by the ICC (International Color Consortium) and manufacturers (such as software and hardware makers). The standards are presented as color profiles. The profiles contain data defining the color model, color ranges (lowest and highest supported color values per channel, also known as a gamut), black and white points (color coordinates that define what is “black” and “white”), and mathematical mechanisms for converting the profile to different color spaces. (Each profile creates a unique color space that can produce a particular range of colors.)
Calibrating Monitors
Color profiles are supported by common operating systems, software, and firmware. When you apply a color profile to a monitor, it affects the way in which colors are interpreted by the monitor. The process of applying the profile is known as monitor calibration. This may be as simple as choosing an ICC profile provided by an operating system. For example, with Windows 7 and 8, you can select a profile through the Color Management tool.
It’s also possible to create a custom profile with monitor calibration software and/or hardware. Software-based calibration generally requires the user to choose a white point by selecting a color temperature that makes maximum RGB values appear the most neutral (without a color cast). Color temperature is the temperature a theoretical body reaches to create a specific hue of light. Color temperature is measured in K, or kelvin units. Various display devices support specific color temperatures, whereby their screen is biased toward a specific hue. For example, 6500 K appears slightly bluish while 5400 K appears slightly reddish. This ability helps white pixels appear “white” in different viewing environments where the native light has its own color temperature. In addition, the software generally requests the selection of a specific gamma. Gamma, when discussing color management, is a nonlinear operation that converts pixel values to screen luminosity. Gamma curves, expressed as a function value such as 1.8, are applied to compensate for human vision, which is more sensitive to differences in dark tones as compared to differences in bright tones, and are a legacy holdover from early CRT monitors, which used a nonlinear voltage-to-screen intensity relationship. Calibration software that utilizes a colorimeter (a device that measures the wavelength of visible light from a screen) is often more accurate. In either situation, creating a custom profile is desirable as it takes into account the peculiarities of an individual monitor.
Using a Working Space in After Effects
You can choose to work within a specific color space provided by a specific color profile within After Effects. This color space is referred to as a “working space.” A working space may be advantageous if you are preparing to export the images to a predetermined output, such as broadcast HDTV. To select a working space, choose File > Project Settings and change the Working Space menu to one of the provided color profiles (see Figure 1.3 earlier in this chapter).
If the working space does not match the color space of imported footage, the color values are converted between spaces. Because each color space has a unique set of colors it supports, the conversion between spaces may lead to the loss of information or the distortion of color values. For example, converting between an sRGB IEC61966-2.1 profile (commonly used for digital images) to a HDTV (Rec. 709) 16-235 profile (a variant of HDTV) causes the values below 16 on a 255 (8-bit) scale to be clipped to 0-black. Although some color space conversions may lead to subtle or imperceptible changes, it’s important to be aware of potential color shifts.
When you import footage, After Effects detects embedded color profiles. If you are using a worki...