![]()
This first section of the book is mainly concerned with developing your skills of observation – and how to select the interesting and unusual from what you see around you. It is concerned with picture-composing devices such as: framing up your shot in the camera viewfinder or LCD monitor; choice of viewpoint and moment to shoot; and picking appropriate lighting. It also discusses how to recognize pattern, line, color and tone in the subject you intend to photograph, and how to use such features to good effect. These are visual rather than technical aspects of photography and most stem from drawing and painting. They apply no matter what camera you own – cheap or expensive, digital or film, auto-everything or covered in dials and controls.
Seeing and photographing
All the world’s cameras, sensors, desktop printers, scanners, films, enlargers and other photographic paraphernalia are no more than tools for making pictures. They may be very sophisticated technically, but they cannot see or think for themselves. Of course, it’s quite enjoyable playing around with the machinery and testing it out, but this is like polishing up your bicycle and only ever riding it around the block to see how well it goes. Bicycles enable you to get out and explore the world; cameras challenge you to make successful pictures out of what you see around you, in perceptive and interesting ways.
Anyone who starts photography seriously quickly discovers how it develops their ability to see. In other words, not just taking familiar scenes for granted but noticing with much greater intensity all the visual elements – shapes, textures, colors and human situations – they contain. This is an exciting and rewarding activity in itself. The second challenge is how to put that mindless machine (the camera) in the right place at the right time, to make a really effective photographic image out of any of these subjects. Seeing and organizing your picture making is just as important as technical ‘know-how’ and it comes with practice.
To begin with, it is helpful to consider the ways seeing differs from photographing. You don’t necessarily have to regard differences as a barrier. The point is that by understanding how the scene in front of you will appear on a final print you will start to ‘pre-visualize’ your results. This makes it much easier to work through your camera.
Pictures have edges
Our eyes look out on the world without being conscious of any ‘frame’ hemming in what we see. Stop a moment and check – your nose, eyebrows, glasses (if you wear them) do form a sort of frame, but this is so out of focus and vague that you are not really aware of any definite ‘edge’ to your vision. However, immediately when you look through a camera viewfinder the world is cut down into a small rectangle with sharply defined edges and corners. Instead of freely scanning your surroundings, you have to compose their essence within this artificial boundary.
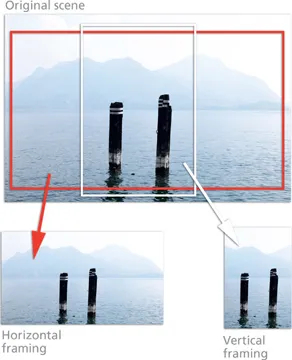
Figure 1.1 The same scene can be framed in a variety of ways, producing photographs that emphasize different parts of the picture. Try turning your camera from the horizontal to the vertical to produce a different point of view.
The hard edges and their height-to-width proportions have a strong effect on a photograph. Look how the same scene in Figure 1.1 is changed by using a different shooting format. Long, low pictures tend to emphasize the flow of horizontal lines and space left to right. Turning the camera to form an upright picture of the same scene tends to make more of its depth and distance, as the scale between foreground and furthest detail is greater and more interactive.
Framing up pictures is a powerful way to include or exclude – for example, deciding whether the horizon in a landscape should appear high or low, or how much of an expanse of color to leave in or crop out. The edge of the frame can crop into the outline of something and effectively present it as a new shape too. Remember, though, that nothing you leave outside the viewfinder can be added later!
The camera does not select
Figure 1.2 Because the camera is not as selective as the human eye, photographers use a range of techniques to add emphasis to their pictures and to direct the attention of the viewer. Here a small zone of focus (commonly called minimum depth of field) is used to emphasize the flowers and de-emphasize the surrounding leaves.
When we look at something we have an extraordinary ability to concentrate on the main item of interest, despite cluttered surroundings. Our natural ‘homing device’ includes turning the head, focusing the eyes and generally disregarding any part of the scene considered unimportant. Talking to a friend outside their house, you hardly register details of the building behind, but the camera has no brain to tell it what is important and unimportant. It cannot discriminate and usually records too much – the unwanted detail along with the wanted. This becomes all too apparent when you study the resulting photograph. Drainpipes and brickwork in the background may appear just as strongly as your friend’s face … and how did that dustbin appear in the foreground?
You therefore have to help the camera along, perhaps by changing your viewpoint or filling up the frame (if your camera will focus close enough). Perhaps you should wait for a change in lighting to pick out your main item from the rest by making it the brightest or the most contrasting color in the picture. Or you might control your zone of sharpness (a device called depth of field or DOF, discussed further on page 68) in order to limit clear detail to one chosen spot, as is the case in Figure 1.2. Other forms of emphasis are discussed on page 9.
You have to train your eyes to search the scene for distractions. When looking through the viewfinder, check the background, midground and foreground detail. Above all, always make a quick scan of everything in the viewfinder before pressing the button.
Sensors and films cannot cope with the
same contrast as the eye
Our eyes are so sophisticated that we can make out details both in the dark shadows and brightly lit parts of a scene (provided they are not right next to each other). This is an ability that is beyond the capabilities of a camera sensor. Photography generally makes darkest areas record darker and lightest areas lighter than they appeared to the eye, so that the whole image becomes more contrasty. It is important to remember that your eyes will always see the contrast of a scene differently to how the camera will record it. With practice this will mean that you can anticipate the differences and therefore be able to predict more accurately how your pictures will turn out (see Figure 1.3).
Figure 1.3 The high contrast contained in this backlit scene is too great for the camera to record clear detail in both the highlight and shadow areas. Instead, the result is a silhouette.
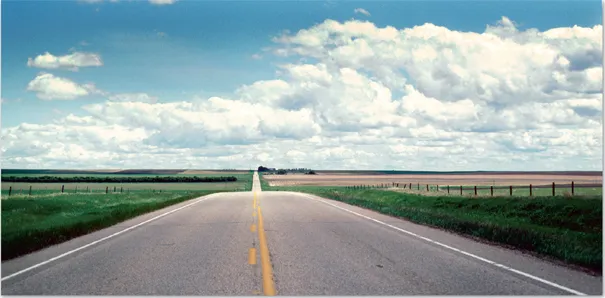
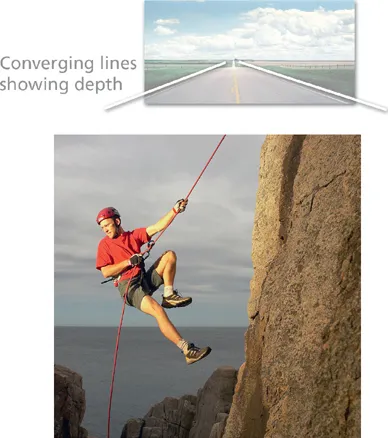
The camera has one ‘eye’
Unlike humans, the cameras we use do not have binocular vision. Their pictures are not three-dimensional. They do not photograph from two points of view. So when we want to show depth in a scene we are photographing we have to imply it through devices such as the use of converging lines (see Figure 1.4), changes in scale or changes in tones aided by lighting. To help you see more like the camera does, close one eye to forecast the camera’s two-dimensional way of imaging.
Figure 1.4 Because the camera only provides a ‘single-eye’ view of the world, photographers have to rely on devices like converging lines to portray distance and depth in their pictures.
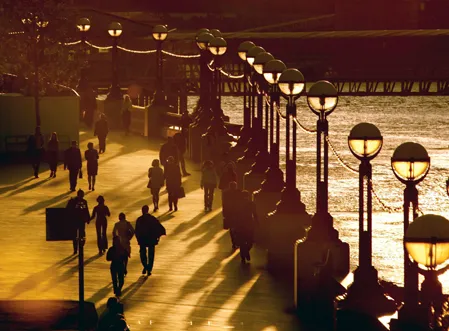
Most photographs capture just one moment in time
When things are active in front of the camera your choice of when to take the picture often ‘sets’ someone’s momentary expression or the brief juxtaposition of one person to another or their surroundings. Capturing the peak of the action often produces photographs that are frozen moments of time (see Figure 1.5). There is often a decisive moment for pressing the button that best sums up a situation or simply gives a good design. You need to be alert and able to make quick decisions if you are going for this type of picture. Once again, the camera cannot think for you.
Figure 1.5 The camera has the ability to capture a moment in time and then preserve it frozen forever.
Color translated into monochrome
When you are shooting or printing out results in black and white (‘monochrome’), the multicolored world becomes simplified into different shades or tones of gray. A scarlet racing car against green bushes may reproduce as two grays that very nearly match. Try not to shoot monochrome pictures that rely a great deal on contrast of colors unless this will also reproduce as contrasty tones. Look at colors as ‘darks’ and ‘lights’. Re...