![]()
Part 1
Tech
![]()
1.1
How a Digital Image is Born
Let’s take a few minutes and step back and start from scratch. The information to follow might seem a little simplistic, but it’s going to make sure we’re all on the same page before we move deeper into more important terms and concepts.
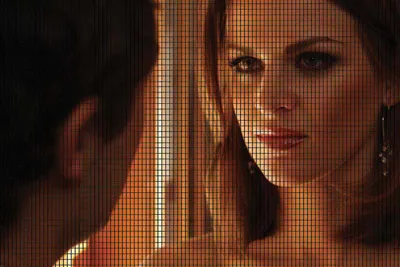
We’re going to assume that we’re shooting a scene—actually this scene with actress Lisa Jay.
Actress Lisa Jay from Tranquility Inc. Tranquility Inc © Adakin Productions.
In order to capture this image, the light reflecting off the objects in the scene enters the camera’s lens and is projected onto the sensor inside the camera.
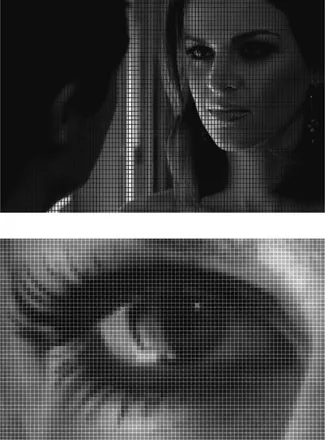
The image to the right is an approximation of how the sensor sees the image.
The photons of light reflecting off of objects in the scene are projected through the camera lens onto the sensor, which is made up of millions of little microscopic photosensitive components called sensels or photosites. Each photosite has a potential “well,” which we can think of as a “bucket,” that collects the number of photons it “sees” in a given period of time. Imagine thousands of little buckets set out under a tree on a rainy day. As the rain falls, it is collected in the buckets. However, if there are branches of the tree over some of the buckets, not as much rain will be collected in those buckets as ones where there is no interference. This is just like the light and dark areas of an image being projected onto the sensor. Some photosites receive much more “rain” than others.
Each of the little rectangles in this image represents a photosite on the sensor.
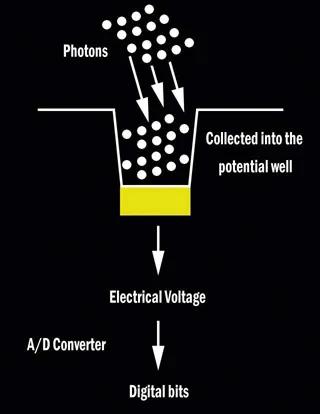
Once the given period of time for a single exposure has lapsed, the photosite counts the number of photons it has in its bucket and converts the collected energy into an electrical voltage. Remember that photons are particle-waves of electromagnetic energy, so this accumulated energy can easily convert into a small electrical charge. The more photons a photosite has collected, the higher the resulting voltage.
That voltage is then changed in an analog-to-digital converter to digital bits. The higher the voltage, the higher the digital bit code value. This digital code value represents how much light that single photosite saw in that exposure.
The sensor, however, is colorblind. It cannot determine the wavelengths (colors) of photons striking it, it can only count the total number of photons it sees in a given period of time.
The image to the right is really how the sensor sees the image—in black and white.
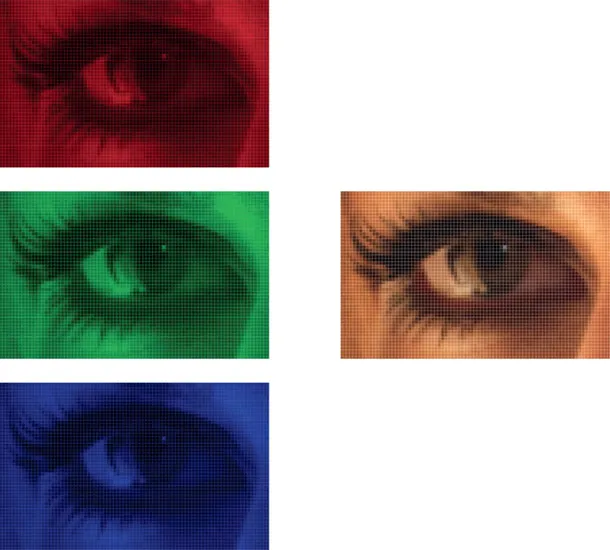
If we peek at that closer, it’s easier to get a more solid idea of what’s happening. Let’s take a look at just Lisa’s eye in the next image.
A closer look helps to illustrate how much light each photosite/sensel receives. Some see no light at all, some see bright highlights.
Each of the individual squares in the image of Lisa’s eye represent a photosite and all that those photosites “see” is the illumination that strikes them. Some of those photosites don’t see much light at all—like the ones in the pupil of Lisa’s eye—while others see a lot of photons, like the highlights in her eye. All of them see the scene as some percentage between black (no light) and white light (maximum brightness possible).
Since the photosites are colorblind—and the resulting digital bits only represent the luminance values of the scene as it was captured, we need a way to determine the actual color of the light that strikes each of the photosites. That’s where we get into three-chip cameras (one chip sensitive to red, one to blue, and one to green light) or a color filter array (CFA) over a single sensor so that each photosite will only receive one range of wavelengths of light—red, green, or blue.
The anatomy of a photosite: photons of light are captured in a potential well and are passed through a silicon substrate that converts their energy into electrical voltage. An analog-to-digital converter changes the voltages into digital bits.
![]()
1.2
Demystifying Digital: How Digital Cameras Capture a Color Image
At this year’s Digital Video Expo I got the opportunity to teach one of my favorite lectures, The Flavors of HD (which is also the basis for my Digital Cinematography class at the Global Cinematography Institute), or as it was known this year: Demystifying Digital. It’s a favorite because I get to discuss so many different aspects of what makes up a digital format and really open people’s eyes to the differences in formats and how to understand them. This year we expanded the session from its typical hour and a half into a day-long session and I was able to cover a lot more ground. After getting feedback from some of the session attendees, I decided to share some of the elements from that session in this column.
One of the fundamental things I discuss is how digital cameras capture a color image, and to start there I’ve got to set some ground rules.
When is a Pixel Not a Pixel?
I blame this one more on manufacturers and hype than individuals with the misunderstanding, but we have to make a distinction between a sensor photosite and a pixel.
A photosite is a light-sensitive cell on a digital sensor (CCD or CMOS) that captures photons of light and then—through an analog to digital converter—turns those photons into bits to create a single point element of a digital picture.
A pixel—which is short for picture element—is a component of color (comprised of red, green, and blue levels) in a final image. In order to create digital images we have to have millions of pixels packed tightly together—each is a single solid color—but together, they form a full picture.
There is a significant distinction to be made here. A pixel is an element of the final picture, but a photosite is a light gathering cell on a sensor. Photosites are merely a well to gather light and they are colorblind. They can only see values of brightness, not colors of the light. In order to create a color image, made up of millions of pixels, we have to find a way to discern red, green, and blue content of the picture and there’s two primary ways of doing that.
Three Blind Chips
Since the sensors themselves are colorblind, if we just let them gather light, there would be no way to determine the color values of the scene we’re photographing. So we have to trick the sensors a bit.
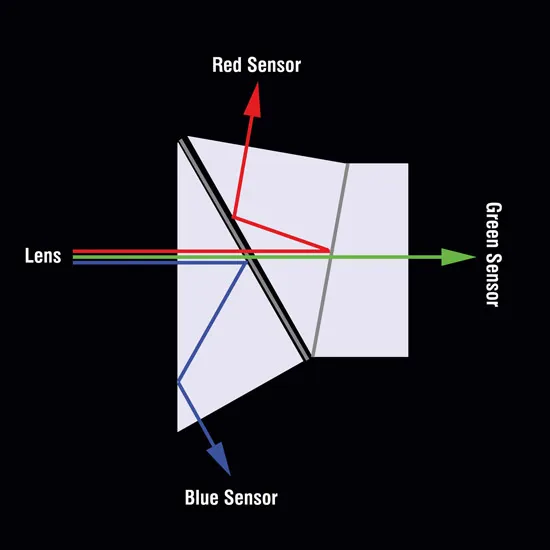
The first method of doing this trickery and gathering RGB information is to use three discreet sensors in the camera (3 CCD or 3 CMOS sensors) to capture color information: one that will gather the red portion of the image, one for the green, and one for the blue light. To do this, after the light passes through the lens into the body of the camera, it strikes a prismatic beam splitter that separates out the light into its red, green, and blue primary color wavelengths. Each color of light is then sent off in a different direction toward an individual sensor inside the camera.
A cross-section of a dichroic prism from a three-chip camera. Full spectrum light enters the lens and is projected onto the prism. The blue light reflects off a dichroic mirror and off the inside of the prism and is projected onto a sensor. The red light passes through the first mirror, but reflects off a second dichroic mirror and off the surface of the prism to project onto a second sensor. The green light passes directly through both mirrors to project onto a third sensor. Each sensor only receives light from one color.
So each sensor only receives one color of light: one red, one green, and one blue. Each sensor, with its own array of millions of photosites, will receive only one color of light, but the camera will combine the information from these three sensors to create a color photo from the RGB information. “Full Raster” or “Native” are terms that refer to three-chip cameras where the number of photosites on each of the sensors is equal to the number of pixels in the recorded image. If each of the sensors has 1,920 × 1,080 photosites, then each pixel is made up of information from three photosites to get its Full Raster RGB information.
There are several problems with three-chip cameras: there is a loss of light through the beam splitter, making the camera less sensitive to light; three sensors and a beam splitter take up a lot of room, making compact cameras with large sensors an impossibility and the distance between the back of the lens and the sensors is too great for use with lenses designed for motion picture or still cameras. Three-chip cameras require lenses specifically designed for use with those cameras, and there are much fewer lenses available. Many three-chip cameras have fixed lenses.
The red, green, and blue images represent the light from the scene that is projected onto the individual sensors in the three-chip camera. The camera’s computer combines this information to create the full-color image.
The Sensor Stands Alone
The second method for gathering RGB information is from a single sensor. When you have a single sensor in a camera, you can have a physically larger sensor in a more compact space—as with HDSLR cameras that feature Super35 (or larger) sized sensors—and the larger the sensor, the less depth of field in your images, and the more sensitive to light the sensor can be. With just one sensor in the camera, the distance from the back of the lens to the sensor can be the same as in film cameras, opening up an entire world of lens choices.
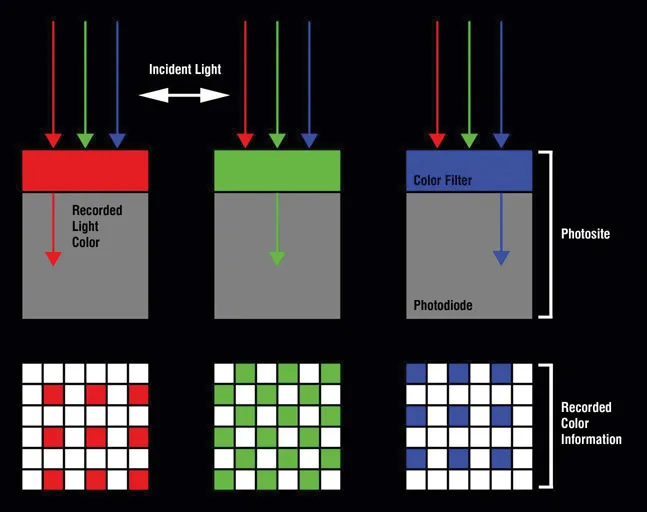
The problem with a single sensor is that you have to find a way to gather all three colors of light with one colorblind sensor. To do this, manufacturers employ a color filter array (CFA) on the sensor. This means that a colored filter is physically “placed” on each of the photosites on the sensor so that only one wavelength of light can pass through that color into that particular photosite. So some photosites will be filtered green, some red, and some blue. Each filtered photosite will only gather the photons that are in those particular wavelengths of color.
The Bayer pattern color filter array, a mosaic (checkerboard) of blue and green and green and red: 1/2 of the photosites are colored green, 1/4 are blue, and 1/4 are red.
The most typical color array is called the Bayer (pronounced buy-ur) pattern array, named after Bryce E. Bayer, who developed the pattern for Eastman Kodak in the mid-1970s. The Bayer pattern features a green, blue, green, and red checkerboard pattern. Note that there are twice as many green filtered photosites as there are red or blue. This is because the human eye is more sensitive to changes in the luminance (brightness) of an image than it is to changes in the chrominance (color) of an image. There is inherently more luminance information in the green channel, so we use twice as many green colored photosites to gather the most important information and the other half of the photosites are equally divided between blue and red.
This image illustrates the filtration process and the amount of information from each color that is received by the sensor. Notice that each photos...