![]()
Chapter 1
3D Interface Overview
Chapter Outline
Setting Up the UI for 3D
3D Panels and Adding More Content
3D Navigation
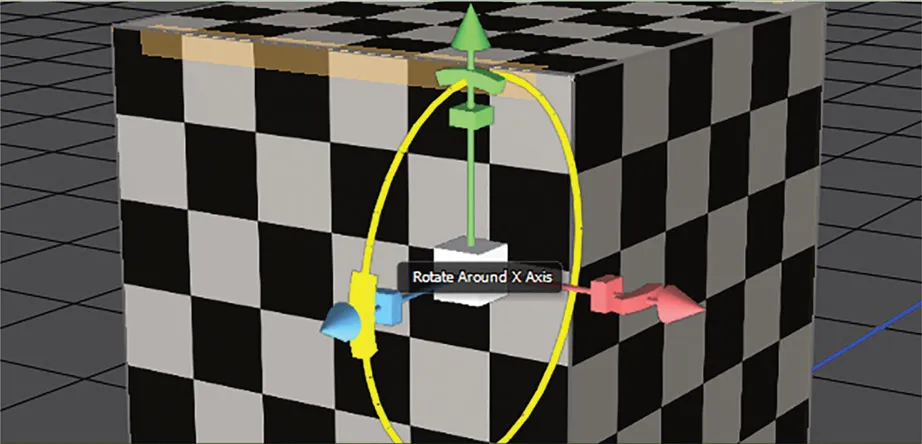
Using the 3D Widget
3D Lighting Types
Importing Third-Party Meshes and 3D Mesh Viewing Styles
3D Mesh and Surface Attributes
3D Environment
This chapter will give a brief overview of the 3D workflow that I have found to be a time-effective way to improving your productivity as well as producing the best 3D results. We will begin with easy approaches to creating custom 3D shapes that will be used to create more sophisticated 3D models.
Photoshop has come a long way and now it is ready for primetime in the use of integrating 3D. Most do not realize the power and flexibility that Photoshop has when integrating 3D into their workflow, or even that it has one. This book will also address the criticisms that 3D functionality in Photoshop is not good enough by showing you the enhanced lighting and texturing capabilities.
So, let’s discover the inner workings of the 3D interactive space in Photoshop that will bring your work to an all-new level. To use 3D in Photoshop make sure that you have a compatible graphics card with a minimum of 512 megabytes of RAM with Open GL 2 capabilities.
Keep in mind that Photoshop is optimized for NVidia cards so if you do not have a NVidia card then you may notice small differences in what it displays for the interface. Also, it is recommend that you make sure you have the latest drivers for your graphic card.
View below the complete system requirements published by Adobe:
Photoshop CC 2015 System Requirements and Language Versions
Windows
- Intel® Pentium® 4 or AMD Athlon® 64 processor (2 GHz or faster)
- Microsoft® Windows® 7 with Service Pack 1, Windows 8 or Windows 8.1
- 2 GB of RAM (8 GB recommended)
- 2 GB of available hard-disk space for installation; additional free space required during installation (cannot install on removable flash storage devices)
- 1024x768 display (1280x800 recommended) with 16-bit color and 512 MB of VRAM (1 GB recommended). Note: 3D features are disabled and some enhanced may not be functional with less than 512-MB VRAM
- OpenGL 2.0–capable system
- Internet connection and registration are necessary for required software activation, validation of subscriptions and access to online services.
Mac OS
- Multicore Intel processor with 64-bit support
- Mac OS X v10.7, v10.8, v10.9 or v10.10
- 2 GB of RAM (8 GB recommended)
- 3.2 GB of available hard-disk space for installation; additional free space required during installation (cannot install on a volume that uses a case-sensitive file system or on removable flash storage devices)
- 1024x768 display (1280x800 recommended) with 16-bit color and 512 MB of VRAM (1 GB recommended)**
- OpenGL 2.0–capable system
- Internet connection and registration are necessary for required software activation, membership validation and access to online services. Note: Video features are not supported on 32-bit Windows systems
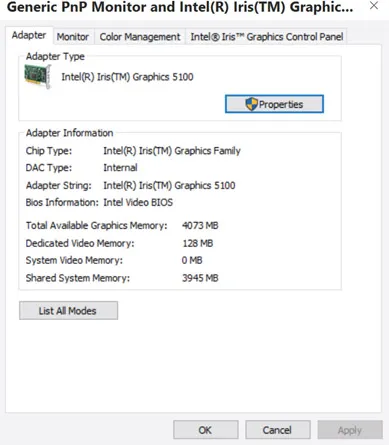
In the process of creating this book I used the Wacom Cintiq Companion 2 (http://www.wacom.com/en-us/products/pen-displays/cintiq-companion) that has a graphics card with approximately 2 GB of memory. Look at the specs in Figure 1.1.
Fig 1.1 Graphic card specs for Wacom Cintiq Companion.
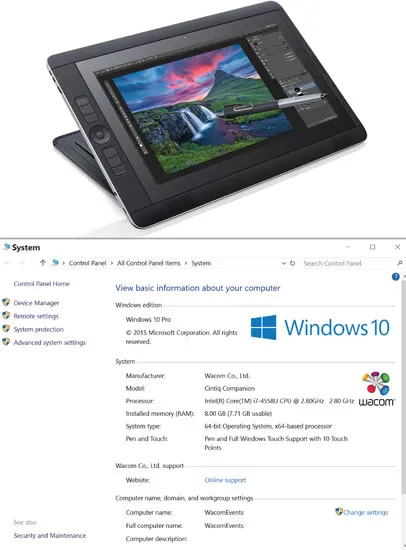
The Cintiq Companion 2 is a 13 inch tablet that uses a stylus that has the capability of 2048 levels of pressure sensitivity for realistic interaction, and gives the user tactile feedback close to using traditional paint brushes, pens, charcoals and more. The Companion 2 uses a Windows 10 Professional operating system with 8 GB of RAM, which are the system resources that I recommend. It also has graphics card resources of close to 2 gigabytes of RAM as shown in Figure 1.2. If you would like to get more specifications, I have provided a PDF file in the “Chapter 1 Work Files” folder called “CitiqCompanion_FactSheet.pdf” for your convenience on the website.
Check out the app for the Cintiq Companion Workflow.
Since the tablet has both stylus and touch-screen technology, you can navigate the interface with your fingers or take advantage of the 2048 levels of pressure to paint onto any 3D objects. We will cover tips and tricks of using the pen and tablet as we create together.
Although it would be helpful to have a Wacom pen and tablet, it is not necessary to follow along with the exercises in this book. A mouse at the minimum will suffice.
Fig 1.2 View of system resources for Cintiq Campanion 2.
Setting Up the UI for 3D
Have as clean an interface as possible to address any real estate challenges, especially if you are going to include the use of the mobile computer tablets that allow you to work out of the studio. You want to make it as easy as possible to share your work with clients as well as work in an uncluttered interface. All files for this chapter are located in the “Chapter 1 Work Files” folder on the website.
See the app for a video on UI and Navigation.
Step 1
In the “Chapter 1 Work Files” folder open “3D Navigation.psd.”
Step 2
Go to Window>Workspace>3D (Figure 1.3) and let’s take a look at Adobe’s default for 3D as sho...