![]()
Section III
Creative Nightscape Image Processing and Applications
Now that you have your constituent images, it’s time to explore how to assemble them into your creative nightscape projects. You’ll begin with an overview of the key steps in both Adobe Lightroom and Photoshop; how to best post-process your images to really bring out the Milky Way, for example, or how to prepare your images to produce the sharpest, crispest star trails imaginable. Next, you’ll learn the basic steps of the two-image blending techniques essential to composite nightscape preparation. Finally, you’ll be led through an array of exciting creative nightscape projects that will keep you busy for years!
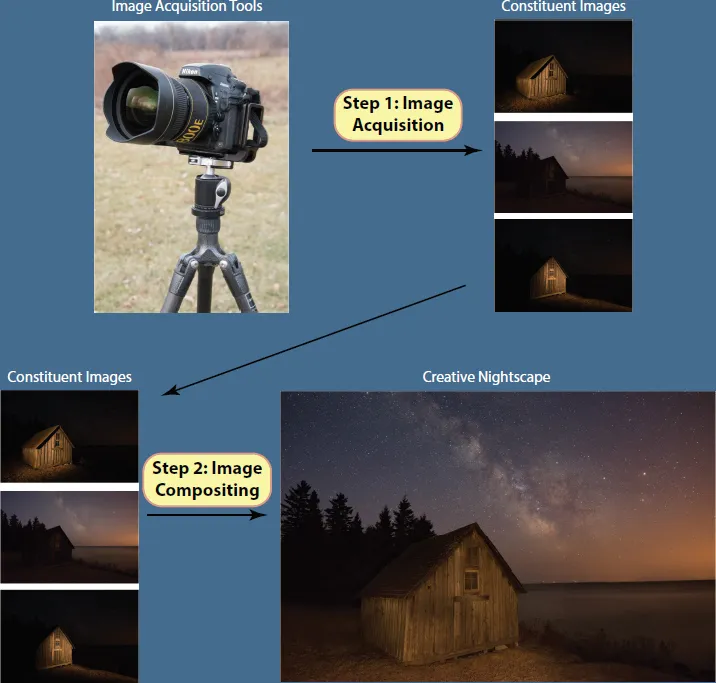
The description of each project is broken down into two basic stages, Figure III.1. The first stage involves specifics of image acquisition unique to each project based on what you’ve already learned; the second involves the actual compositing process. Both stages are common to all the projects, and it’s helpful to consider each stage separately. The example shown in Figure III.1 is drawn from Figure 1.4; as you can imagine, there are different aspects to consider for each of the two stages in the four examples shown in Figure 1.4.
After the first two chapters on mastering Lightroom and Photoshop, the remaining chapters provide detailed descriptions of how to create specific types of creative nightscapes from your constituent images. Chapters 12–14 focus on specific night sky projects: star trails, sun and moon composites and meteor showers. The next three chapters, Chapters 15–17, emphasize advanced compositing projects: high dynamic range composites, panoramas and 360° virtual reality composites. The final two chapters in this section, Chapters 18 and 19, explore the creative projects achieved by adding your own light to the scene through light painting and light drawing.
SIII-I.1 The two principal stages of making a creative nightscape, shown for this example of a simple blended image: (a) acquisition of the necessary constituent images and (b) processing them into the final composite image. This common framework is applied to each of the creative nightscape projects in this section.
![]()
9
Lightroom Fundamentals for Creative Nightscapes
Adobe Lightroom Classic CC (hereafter referred to simply as Lightroom) helps you as a nightscape image and time-lapse photographer in several ways. First, it allows you to manage your entire collection of photographs from a single interface. Second, it gives you state-of-the-art capabilities in post-processing individual images to bring them to their ultimate state of perfection. Lightroom also offers you a couple of tools specifically for compositing constituent images. Finally, it interfaces beautifully with LRTimelapse, as you will see in Chapters 20 and 21, to create fluid time-lapse masterpieces. We’ll focus mainly on Lightroom’s capabilities relevant to nightscape photography and time-lapse preparation; there are abundant resources for you to explore the full capabilities of Lightroom in more depth (Kelby 2015).
In addition to Adobe Lightroom Classic CC, Adobe also offers an entirely cloud-based product with the name Adobe Lightroom CC. Distinct from Lightroom Classic CC, Lightroom CC best serves an audience whose needs are focused around social media and the ability to edit images from mobile devices. Here, we will stick with Lightroom Classic CC.
Image Management
One of Lightroom’s strengths is how it lets you manage your entire collection of images. In particular, it does a superb job of giving you the option of working with batches of images at a time. Photoshop, on the other hand, is primarily designed to work on one image at a time (although the one image can be comprised of hundreds of individual images, as you will see).
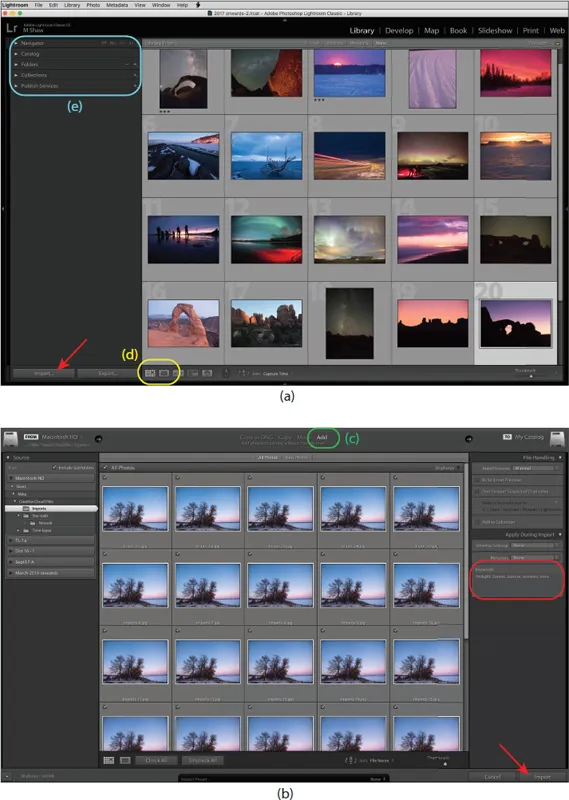
When you first launch Lightroom, the first thing you’re going to want to do is to look at some of your images, right? The way you do this is to import the images into Lightroom and then you can see them in your image Library, Figure 9.1(a). There are a few ways to perform the Import function; one way is simply from the main menu:
Alternatively, you can click on the Import button at the lower left corner of the Library screen; arrow, Figure 9.1(a). Either way, when the Import pop-up window appears, Figure 9.1(b), navigate to the image location and then click on the Import button in the lower right of the Import window, Figure 9.1(b) arrow.
Choosing the “Add” option of Import, Figure 9.1(c), is recommended. Doing so causes Lightroom to simply register the location of each image without creating a duplicate copy. Also, you may wish to include keywords as you import your images, Figure 9.1(b–circled). Keywords can be as simple as the date, or as descriptive as you like. Try to stick to a consistent list, such as Milky Way, time-lapse, desert, and beach, to aid in your future searches. Consistently adding keywords when you import images into your library can be an immense help years in the future when you’re searching for a particular image but can’t remember its details.
You have a few choices about how to view the images once you’ve imported them. You can view a grid of thumbnails, 9.1(a), or individual images at full-scale, Figure 9.1(d). The Library is also where you can create virtual Collections of images tailored to specific projects, Figure 9.1(e). Collections are extremely helpful since they don’t duplicate the images. Instead, Lightroom creates copies of just the metadata files where your changes are stored, saving space on your storage media.
9.1 (a) The Image Library in Adobe Lightroom Classic CC (hereafter referred to as simply Lightroom). (b) The Image Import window; (c) the “Add” import option; (d—circled) grid vs. individual image view option and (e—circled) where you can choose how to organize your images. Collections are a great way to “virtually” group related images, without the need to duplicate them.
Also, Lightroom gives you the option of creating 1:1 Previews to speed up the process of reviewing the potentially hundreds of images you have created. This is accomplished by selecting:
- Library -> Previews -> Build 1:1 Previews
Although memory intensive, these previews allow you to scroll through sequential images at full resolution very quickly. This is especially useful in selecting meteor-containing images for assembling into meteor shower composites, as described in Chapter 14.
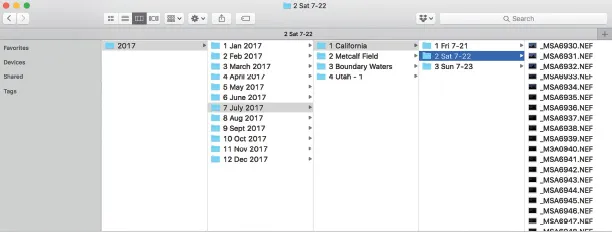
You have a basic choice to make at this stage. Either you store all your images into a single folder or you store your images in a number of separate folders. My preference is to file images in separate folders organized chronologically by year, by month; and then by day; it’s simply how my brain works, Figure 9.2. Thus, when I return from a night’s shooting, I create a new folder with that night’s date and location or description, and copy all the images from all my cameras into that single folder. I place that folder into the corresponding month’s folder on my hard drive, Figure 9.2. Then I open Lightroom and import all the images from that folder location.
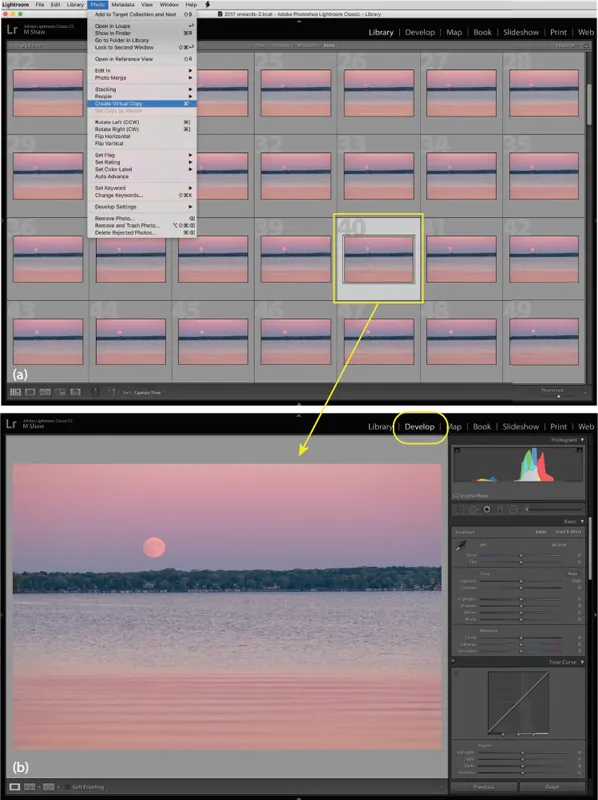
Now that you have imported your images, it’s time to start post-processing them. This is always one of my favorite parts; you never know what gems are hidden in your images! To start with, let’s make a virtual copy of one of your images in your image Library, Figure 9.3(a). To do so simply perform the following:
- Photo -> Make Virtual Copy
While not required, virtual copies are one of Lightroom’s great features; you can create multiple versions of the same image without taking up storage space. Next, click on the Develop menu to access the full suite of options, Figure 9.3(b). This is the area where you’ll do all your editing work.
9.2 Example of the author’s image basic filing strategy. Images from each day or night’s shooting are copied into individual folders that are in turn stored by month, and then by year.
Global Adjustments
The most common global adjustments are shown in the Basic panel at the top of the Develop module, Figure 9.3(b). As the name implies, global adjustments are applied equally to the entire image. Conversely, you can apply very localized adjustments to small regions of your image, as described later. Most global adjustments are likely familiar to you: white balance, overall exposure, contrast and so forth. Let’s begin by adjusting the white balance, controlled by the Temperature and Tint sliders. You may choose to apply one of the white balance presets: Auto, Cloudy, Shade, etc. These are often perfectly suited to your needs.
9.3 Preliminary steps to image editing in Lightroom: (a) creating a virtual copy of an image; (b) enabling the Develop module (circled). While creating a virtual copy is certainly not required, it facilitates creating multiple versions, each with different attributes that can be compared.
For the case of night skies, however, correctly adjusting the white balance can be troublesome. Here’s one reliable way to go about it for a typical starry sky nightscape, Figure 9.4(a). First, set both the Vibrance and Saturation sliders to 100%, Figure 9.4(b). Your image will likely look grotesquely oversaturated, but don’t worry! Next, slide the Temperature slider back and forth from l...