In this chapter, we'll cover the following recipes:
- Building a back-end web API using HTTP triggers
- Persisting employee details using Azure Table storage output bindings
- Saving profile picture paths to queues using queue output bindings
- Storing images in Azure Blob Storage
- Resizing an image using an ImageResizer trigger
Introduction
Every software application requires back-end components that are responsible for taking care of the business logic and storing data in some kind of storage, such as databases and filesystems. Each of these back-end components can be developed using different technologies. Azure serverless technology allows us to develop these back-end APIs using Azure Functions.
Azure Functions provides many out-of-the-box templates that solve most common problems, such as connecting to storage and building web APIs. In this chapter, you'll learn how to use these built-in templates. Along with learning about concepts related to Azure serverless computing, we'll also implement a solution to the basic problem domain of creating the components required for an organization to manage internal employee information.
Figure 1.1 highlights the key processes that you will learn about in this chapter:
Figure 1.1: The key processes
Let's go through a step-by-step explanation of the figure to get a better understanding:
- Client call to the API.
- Persist employee details using Azure Table Storage.
- Save profile picture links to queues.
- Invoke a queue trigger as soon as a message is created.
- Create the blobs in Azure Blob Storage.
- Invoke the blob trigger as soon as a blob is created.
- Resize the image and store it in Azure Blob Storage.
We'll leverage Azure Functions' built-in templates using HTTP triggers, with the goal of resizing and storing images in Azure Blob Storage.
Building a back-end web API using HTTP triggers
In this recipe, we'll use Azure's serverless architecture to build a web API using HTTP triggers. These HTTP triggers could be consumed by any front-end application that is capable of making HTTP calls.
Getting ready
Let's start our journey of understanding Azure serverless computing using Azure Functions by creating a basic back-end web API that responds to HTTP requests:
- Refer to https://azure.microsoft.com/free/ to see how to create a free Azure account.
- Visit https://docs.microsoft.com/azure/azure-functions/functions-create-function-app-portal to learn about the step-by-step process of creating a function application, and https://docs.microsoft.com/azure/azure-functions/functions-create-first-azure-function to learn how to create a function. While creating a function, a storage account is also created to store all the files.
- Learn more about Azure Functions at https://azure.microsoft.com/services/functions/.
Note
Remember the name of the storage account, as it will be used later in other chapters.
- Once the function application is created, please familiarize yourself with the basic concepts of triggers and bindings, which are at the core of how Azure Functions works. I highly recommend referring to https://docs.microsoft.com/azure/azure-functions/functions-triggers-bindings before proceeding.
Note
We'll be using C# as the programming language throughout the book. Most of the functions are developed using the Azure Functions V3 runtime. However, as of the time of writing, a few recipes were not supported in the V3 runtime. Hopefully, soon after the publication of this book, Microsoft will have made those features available for the V3 runtime as well.
How to do it…
Perform the following steps to build a web API using HTTP triggers:
- Navigate to the Function App listing page by clicking on the Function Apps menu, which is available on the left-hand side.
- Create a new function by clicking on the + icon:
Figure 1.2: Adding a new function
- You'll see the Azure Functions for .NET - getting started page, which prompts you to choose the type of tools based on your preference. For the initial few chapters, we'll use the In-portal option, which can quickly create Azure Functions right from the portal without making use of any tools. However, in the coming chapters, we'll make use of Visual Studio and Azure Functions Core Tools to create these functions:
Figure 1.3: Choosing the development environment
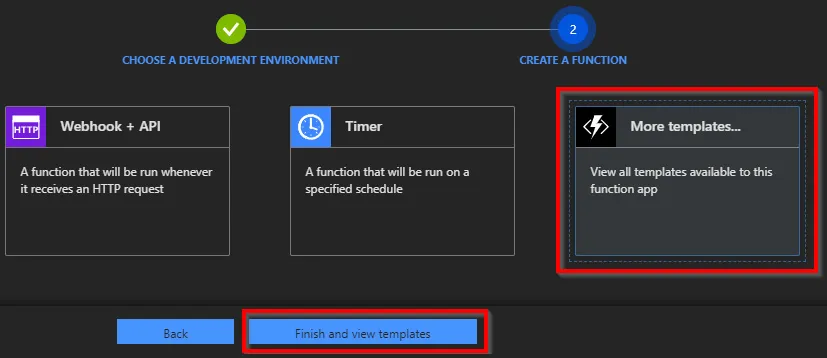
- In the next step, select More templates… and click on Finish and view templates, as shown in Figure 1.4:
Figure 1.4: Choosing More templates… and clicking Finish and view templates
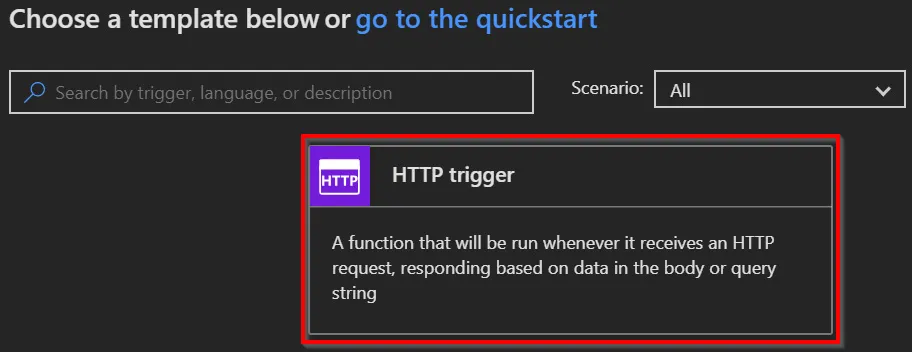
- In the Choose a template below or go to the quickstart section, choose HTTP trigger to create a new HTTP trigger function:
Figure 1.5: The HTTP trigger template
- Provide a meaningful name. For this example, I have used RegisterUser as the name of the Azure function.
- In the Authorization level drop-down menu, choose the Anonymous option. You'll learn more about all the authorization levels in Chapter 9, Configuring security for Azure Functions:
Figure 1....