The siege of Tobruk lasted 240 days during which the 'gallant garrison' of Allied soldiers, including the famous 'Desert Rats' held out against constant attacks from Rommel's Afrika Korps. The battle became one of the longest sieges in British military history and a potent symbol of British resistance. To understand what happened and why – read Battle Story. Diary extracts and quotes offer a real insight into what it was like for the Allied soldiers to live under siege. Maps highlight the adversities of the terrain and the strategic importance of the Tobruk fortress. Rare photographs place you on the frontline of the unfolding action. Orders of battle reveal the composition of the opposing forces' armies. Packed with fact boxes, this short introduction is the perfect way to explore this important battle.
- 144 pages
- English
- ePUB (mobile friendly)
- Available on iOS & Android
eBook - ePub
Battle Story: Tobruk 1941
About this book
Trusted by 375,005 students
Access to over 1.5 million titles for a fair monthly price.
Study more efficiently using our study tools.
Information
THE BATTLEFIELD:
WHAT ACTUALLY HAPPENED?
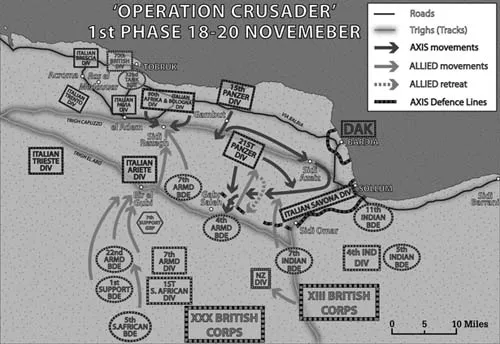
The Opening Moves (18–20 November)
| 18 November | Start of Operation Crusader, the winter battle in the Western Desert. British forces advance deep into Cyrenaica |
| 19 November | British 22nd Armoured Brigade clashes with the Italian Ariete Division at Bir el Gubi and suffers heavy losses. British 7th Armoured Brigade seizes Sidi Rezegh |
| 20 November | British 7th Armoured Brigade clashes with German and Italian forces at Sidi Rezegh, while the 4th Armoured Brigade suffers heavy losses in its encounter with the Afrika Korps at Gabr Saleh |
At dawn on 18 November, after a three-day postponement imposed by the delayed arrival of the 22nd Armoured Brigade, Operation Crusader started with Eighth Army units and formations moving from their jumping-off positions in the Egyptian desert and advancing deep into eastern Cyrenaica. The first day of the advance was quite uneventful, but not without problems; leading reconnaissance armoured cars occasionally met with their German counterpart, who reported back about the British advance. Bad weather prevented air reconnaissance, which meant there was some uncertainty about the extent of German knowledge of the British movements. This was one of the problems, since lacking any sign of enemy activity or reaction, Cunningham was uncertain about the next step to take; his plan had been conceived in relation to an enemy reaction and subsequent troop movements, and lacking any sign of them there was little if anything that could be done. Technical unreliability also took its toll on the armoured forces, with the 7th Armoured Brigade down to 119 running tanks (more than 15 per cent breakdowns) and the 22nd Armoured Brigade down to 136 (12 per cent breakdowns). By the evening almost all the objectives for the day had been reached; XXX Corps had the 1st South African Division deployed on the track running south from Bir El Gubi, while the 7th Armoured Division’s 22nd Brigade was some 50km to the south of it, the neighbouring 7th Armoured Brigade having reached and crossed the Trigh El Abd, the track from Bir El Gubi leading east to the frontier, and deployed north-west of Gabr Saleh. The 4th Armoured Brigade, intended to screen the area between the 7th Armoured Division and the XIII Corps, stood on the Trigh El Abd, between Gabr Saleh and Sidi Omar, while XIII Corps’ New Zealand and 4th Indian divisions had crossed the frontier line to the south of Sidi Omar, outflanking the Axis position along the frontier.
THE CAPTURE OF JALO
Oasis force carried out a diversion intended to distract the enemy attention from the true objectives of Operation Crusader. Moving across the desert from Jarabub, the force reached and seized the oasis of Jalo (some 150km south of Agedabia) with a pincer movement on 24–25 November 1941. The oasis was then used as a base by the Long Range Desert Group.
The morning of 19 November opened with uncertainty and critical decisions. Facing no visible German reaction, it was clear that the original plan of bringing the German armour to battle in the Gabr Saleh area needed amendments, and both General Gott, 7th Armoured Division commander, and General Norrie, XIII Corps commander, were loath to leave their armour sitting idle in the desert. Therefore both the 7th and the 22nd Armoured brigades were ordered to advance, 7th Support Group was to remain in the Gabr Saleh area to provide assistance if needed, and the 4th Armoured Brigade was to protect the flanks while screening the right wing of XXX Corps’ advance. In the morning Gott appeared at the HQ of the 22nd Armoured Brigade and ordered an advance toward Bir El Gubi. This was a critical move, even with the benefit of hindsight. At that moment Gott had every reason to order the attack because the Ariete Division, the one deployed at Bir El Gubi, could not be left unmolested in the area, and also because it appeared a suitable target for the brigade to acquire some battlefield experience before clashing with the Germans. The 22nd Brigade attack against Bir El Gubi ran into the position defended by the Ariete Division, but this was not the easy victory that everybody had forecast. The Italian positions were overrun but, lacking infantry support (the brigade had only one 25-pounder battery), there were no troops to mop up the area, even when Italian soldiers holding one of the positions started to surrender. The Italians reacted and their medium tanks outflanked the Cruiser tanks of the 22nd Brigade, which was eventually compelled to withdraw. The Italians had lost thirty-four tanks while claiming the destruction of fifty of the enemy; the 22nd Brigade reported the loss of twenty-five, the difference (largely debated) being almost certainly made of the damaged ones. Much more importantly, the Italians had proven themselves a match for the Allies on the battlefield.
The 7th Armoured Brigade’s advance was, however, completely uneventful. At about 1 p.m. the brigade approached Sidi Rezegh without having seen the enemy, and shortly thereafter seized the nearby airfield and captured nineteen Italian aircraft before deploying along the escarpment to the north. More or less, XIII Corps experienced a quite uneventful day too, its two divisions advancing north of the Sidi Omar. At the end of the day it seemed that events provided the necessary amendments to the Crusader plan; Cunningham decided to exploit the success in the north and ordered 7th Support Group to move to Sidi Rezegh, while the 1st South African Division was to move to Bir El Gubi, leaving one brigade ready to move to Sidi Rezegh. The 22nd Armoured Brigade was to move north of Bir El Gubi, while the 4th Armoured Brigade was to remain at Gabr Saleh.
‘STRAFER’ GOTT
General William Gott, commander of the British 7th Armoured Division since September 1941, acquired his nickname ‘Strafer’ while leading the Support Group during the Beda Fomm battle in February 1941. He became commander of the XIII Corps after Godwin-Austen relieved himself of command in February 1942.
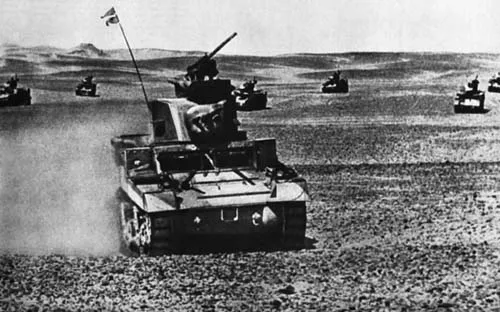
28. The US-built M3 light tank, also known as a ‘Honey’, which equipped the British 4th Armoured Brigade.
On 18 November there were divided opinions in the German camp about the extent of the enemy movements; Rommel thought this was only a reconnaissance in force, while the Afrika Korps commander, General Ludwig Crüwell, was convinced that this was the beginning of a major offensive. Both German Panzer divisions lay idle in their positions, 15th Panzer east of Tobruk and close to the coast, and 21st Panzer on the Trigh Capuzzo, some 30km west of Sidi Azeiz. On the 19th Rommel did not change his opinion, but allowed 15th Panzer Division to be moved south-west of Gambut, along the Trigh Capuzzo, while a combat group of the 21st Panzer was to move toward Gabr Saleh. The combat group, with some eighty Panzers, clashed with the 4th Armoured Brigade in the evening, putting twenty-three M3 Stuart tanks out of action for the loss of two of their own, plus six damaged. At this point it was clear that the enemy was launching a major offensive, and on the 20th a decision was made to react and destroy the 4th Armoured Brigade moving toward the Trigh Capuzzo. Earlier the same day, both Panzer divisions were on the move and, trying to reach the flank of the enemy units, advanced to the south of the Trigh Capuzzo toward the frontier. However, the 21st Panzer Division ran out of fuel and halted north of Sidi Omar, while the 15th Panzer Division (contrary to Rommel’s orders) swung west and attacked the 4th Armoured Brigade, destroying another twenty-six Stuart tanks. By the evening the 22nd Armoured Brigade had moved east toward Gabr Saleh, while the 1st South African Division took up positions around Bir El Gubi, its 5th Brigade moving to support the 7th Armoured Brigade and the 7th Support Group against the German 90th Afrika Division at Sidi Rezegh. That same evening Cunningham approved the suggestion made by Gott and ordered the British 70th Division to start its breakout from Tobruk the morning after.
The First Battle of Sidi Rezegh (21–23 November)
| 21 November | Tobruk garrison attempts a breakout while the Afrika Korps moves toward Sidi Rezegh |
| 22 November | New Zealander Division attacks Sollum while Indian forces attack Sidi Omar. British 7th Armoured Division fights the first tank battle at Sidi Rezegh against the Afrika Korps |
| 23 November | End of the tank battle at Sidi Rezegh, with heavy casualties on both sides. The Afrika Korps attacks and destroys the 5th South African Brigade at the battle of the ‘Sunday of the Dead’. The Italian CAM is put under Rommel’s command |
The situation was still quite unclear for both sides on the morning of 21 November. While XIII Corps advanced west of the frontier, the 22nd and 4th Armoured brigades faced the 15th and 21st Panzer divisions in what looked like the beginning of the tank battle envisaged in the plan for Operation Crusader. At Sidi Rezegh, while the South African 5th Brigade approached, the 7th Support Group was deployed south of the escarpment with 7th Armoured Brigade to the rear, facing what was known as Point 175. On the night of 20/21 November the 70th Division started its breakout from the Tobruk perimeter, while the 7th Support Group, with tank support from the 7th Brigade, attacked from Sidi Rezegh to seize the high ground dominating the Trigh Capuzzo. Soon, news came of an unexpected German move.
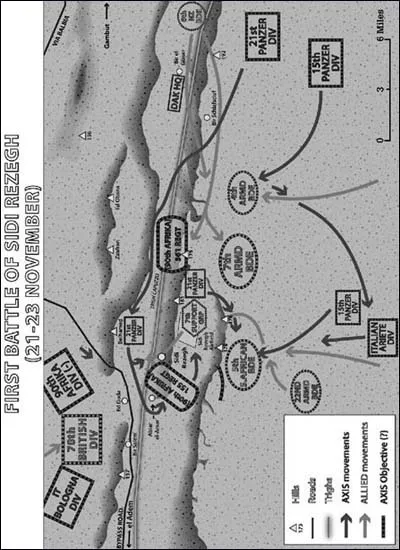
At 4 p.m. on the 20th, reports eventually enabled Rommel to get a clear picture of the situation, recognising that the main British effort was aimed at Sidi Rezegh. Since the strength of the enemy forces did not suggest a direct confrontation, a battle of movement was sought and the two Panzer divisions under the command of the Afrika Korps were redirected west to Sidi Rezegh. That same night the Afrika Korps started to move under cover of darkness, leaving behind a defence screen, and advancing toward Sidi Rezegh unseen by the two British armoured brigades. News of the arrival of the German Panzers reached 7th Armoured Division’s units at Sidi Rezegh at 8 a.m., just before the attack toward the Trigh Capuzzo was to start; but since this could not be halted, given the imminent breakout from Tobruk, Brigadier Davy (in command of the area) took with him the 7th Hussars and the 2nd RTR to face the Panzers. This would result in a bitter day of battle at Sidi Rezegh. The 70th Division’s breakout started at 8 a.m., and was faced with unexpected resistance not only from Italian troops, but also from the German 90th Afrika Division. Supported by the tanks of 32nd Armoured Brigade, the British units seized the enemy strongpoints one by one, before they were eventually halted by heavy artillery fire. By the afternoon a bridgehead some 4km deep and 4km wide had been established toward Ed Duda, and about 1,000 prisoners had been taken, half of them Germans. At the same time as the breakout commenced, the attack by the 7th Armoured Division at Sidi Rezegh started with the infantry of the 7th Support Group crossing the escarpment toward Ed Duda, followed by the tanks of 6th RTR of the 7th Armoured Brigade; however, as soon as they started to cross the Trigh Capuzzo, German anti-tank and artillery fire inflicted horrendous casualties. Rommel, observing the situation first hand, ordered all the available artillery, anti-tank and 88mm Flak guns of the Afrika Korps under the command of General Böttcher to move forward; these started to destroy British tanks one by one, until 7th RTR withdrew back to the south of the escarpment after the loss of three-quarters of its tanks.
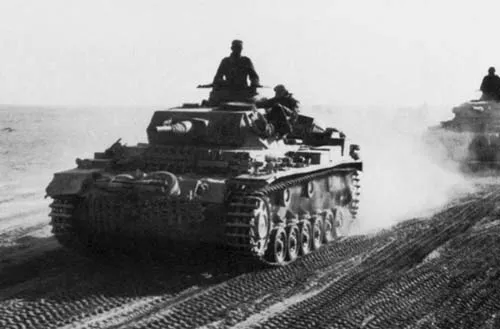
29. German Panzer III tanks moving across the desert. This was the German main battle tank throughout the Western Desert campaign.
The deployment of the Afrika Korps to Sidi Rezegh was quite a gam...
Table of contents
- Cover
- Title Page
- Contents
- Acknowledgements
- List of Illustrations
- Introduction
- Timeline
- Historical Background
- The Armies
- The Days Before Battle
- The Battlefield: What Actually Happened?
- After the Battle: The Winners and the Losers
- The Legacy
- Orders of Battle
- Further Reading
- Copyright
Frequently asked questions
Yes, you can cancel anytime from the Subscription tab in your account settings on the Perlego website. Your subscription will stay active until the end of your current billing period. Learn how to cancel your subscription
No, books cannot be downloaded as external files, such as PDFs, for use outside of Perlego. However, you can download books within the Perlego app for offline reading on mobile or tablet. Learn how to download books offline
Perlego offers two plans: Essential and Complete
- Essential is ideal for learners and professionals who enjoy exploring a wide range of subjects. Access the Essential Library with 800,000+ trusted titles and best-sellers across business, personal growth, and the humanities. Includes unlimited reading time and Standard Read Aloud voice.
- Complete: Perfect for advanced learners and researchers needing full, unrestricted access. Unlock 1.5M+ books across hundreds of subjects, including academic and specialized titles. The Complete Plan also includes advanced features like Premium Read Aloud and Research Assistant.
We are an online textbook subscription service, where you can get access to an entire online library for less than the price of a single book per month. With over 1.5 million books across 990+ topics, we’ve got you covered! Learn about our mission
Look out for the read-aloud symbol on your next book to see if you can listen to it. The read-aloud tool reads text aloud for you, highlighting the text as it is being read. You can pause it, speed it up and slow it down. Learn more about Read Aloud
Yes! You can use the Perlego app on both iOS and Android devices to read anytime, anywhere — even offline. Perfect for commutes or when you’re on the go.
Please note we cannot support devices running on iOS 13 and Android 7 or earlier. Learn more about using the app
Please note we cannot support devices running on iOS 13 and Android 7 or earlier. Learn more about using the app
Yes, you can access Battle Story: Tobruk 1941 by Pier Paolo Battistelli in PDF and/or ePUB format, as well as other popular books in History & World War II. We have over 1.5 million books available in our catalogue for you to explore.