![]()
CHAPTER 1
Introduction to 3ds Max and Basic Modeling Terms
The first part of this chapter is designed to get complete beginners up to speed with an overview of the 3D Studio Max user interface, tools, and some functions. The version we’ll be covering is Max 2011; if you happen to have an earlier version a lot of this information will still be accurate.
A trial version of the latest release can be downloaded from the Autodesk website. Just go to www.autodesk.com and look in the Products tab.
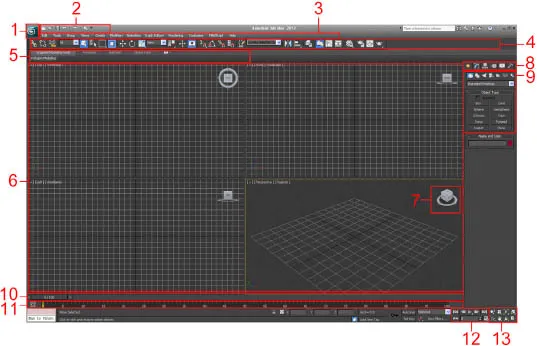
First of all let’s have a brief look at the layout of the user interface (UI). Figure 1a.1 is a screen grab of how 3ds Max looks when it’s launched. Let’s have a look at each of the main areas of the interface.
1. In the top-left corner, we have a button which is the 3ds Max logo. Click on this to bring up the Application menu; this provides the file-management commands such as opening or loading a scene and the saving options.
2. To the right of this is the quick access toolbar – it contains icons for saving, new scene, open file, and the undo and redo commands.
FIG 1a.1 Layout of the user interface.
3. Just below these we have the menu bar. This gives you access to all the tools and their settings in max along with the create options for creating 3D shapes. It also contains all the preferences and software settings under Customize > Preferences.
4. Below the menu bar is the main toolbar – this contains a lot of the basic tools we will need. Highlighted in the screenshot of the toolbar below are the select, move, rotate, and scale buttons. These are the tools we need to manipulate objects and meshes within Max.
Other options on this bar include the snap settings for snapping components using different methods. The selection options are also available here, including the selection filter, which is a useful dropbox that allows you to restrict selections to certain object types. This is very useful when dealing with complex scenes with many types of objects.
On the right side of the toolbar, as shown in the image, are the buttons to bring up the material editor and the rendering options.
FIG 1a.2
5. Beneath the main toolbar are the Graphite Modeling Tools. This section gathers all the standard edit tools related to poly modeling in one place. It really helps to speed up the modeling process.
6. The four windows highlighted by number 6 are the four default viewports. From the top left, these are the top view, front view, left view, and the perspective view. It is possible to arrange the viewports whichever way you want. To maximize or minimize the active viewport, the shortcut is ALT + W. The currently active viewport will always be highlighted by a yellow border.
You can also left click and drag into the intersection between viewports to resize them. Right click in the intersection again and select reset layout to restore the default four panel view.
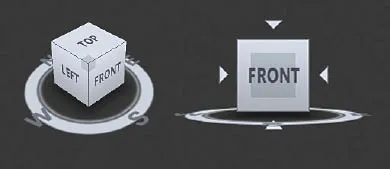
7. Highlighted here is the viewcube. This is a very handy tool for quickly changing the orientation of a camera or changing the viewport with one click. You can do this by clicking on either a direction on the compass around the viewcube or clicking on the cube itself.
When the cube is displayed in a 3D viewport you can select any corner, side, or face to position the camera. To change to a standard view, click on the center of a face.
When in a standard view four arrows will appear around the viewcube allowing you to cycle through all the standard viewports, for example front, back, and top. To go back to a 3D view, click on a side or a corner.
You can also hold the LMB (left mouse button) and drag to rotate the viewcube and viewport.
Below is an image of the viewcube. The viewcube on the left is from the perspective viewport and the right one is from the front viewport.
FIG 1a.3
8. This is the command panel and comprises six panels that give you access to most of the modeling features of 3ds Max. To display a different panel, you click its tab at the top of the command panel.
The most important panels for beginners are the create panel and the modify panel.
Create panel: This panel gives you access to the primitive shapes that are good starting points for creating models. Also featured within this tab are shapes, lights, and cameras. There are seven categories. All of these can be created by selecting what you want in the menu with the LMB and then clicking the LMB in the viewport. Then, the item will appear.
Modify panel: The modify panel is where you can change the creation parameters of an object and also where you can apply modifiers to objects to reshape them. The modify panel’s contents will contain different parameters depending on what category or type of object is selected. We will be dealing with all these various parameters as we encounter them throughout the book.
9. These are the object categories within the create panel. This is the panel which contains the basic primitive objects. The drop-down box below the icons allow you to access more advanced shapes and items. By default, it is on standard primitives.
10. This is the time slider. This displays the current frame the time slider is on and how many frames are in the total range. To move the slider, you can either select it and hold the LMB and drag it along back and forth or you could use the playback controls to the right (12).
11. The track bar sits below the time slider and is a time line displaying frames in increments. It is mainly used for adjusting keys – moving, copying, or deleting them.
12. These are the ...