HDR is both a technical solution to the limitations of digital camera sensors, and a creative tool that can give any image much more impact - but it is not without its pitfalls, and it's essential to understand these if you want to take full advantage of this innovative technique. The second edition of David Nightingale's successful Practical HDR is completely updated with the latest techniques and technologies in HDR. Practical HDR provides you with an abundance of step-by-step examples that will quickly make you an expert on the theory and practice of shooting and processing HDR images, allowing you to get the best possible results every time.
As well as practical advice on shooting and processing, the book also contains a global showcase of inspirational HDR images - you will quickly find that HDR offers unparralleled opportunities for indulging your creative instincts, from photo-realistic to hyper-realism.
Trusted by 375,005 students
Access to over 1.5 million titles for a fair monthly price.
One of the first things you learn as a photographer is that the way you perceive a scene is often quite different to how your camera evaluates and processes the same data. For example, a shot you intend as a backlit portrait may well end up as a silhouette, a shot of a brightly lit scene may end up looking too dark, and so on. In other words, the image you see is sometimes not the one you manage to take.
There are two main reasons for this. The first is that your camera will attempt to set an optimum exposure for a particular shot, so it will set the aperture or shutter speed, or both, to make sure that enough light hits the sensor to produce a well-exposed image.
The problem is, your camera assumes an average level of illumination for every shot you take, so if you shoot in a dark room, the image may well end up brighter than the original scene as your camera bases its exposure on an average level of illumination. By the same token, a shot of a person, backlit by a bright sky, may produce a shot with a beautifully exposed sky, but no detail in your subject’s face—again because the camera works on the assumption that all pictures are taken under “average” lighting conditions.
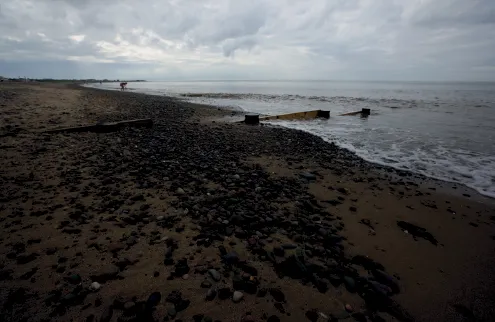
The second reason your images may not end up as you intend them is because of the difference between the way in which you see things and how your camera records them. While you might see a richly detailed landscape set against the backdrop of a bright, but cloudy sky, the camera will be likely to deliver a picture where the sky looks as you intended, but the foreground is too dark, or with a correctly exposed foreground and an overexposed, blank white sky. Worst of all, you might get an image with both a featureless sky and an overly dark foreground. In this instance, adjusting the exposure won’t fix the problem, it will just present you with a different one. Increasing the exposure to compensate for an overly dark foreground will overexpose the sky still further, while decreasing the exposure to retain the detail in the sky will lead to an even darker foreground.
A correctly exposed sky with an overly dark foreground
A correctly exposed foreground with an overexposed sky
An image containing areas of under and overexposure
An HDR image allows you to combine the brightest and darkest parts of a scene that your camera wouldn’t be able to record in a single shot.
The problem is that the “dynamic range” of the scene you are trying to photograph is larger than your camera can record. At its simplest, dynamic range is the ratio between the lightest and darkest tones in an image. This is often measured in EV (Exposure Value), which refers to the combinations of shutter speed and relative aperture that give the same exposure. Additional terms that are often used in this context are “f-stops” and “contrast ratio.”
When we view a scene, we can perceive a range of between 10–14EV (or f-stops), and if we take into account the fact that our eyes can adjust to different levels of brightness this increases to around 24EV. But digital cameras can only record an EV range of 5–9 stops, so if the scene contains an EV range of around 9 or more, there is no combination of aperture or shutter speed that will allow you to capture the entire dynamic range of the original scene. All you can do is optimize the exposure for the shadow detail or the highlight detail, but you will inevitably lose one or the other.
From a photographic point of view, there are three solutions. First, you can simply avoid taking shots where you know that the size of the EV range will compromise the quality of the final image. In the case of a landscape shot this might mean waiting until the balance of light between the brightest and darkest areas of the scene falls within a smaller EV range.
Second, you could use a graduated neutral density (ND) filter to darken the brightest areas of the image. These can darken a portion of an image in increments from 1–3EV and are especially useful for landscape photography as the sky can often be a lot brighter than the foreground. However, the gradation on the filter is fixed, so it is generally only suitable if there is a clear “dividing line” between the light and dark areas of the scene—useful for a landscape with a flat horizon, but less useful for images where the bright and dark areas are irregularly shaped.
Finally, you can shoot a range of different exposures that record the detail in both the deepest shadows and the brightest highlights, and then combine them into an High Dynamic Range (HDR) image, which is clearly the key topic for the remainder of this book.
JPEG files distribute the data in a slightly different way to Raw files. While there is still a bias toward the highlight detail, the number of levels allocated to each area of brightness is more evenly distributed, as illustrated in the accompanying grid.
12-bit Raw file
Levels
1: Highlight areas
2048
2: Bright areas
1024
3: Midtones
512
4: Dark areas
256
5: Shadow areas
128
8-bit JPEG file
Levels
1: Highlight areas
69
2: Bright areas
50
3: Midtones
37
4: Dark areas
27
5: Shadow areas
20
Digital Sensors and Contrast Ratios
Your eyes and your camera’s sensor respond to light in a similar way, with photons striking a receptor (either your retina or the photosites on the sensor). This generates a signal, the strength of which is proportional to the amount of photons striking the receptor within a given amount of time. With the eye, exposure to light is continuous, and the effect on the retina decays over time, but with a camera the effect is additive—the shutter opens, photons are collected in the photosites for a finite period of time, and then the shutter closes. At this point, the photons are “counted” to produce a digital signal indicating the amount of light that was received during the exposure.
The reason a typical digital camera can capture an EV range of between 5 and 9 stops is because each photosite on your camera’s sensor has a specific capacity, and once it reaches the maximum limit the signal it outputs is the same, irrespective of how many further photons strike it. In other words, it’s like a bucket: once it’s full there is no way to add any further content. This is significant, as differences in brightness can only be recorded in terms of the differences in the number of recorded photons. For example, if the capacity of each photosite was a maximum of 1024 photons, then the theoretical maximum EV range it could record would ...
Table of contents
Cover
Half Title
Title Page
Copyright Page
Table of Contents
Introduction
1 Understanding Dynamic Range
2 Shooting for HDR
3 Merging Your Bracketed Sequence
4 Creating Photorealistic HDR Images
5 Creating Hyper-real HDR Images
6 HDR Post-production
Glossary
Index
Acknowledgments
Frequently asked questions
Yes, you can cancel anytime from the Subscription tab in your account settings on the Perlego website. Your subscription will stay active until the end of your current billing period. Learn how to cancel your subscription
No, books cannot be downloaded as external files, such as PDFs, for use outside of Perlego. However, you can download books within the Perlego app for offline reading on mobile or tablet. Learn how to download books offline
Perlego offers two plans: Essential and Complete
Essential is ideal for learners and professionals who enjoy exploring a wide range of subjects. Access the Essential Library with 800,000+ trusted titles and best-sellers across business, personal growth, and the humanities. Includes unlimited reading time and Standard Read Aloud voice.
Complete: Perfect for advanced learners and researchers needing full, unrestricted access. Unlock 1.5M+ books across hundreds of subjects, including academic and specialized titles. The Complete Plan also includes advanced features like Premium Read Aloud and Research Assistant.
Both plans are available with monthly, semester, or annual billing cycles.
We are an online textbook subscription service, where you can get access to an entire online library for less than the price of a single book per month. With over 1.5 million books across 990+ topics, we’ve got you covered! Learn about our mission
Look out for the read-aloud symbol on your next book to see if you can listen to it. The read-aloud tool reads text aloud for you, highlighting the text as it is being read. You can pause it, speed it up and slow it down. Learn more about Read Aloud
Yes! You can use the Perlego app on both iOS and Android devices to read anytime, anywhere — even offline. Perfect for commutes or when you’re on the go. Please note we cannot support devices running on iOS 13 and Android 7 or earlier. Learn more about using the app
Yes, you can access Practical HDR by David Nightingale in PDF and/or ePUB format, as well as other popular books in Médias et arts de la scène & Médias numériques. We have over 1.5 million books available in our catalogue for you to explore.