Creating Motion Graphics with After Effects
eBook - ePub

Creating Motion Graphics with After Effects

Essential and Advanced Techniques

  1. 768 pages
  2. English
  3. ePUB (mobile friendly)
  4. Available on iOS & Android
eBook - ePub

Creating Motion Graphics with After Effects

Essential and Advanced Techniques

About this book

After Effects CS5.5 Update:

/tv.adobe.com/show/after-effects-cs55-new-creative-techniques/

Chris and Trish Meyer have created a series of videos demonstrating how to use their favorite new and enhanced features in After Effects CS5.5. Virtually all of these videos use exercise files from Creating Motion Graphics with After Effects (5th Edition for CS5) as their starting point, extending the usefulness of this book for its owners. These videos may be viewed for free on AdobeTV.

* 5th Edition of best-selling After Effects book by renowned authors Trish and Chris Meyer covers the important updates in After Effects CS4 and CS5
* Covers both essential and advanced techniques, from basic layer manipulation and animation through keying, motion tracking, and color management
* The downloadable resources are packed with project files for version CS5, source materials, and nearly 200 pages of bonus chapters

Trish and Chris Meyer share over 17 years of hard-earned, real-world film and video production experience inside this critically acclaimed text. More than a step-by-step review of the features in AE, readers will learn how the program thinks so that they can realize their own visions more quickly and efficiently. This full-color book is packed with tips, gotchas, and sage advice that will help users thrive no matter what projects they might encounter.

Creating Motion Graphics 5th Edition has been thoroughly revised to reflect the new features introduced in both After Effects CS4 and CS5. New chapters cover the revolutionary new Roto Brush feature, as well as mocha and mocha shape. The 3D section has been expanded to include working with 3D effects such as Digieffects FreeForm plus workflows including Adobe Repoussé, Vanishing Point Exchange, and 3D model import using Adobe Photoshop Extended. The print version is also accompanied by downloadable resources that contain project files and source materials for all the techniques demonstrated in the book, as well as nearly 200 pages of bonus chapters on subjects such as expressions, scripting, and effects.

Subjects include: Animation Techniques; Layer Management; Modes, Masks, and Mattes; Mastering 3D Space; Text Animation; Effects & Presets; Painting and Rotoscoping; Parenting, Nesting, and Collapsing; Color Management and Video Essentials; Motion Tracking and Keying; Working with Audio; Integrating with 3D Applications; Puppet Tools; Expressions; Exporting and Rendering; and much more.

Frequently asked questions

Yes, you can cancel anytime from the Subscription tab in your account settings on the Perlego website. Your subscription will stay active until the end of your current billing period. Learn how to cancel your subscription.
No, books cannot be downloaded as external files, such as PDFs, for use outside of Perlego. However, you can download books within the Perlego app for offline reading on mobile or tablet. Learn more here.
Perlego offers two plans: Essential and Complete
  • Essential is ideal for learners and professionals who enjoy exploring a wide range of subjects. Access the Essential Library with 800,000+ trusted titles and best-sellers across business, personal growth, and the humanities. Includes unlimited reading time and Standard Read Aloud voice.
  • Complete: Perfect for advanced learners and researchers needing full, unrestricted access. Unlock 1.4M+ books across hundreds of subjects, including academic and specialized titles. The Complete Plan also includes advanced features like Premium Read Aloud and Research Assistant.
Both plans are available with monthly, semester, or annual billing cycles.
We are an online textbook subscription service, where you can get access to an entire online library for less than the price of a single book per month. With over 1 million books across 1000+ topics, we’ve got you covered! Learn more here.
Look out for the read-aloud symbol on your next book to see if you can listen to it. The read-aloud tool reads text aloud for you, highlighting the text as it is being read. You can pause it, speed it up and slow it down. Learn more here.
Yes! You can use the Perlego app on both iOS or Android devices to read anytime, anywhere — even offline. Perfect for commutes or when you’re on the go.
Please note we cannot support devices running on iOS 13 and Android 7 or earlier. Learn more about using the app.
Yes, you can access Creating Motion Graphics with After Effects by Chris Meyer,Trish Meyer in PDF and/or ePUB format, as well as other popular books in Media & Performing Arts & Film & Video. We have over one million books available in our catalogue for you to explore.

Information

1
After Effects 101

Moving in and getting comfortable

After Effects can be thought of as a blank canvas – a canvas that comes with hundreds of brushes and tools to create images with. The problem with too many tools is that it can be hard to know where to start. Therefore, in this first chapter we want to give you an overview of the After Effects user interface. We also want to give you an idea of how After Effects “thinks” – how projects are structured, how to import sources, and how everything comes together.
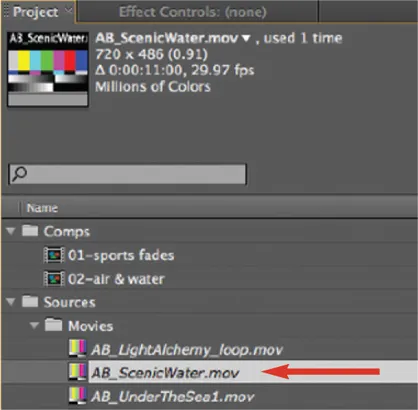
Our example project files share footage from a central Sources folder on the DVD. If you copy the Chapter Example Projects and Bonus Chapters folders to your hard drive, be sure to also copy the Sources folder. If After Effects cannot find an already-imported source file, it will temporarily replace its icon with color bars in the Project panel. To fix this problem, just double-click this icon and locate the first missing footage item on your drive; After Effects will then automatically find the other missing files.
image

Welcome to After Effects

When you first launch After Effects CS5, you’ll see a Welcome screen that includes a searchable Tip of the Day, as well as links to your most recent projects, the Help system, and common tasks such as opening Bridge to browse template projects or other potential source material. It can be reopened at any time by choosing Help > Welcome and Tip of the Day.
The user interface has received a few tweaks in CS5. Generally it is even darker and more compact, with updated icons that should be easier to read across a wider range of user interface brightness settings. (The User Interface Brightness can be set in Preferences > Appearance.)

The After Effects Project

All of your work occurs inside an After Effects project file (file extension: .aep). You must import source material into a project to use it. Importing creates a link to your sources, but does not actually copy the sources into the project file – so the project file itself remains small. When you copy a project to another computer, you need to move its source files with it. If After Effects cannot find an already-imported source file, it creates a placeholder and lists the source as temporarily missing.
Example Project
Open the 01-Example Project.aep project file to work through the examples in this chapter. You will find it on this book’s DVD in the Chapter Example Projects > 01-After Effects 101 folder.
Source material is referred to as footage and appears in the Project panel. Audio, video, still images, vector artwork, PDF files, and other formats may all be footage. Every footage item has a set of parameters attached to it that determine its alpha channel (transparency), frame rate, and other important information that tells After Effects how to use it. We will go over the Project panel and basic importing a few pages from now; importing and interpreting footage are covered in much more detail in Chapter 38.

Compositions

The next major building block is the composition (“comp” for short). In comps, you assemble your footage items into the desired composite image. Each item in a composition is referred to as a layer. A layer is usually a footage item that has been added to the current comp. There are other types of layers, including synthetic footage items such as solids, text, and shapes; “null objects” that help group together layers or which can serve as controllers; 3D cameras and lights; and special adjustment layers for applying effects.
You can use the same footage item multiple times in the same composition; you can also use it in multiple compositions inside the same project.
Compositions are sorted in the Project panel alongside your footage items. When you open a composition, it appears in two panels: the Composition panel and the Timeline panel. The Comp panel is a stage where you can arrange your layers visually; the Timeline panel is where you stack them, sequence them in time, and control most of their animations. Indeed, virtually any property of a layer – including effects you apply to them – can be animated through a process known as keyframing (covered in Chapters 3, 4, and beyond).
An important concept is that compositions are always “live” – you can go back later and alter any setting of any layer. This allows you to try new ideas or change your mind while maintaining maximum image quality. All of your edits to layers and footage are also nondestructive, which means you can always get back to your original sources.
A composition can contain your final work, which you render (compute, then save) to disk. The resulting file – usually a movie or a sequence of stills – can then be used as is, or if it’s a title or visual effect, it can be incorporated into the finished program in an editing system. You can also render movies to embed directly in a website.
One After Effects project file can contain as many compositions as you like. Compositions can also be used as layers in other compositions (this is called nesting), making it possible to build complex animations that are still easy to understand and edit. The basics of creating a composition are covered in detail in the next chapter. We’ll discuss building chains of comps in Chapters 18 and 19.
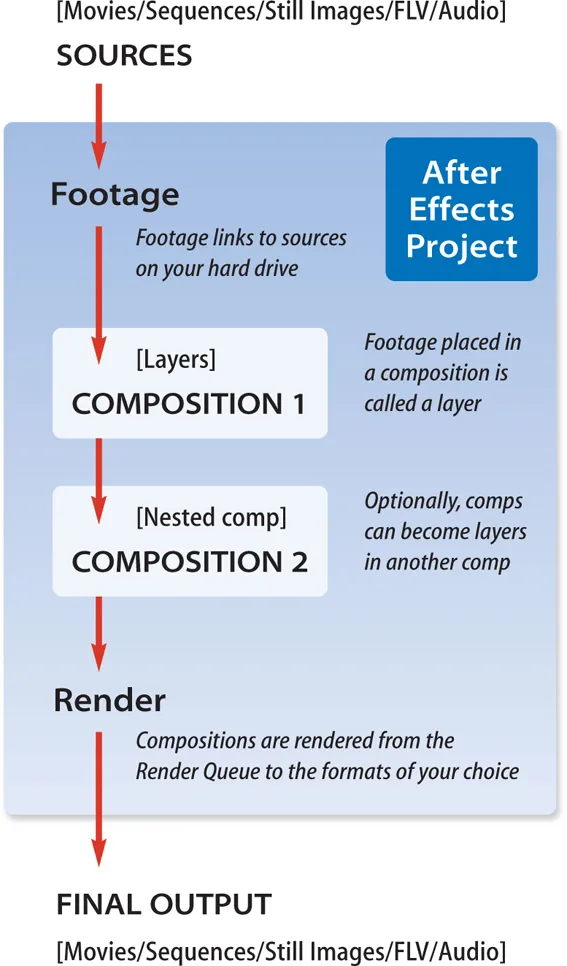
This is how an After Effects project is structured: Source files on your computer are imported as footage items; footage is used as layers in a composition. A comp can be rendered directly or used as a layer in other comps (this is called nesting).
image
You can queue up multiple comps to render as a batch while you sleep. (Rendering is covered in Chapters 42 through 44.)

Factoid: Importing Projects

You can import an entire project into the current project. After Effects will copy the links to the imported project’s source files as well.
In the rest of this chapter, we will give you an overview of the After Effects Application window and its main panels. We’ll then discuss importing files, including using Adobe’s centralized media management utility Bridge. Lastly, we’ll show you how to rearrange the panels and frames inside the Application window, and create custom workspaces.
The Standard workspace in After Effects. The active panel is highlighted with a yellow outline. Note the QuickSearch fields (circled in red) which were added to the Project and Timeline panels in CS4. Background courtesy Artbeats/Light Alchemy.
image

The Application Window

When you open a project in After Effects, it opens into its Application window. By default, this window occupies your entire main monitor; you can resize it by dragging the lower right corner.
The Application window is divided into frames and panels. A frame is a major space division inside this window. One or more panels of information may be “docked” into each frame. Panels are dedicated to different types of information, such as the Tools, Project, Composition, Timeline, Audio, Info, Preview, and other panels. Any panels not currently open can be accessed through the Window menu. In some cases, you may have multiple copies of the same type of panel, such as having multiple comps open.

Tip: Resize Window

To resize the Application window (or any floating window) to fit inside its current screen, press Command+\ on Mac (Control+\ on Windows). Press this again to expand the window further to fill the screen, with its borders extending beyond the screen.
Later in this chapter we will show you how to rearrange these frames and panels, as well as how to save your custom layout as a workspace.
QuickSearch fields in the Project and Timeline panels were added in CS4. These make it much easier to find specific sources or parameters, as well as comments in these panels. Related to this, the old Find icon has now disappeared from the bottom of the Project panel; it has been replaced by the QuickSearch field in the Project panel. You can type in the name of the file you are looking for, characteristics of it such as duration or file extension, or the special phrases “missing“, “used“, and “not used“.
The Selection tool (shortcut = V) is the one you will use most often. The Rotation and Pan Behind tools are covered in Chapter 3, 10, and 13. The Pen tool can be used to draw animation motion paths (Chapter 3), but is mostly used to create masks (Chapter 10) and shapes (Chapter 32). The 3D Camera tools and the Axis Mode buttons are covered in Chapter 13. The Type tool is covered in Chapter 21. The Paint tools are covered in Chapter 33, Roto Brush (new in CS5) in Chapter 34, and the Puppet tools in Chapter 35.
image

The Tools Panel

After Effects features a toolbar (known as the Tools panel) that defaults to running as a strip along the top of the Application window. It contains a number of icons you can click to switch between tools; they also visually confirm which tool is currently selected. Many of these tools have popup menus that allow you to choose among variations on that tool – such as different basic shapes for masks and shape layers.
When you select specific tools, additional options may also appear in the middle of the Tools panel (an example would be buttons to define the color and type of Stroke and Fill when you select a Shape tool). Selecting some tools will also automatically open related panels – for example, selecting the Text tool opens its Character and Paragraph panels.

Panels in Depth

Many tools and functions inside After Effects have dedicated panels. As we cover these tools in future chapters, we will also cover their related panels in depth. Those chapters include:
Composition, Timeline, Layer, and Preview: Chapter 2.
Motion Sketch, Smoother, and Wiggler: Chapter 5.
Align: Chapter 6.
Layer: Chapters 3, 7, , 29, 30, 33, 34, and others.
Mask Interpolation: .
Character & Paragraph: Chapter 21.
Effects & Presets plus Effect Contro...

Table of contents

  1. Cover
  2. Halftitle
  3. Title
  4. Copyright
  5. Contents
  6. Introduction: When the Going Gets Tough…
  7. Getting Started: How to Use This Book
  8. 1. After Effects 101: Moving in and getting comfortable
  9. 2. Creating a Composition: Procedures and shortcuts for setting up a blank canvas
  10. 3. Basic Animation: Animating a layer’s transformations along with mastering motion paths
  11. 4. Keyframe Velocity: The secrets to creating sophisticated animations
  12. 5. Animation Assistance: A series of tips, tricks, and Keyframe Assistants to make your life easier
  13. 6. The Layer Essentials: Tips for managing multiple layers efficiently, including hot keying, markers, and the layer switches
  14. 7. Trimming Layers: Learning how to edit layers through trimming, splitting, and sequencing
  15. 8. Motion Blur and More: Life’s a blur – at least, to a camera it is
  16. 9. Blending Modes: One of the most creative tools After Effects offers is mixing images together using blending modes
  17. 10. All About Masking: Masking tools create transparency using standard or freeform Bezier shapes
  18. 11. All About Track Mattes: Mastering track mattes is a prerequisite for creating complex multilayered compositions
  19. 12. Stencils and the “T”: Stencils are a great way to add transparency to multiple layers. And then there’s that “T” switch…
  20. 13. 3D Space: Adding depth to your animations by mastering Z space
  21. 14. Cameras: Get new perspective on your 3D layers by placing cameras around them
  22. 15. Lighting in 3D: We continue our exploration of 3D by discussing how to illuminate your layers
  23. 16. Parallel Worlds: Combining 3D layers from different sources
  24. 17. Parenting Skills: The ability to group layers together greatly eases the creation of complex animations
  25. 18. Nesting Compositions: Creating complex motion graphics that are easy to edit requires building a hierarchy of compositions
  26. 19. Precomposing: Continuing our tour of After Effects’ rendering order, we prove that precomposing is easy once you know how…
  27. 20. Collapsing Transformations: Options for maximizing resolution also rewire the rendering order
  28. 21. Textacy: Mastering this powerful text animation engine is well worth the effort
  29. 22. Applying and Using Effects: After animating layers comes treating their images with special effects
  30. 23. Effects Roundup Overview: Where to find tips on our favorite effects
  31. 24. Compound Effects: Compound effects may seem nonintuitive at first, but they require learning only a few simple rules
  32. 25. Presets and Variations: Alternatives to reinventing the wheel every time you use an effect
  33. 26. Color Management: Preserving your colors through your workflow
  34. 27. Keying: Effectively removing a color background requires attention throughout the chain
  35. 28. Frame Rate Manipulation: Time Stretch, Reverse, and Remap, plus smoothing the result with Frame Blending
  36. 29. Motion Stabilization: After Effects includes the ability to stabilize wobbly footage. Mastering this is also the key to having one object track another
  37. 30. Motion Tracking: Motion Tracking allows you to add an object to a scene after it was shot – if you’re both lucky and good…
  38. 31. mocha: Advanced motion tracking using mocha for After Effects plus mocha shape
  39. 32. Shape Layers: These new vectorbased layers open a multitude of graphic possibilities
  40. 33. Paint and Clone: A painting workout in After Effects using the Brush, Erase, and Clone tools
  41. 34. Roto Brush: A new tool for separating foregrounds from backgrounds
  42. 35. The Puppet Tools: A fun way to organically warp and animate layers
  43. 36. Working with Audio: An overview of handling audio in After Effects, including how to “read” audio as clues for editing and animation
  44. 37. Expressions: Expressions hold the key to animating repetitive tasks or complex relationships
  45. 38. Import and Interpret: Getting files in, deciding how After Effects should interpret them…and changing your mind later
  46. 39. Integration 101: Going beyond the simple exchange of rendered movies and images
  47. 40. Integrating with 3D Applications: Techniques to get more information from your 3D program into After Effects
  48. 41. Video Issues: An overview of all those pesky technical issues you need to keep straight when you’re working with video
  49. 42. Render Queue: The Render Queue is where you set up and manage the creation of your final work
  50. 43. Advanced Rendering: Network rendering and project management features
  51. 44. Prerendering and Proxies: Planning ahead can save time later
  52. 45. What’s Your Preference?: Setting preferences to optimize your workflow
  53. Audio Output Mapping
  54. Media Credits
  55. Index
  56. Resources