
- 148 pages
- English
- ePUB (mobile friendly)
- Available on iOS & Android
eBook - ePub
Site Carpentry
About this book
This book deals with sound craftsmanship utilising correct tools and materials. Practical advice on subjects such as framework, design and construction, timberfloor construction and arch centres.
Trusted by 375,005 students
Access to over 1.5 million titles for a fair monthly price.
Study more efficiently using our study tools.
Information
CHAPTER 1
The Basic Tool Kit
In this book the term carpentry is used in the wider sense and is meant to apply to all woodworking carried out on site, including formwork, carcasing and first and second fixing.
Although modern developments are more and more away from complicated joints and elaborate assemblies, the ultimate success of the work both for economy and quality still depends upon sound craftmanship with a systematic approach to the work plus overall precision and first-time accuracy in cutting, fitting and assembling. These qualities require sustained habits of concentration and the availability of satisfactory tools and equipment.
The tool kit
The carpenter’s tool kit must be a matter of personal choice but it is best to start with a basic set of tools and add to them only when a special tool is needed. The writer considers that the following list should cover most of the tools needed for straightforward work.
1. An American pattern axe.
2. An American pattern claw hammer.
3. A No.1 Warrington pattern hammer for small nails.
4. 150 and 300 mm all-steel try squares.
5. A spirit level with an additional bubble for plumbing.
6. A plumb bob, preferably a brass centre bob.
7. Two marking gauges, of different coloured woods for easy identification.
8. A 1000 mm fourfold boxwood rule; A 2000 mm flexible steel rule is a useful adjunct, but not a substitute.
9. A pair of carpenter’s compasses, preferably with quadrant and screw adjustment.
10. A handsaw 6 points to the inch (25.4 mm, metrication has not caught up yet) and from 610 to 660 mm long.
11.A 500 mm panel saw with 10 points to the inch.
12. A 300 mm tenon saw with 14 points to the inch. The brass backed saw is more expensive but generally has better steel in the blade and can be straightened more easily if the edge loses its tension (Fig. 1).
13. A pad saw with spare blades.
14. A hack saw with spare blades.
15. A wooden jackplane; although these have gone out of fashion they are superior to steel planes for taking off heavy shavings, are not so likely to break if dropped and can be trued up when worn.
16. A steel fore plane or try plane 450, 560 or 610 mm long.
17. A steel smoothing plane.
18. A rebate plane; the wooden rebate plane with the skew mouth works very sweetly but the steel rebate plane is usually fitted with a fence and is easier to set.
19. A mallet; this can be home made with an ash handle and a head of beech or applewood. The writer had a mallet head of laburnum which gave many years of service.
20. An assortment of chisels. Firmer chisels are more robust but bevelled edged chisels are nicer to use and are better for cutting dovetail sockets, etc.
21. A ratchet brace with a wide swing and an assortment of bits. A screwdriver bit is useful for stubborn screws. A countersink is essential.
22. A cold chisel about 38 mm wide and a plugging chisel.
23. A steel cabinet scraper and hardened and highly polished steel sharpener are necessary if hardwood has to be cleaned up on site.
24. A 610 mm nail bar of hard octagonal section steel.
25. Various saw files, a flat mill saw file, a smooth rat tail file and any other files needed to keep the tools in good order.
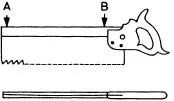
Fig.1. A BUCKLED TENON SAW MAY BE STRAIGHTENED BY GENTLE TAPS AT A AND B
26. A combination indian oil stone and leak proof oil can.
27. A glass paper rubber purchased or home made.
28. An oily rag kept in a large flat tin.
29. A nail punch and a centre punch.
30. Several screwdrivers to suit from No. 4 to No. 12 screws.
Other equipment supplied by the contractor or made up on the job include a saw sharpening horse (most essential), various straight edges, preferably of rift sawn timber and either yellow pine or sitka spruce, a 3 m measuring rod and a 30 m steel tape. A linen tape is less open to damage but cannot be used for setting out specified measurements from drawings to a great accuracy, although it may be used for taking measurements and transferring them.
A pinch rod (Fig. 2) is useful for measuring between internal faces, e.g. in door openings.

Fig.2. PINCH ROD FOR INTERNAL MEASUREMENT
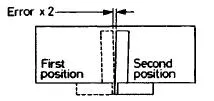
Fig.3. TESTING TRY SQUARE
Care and maintenance of tools
The following are, in the writer’s opinion, points which need to be observed in looking after and handling tools.
THE AXE: Although this should be kept sharp, the edge should be thick to ensure that the chips are forced off as they are cut.
HAMMERS: The face of the head should be polished (with old glass paper) and kept free from grease or nails will be bent over when driving. The claw hammer should not be used for drawing large nails.
TRY SQUARES: Should be checked against a straight edge (Fig. 3) and corrected or discarded if inaccurate.
SPIRIT LEVEL: The accuracy of this depends primarily upon the sensitivity of the bubble. (The bubbletube should of course have twin markings). When selecting one from several in a shop place a bus-ticket under the end of each one on the counter in turn and buy the one which shows the greatest movement of the bubble. Test similarly for plumbing against a vertical surface. It may be tested for accuracy by reversing on a level surface. In the writer’s opinion it is better to use a plumb line for testing vertical heights if great accuracy is needed.

THE PLUMB BOB: This is always positive. Using a fine line minimises the effect of the wind. A line may be plumbed single handed on to the floor (Fig. 4), a quoin may be checked both ways by a combination of sighting and measuring (Fig. 5).
FOLDING BOXWOOD RULES: Should preferably not be used for marking long lengths involving a number of pencil ticks, particularly on sawn timber If a steel tape is not available two rules may be ‘leapfrogged’ (Fig. 6).

Fig.6. MARKING OFF LONG LENGTH BY LEAPFROGGING TWO RULES
SAWS: are probably the most important part of the carpenters kit. The saw should cut freely and should not run one way or the other. When cutting to a line, half the lines should be cut away when sawing; the line of shadow along the side of the saw in the cut should remain even.
Assuming that the saw is in a bad condition, the following procedure is necessary to bring it into full working order.
1. Top off the teeth using a mill saw file in a topping clamp (Fig. 7) until the points of the lower teeth have been reached and the line of points follows a slight camber.
2. Shape the teeth and bring them all to the same size (Fig. 7). The saw file should be square to the blade and the fronts of the teeth leaning back at 15 deg. to the vertical (8 deg. for rip saws). The width of the file face should be more than twice the width of the tooth or the centre of the file will get double wear (Fig. 8).

Fig.7. TOPPING AND SHAPING SAW TEETH. NOTE ALLTEETH ARE NOT YET THE SAME SIZE BUT POINTS ARE LEVEL

Fig.8.
3. Set each tooth from about half the depth of the gullet. Alternate teeth are set from each side. Too much set is not needed on clean, dry timber; but when sawing used formwork timber, this will be both gritty and wet and more set is needed. If the pliers-type set is used with a single plunger, the setting angle may be increased by grinding off the anvil and the plunger to fit.
Excess set may be removed by running an oilstone along each side of the saw, flattening off the set as required. This has the advantage of making the cut smoother while enabling the saw to be resharpened several times without re-setting.
4. Finally sharpen by putting the bevel on the cutting edge. The file should be held at an angle of about 70 deg. to the saw blade (85 deg. for a rip saw). Filing should be on every other gullet, the file pointing towards the handle and filing the front of the tooth leaning towards the operator. Of course this is turned round and repeated in the other gullets.
USING THE SAW: Sawing should be done without pressure using long rythmic strokes about 3/4 the length of the saw. In the case of the pad saw however that part of the saw which is to be used according to the degree of curvature of the cut should be pushed out and the cutting done in short strokes with the handle close to the timber.
PLANES: Plane irons should be shaped and the shape maintained during each sharpening as follows:
The edge of the jack plane should be ...
Table of contents
- Cover
- Full Title
- Copyright
- Contents
- Preface
- 1 THE BASIC TOOL KIT
- 2 FORMWORK
- 3 TIMBER FLOOR CONSTRUCTION
- 4 CENTRES AND ARCHES
- 5 SHORING
- 6 ROOFING
- 7 STAIR CONSTRUCTION
- 8 PARTITIONS
- 9 WINDOWS AND DOORS
- 10 INTERNAL FITMENTS
- 11 TIMBER BUILDINGS
- Appendix A
- Index
Frequently asked questions
Yes, you can cancel anytime from the Subscription tab in your account settings on the Perlego website. Your subscription will stay active until the end of your current billing period. Learn how to cancel your subscription
No, books cannot be downloaded as external files, such as PDFs, for use outside of Perlego. However, you can download books within the Perlego app for offline reading on mobile or tablet. Learn how to download books offline
Perlego offers two plans: Essential and Complete
- Essential is ideal for learners and professionals who enjoy exploring a wide range of subjects. Access the Essential Library with 800,000+ trusted titles and best-sellers across business, personal growth, and the humanities. Includes unlimited reading time and Standard Read Aloud voice.
- Complete: Perfect for advanced learners and researchers needing full, unrestricted access. Unlock 1.5M+ books across hundreds of subjects, including academic and specialized titles. The Complete Plan also includes advanced features like Premium Read Aloud and Research Assistant.
We are an online textbook subscription service, where you can get access to an entire online library for less than the price of a single book per month. With over 1.5 million books across 990+ topics, we’ve got you covered! Learn about our mission
Look out for the read-aloud symbol on your next book to see if you can listen to it. The read-aloud tool reads text aloud for you, highlighting the text as it is being read. You can pause it, speed it up and slow it down. Learn more about Read Aloud
Yes! You can use the Perlego app on both iOS and Android devices to read anytime, anywhere — even offline. Perfect for commutes or when you’re on the go.
Please note we cannot support devices running on iOS 13 and Android 7 or earlier. Learn more about using the app
Please note we cannot support devices running on iOS 13 and Android 7 or earlier. Learn more about using the app
Yes, you can access Site Carpentry by C.K. Austin in PDF and/or ePUB format, as well as other popular books in Technology & Engineering & Architecture Methods & Materials. We have over 1.5 million books available in our catalogue for you to explore.