![]()
| Project Fact Card:, Project 1: Drag and drop sorting |
Who is it for? - 4- to 5-year-olds (NC Level 1)
| What do I need to know? - How to search for and save images
- How to use basic draw tools to create simple shapes
- How to insert images
- How to lock objects to the page in drawing software
|
What will the children do? - Select images on the screen and position them according to observable characteristics using pens or fingers on a whiteboard, a stylus on a tablet PC or the mouse or other input device on a PC
|
What should the children know already? - That it is possible to interact with an image on the computer to make changes to it
- How to select an item on the screen
| What resources will I need? - Drawing software or whiteboard software which allows drag and drop
- Whiteboard, tablet PC or touch-screen will help
|
What will the children learn? - That pictures provide information
- That objects can be described, identified and sorted using keywords
- That ICT can help to sort and present information
- That object-based drawing software can be used to model and present sorting activities
- That ICT can be used to communicate ideas through pictures
- That ICT makes it easy to correct mistakes and explore alternatives
|
How to challenge the more able - Help children to devise and create their own sorting sheets
- Encourage and support children to find their own images to add to the exercise
- The sorting can be extended to two functions and Venn diagrams or Carroll diagrams introduced
- Work with a very similar group of objects to encourage careful observation of differences
| How to support the less able - Provide a simplified collection of images
- Make sure that the images and diagrams are large and clear
- Physically support the movement of images
|
Why teach this? - The activity in this project is designed to emulate an activity that the children should be familiar with using concrete apparatus.
- The main focus of the activity is the FS Area of Learning ‘Knowledge and understanding of the world’ as the children explore and examine objects, sorting them by one function, and find out about ICT.
- They will operate simple equipment and develop an interest in the technology.
- It is possible to carry out this activity using images of almost any collection of objects. They could be photographs of animals or insects, even the children themselves. The internet is also a useful source of images; the process of sorting and presenting the information can be carried out using things that the children are interested in, e.g. vehicles, cartoon characters, food, fruit.
|
PROJECT 1
Drag and drop sorting
What will the children do?
The provisional nature of ICT that enables interaction with images to change their layout and appearance is key to the sorting activity in this project. As well as developing the children's knowledge and understanding of the objects that they are sorting, they will be developing skills controlling the software and understanding of the functions of the technology. There are opportunities to contribute to physical development through the necessary motor control of the mouse, touchpad, stylus and interactive whiteboard.
There are several commercial sorting games available and by using software such as Flash or Hot Potatoes – JMatch it is possible to create drag and drop exercises which offer feedback to the children by not allowing ‘incorrect’ placing of images and praising ‘correct’ ones. While there may be advantages to these types of ICT resource when a practitioner is unable to observe, in a practitioner-led group activity, the facility to place objects anywhere on the screen and discuss the children's reasons makes a valuable contribution to learning and assessment.
The type of draw file described in this project is easily created and has the advantage of being tailored to the needs, interests and environment of the children.
Activity 1: Drag and drop sorting
The key Foundation Stage activity is the sorting of objects by one function. Clearly the sorting of screen-based images needs to complement hands-on activities with physical objects but can extend the activity to objects that would be hard to obtain or difficult or dangerous to handle.
Whether the images are on the whiteboard or computer screen the activity requires the children to select images and move them to the appropriate part of the screen using the pen or finger on the interactive whiteboard or the mouse or other input device on the computer.
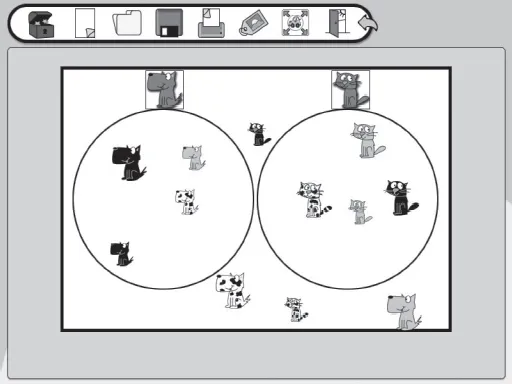
A sorting exercise using BlackCat Sort on the interactive whiteboard
What should the children know already?
While some understanding that it is possible to interact with an image on the computer to make changes to it will help the children to focus on the objects, it is not essential. Similarly, some understanding of ‘point and click’ to select an item on the screen will help, but this activity could equally serve as an introduction to computer use. Whatever the children's prior knowledge, their development will be aided by including some discussion of the role of the technology in the activity and how the children managed to control it.
What do I need to know?
The resource for this activity can be created using any drawing software or general purpose software like Microsoft Word or Textease. All interactive whiteboards come with software tools and there is a growing range of interactive whiteboard teaching tools like Lesson Planit and Easiteach which enable the creation of this type of resource. The examples here use Easiteach and Textease but any software which will enable images to be imported, selected and moved will work.
How to search for and save images
Most drawing software will come with a range of images. Whiteboard software, too, prides itself on the range of visual resources supplied with the software for teachers and practitioners to use. If, however, you cannot locate the image that you require, there are several avenues open to you.
Search online using a search engine like Google images
Photograph the object using a digital camera
Scan pictures from books or magazines
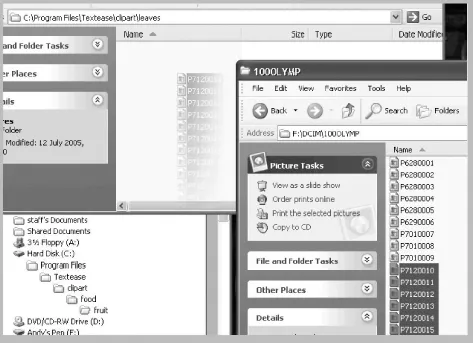
Whatever the source, the resultant image files need to be saved to disk so that they can be inserted in the document. Textease and Easiteach use the same resource banks so a collection of images can be saved in the Clip Art directory and used in either program. The easiest way to transfer images is by opening two windows: one for the source – in this case the digital camera:
| Copy or Move? When dragging files from one window to another, one of two things will happen. - If both windows are from the same disk the file will be moved.
- If the windows are from different disks the file will be copied.
|
and the other for the destination folder or directory on the local disk or network server. The images that you require can then be selected and dragged to the destination folder window. Creating a separate folder for each collection of images makes it easier to locate and insert them later on. Files can be transferred one at a time or the entire...