Design Games for Architecture teaches you how to create playful software tools based on your architectural design processes, whether or not you are familiar with game design technology. The book combines the fun and engaging aspects of video games to ease the sometimes complex process of learning software development. By working through exercises illustrated with screen shots and code, you acquire knowledge about each step required to build useful tools you can use to accomplish design tasks. Steps include analysing design processes to identify their logic, translating that logic into a collection of objects and functions, then encoding the design procedure into a working software tool. Examples presented in the book are design games---tools that a designer "plays" like video games---that span a wide range of design activities. These software tools are built using Unity, free, innovative, and industry-leading software for video game development. Unity speeds up the process of software creation, offers an interface that will be familiar to you, and includes very advanced tools for creating forms, effects, and interactivity. If you are looking to add cutting-edge skills to your repertoire, then Design Games will help you sharpen your design thinking and allow you to specialize in this new territory while you learn more about your own design processes.
- 208 pages
- English
- ePUB (mobile friendly)
- Available on iOS & Android
eBook - ePub
About this book
Trusted by 375,005 students
Access to over 1.5 million titles for a fair monthly price.
Study more efficiently using our study tools.
Information
Chapter
1
1
TOOLS OF THE TRADE
In the following chapters I will present several example design games and explain how they are built. For each example I will examine the design task that the tool addresses, how to analyze that task for its constituent parts and how that analysis gets translated into working software. But before getting into those examples, which constitute the bulk of this book, I need to discuss the software that you will be using to build them.

www.routledge.com/cw/westre
The only software necessary to complete the exercises in this book is called Unity. Unity is a software development environment used to create video games. A software development environment is like a one-stop-shop for creating software. Instead of relying on a variety of different applications to assemble files, write code and package the final product, Unity and other software like it gather all of these functions into a single place. This eliminates much of the confusion that is involved in hunting down many tools each providing a different function. Unity gathers a wide variety of very powerful capabilities into a single package. This includes a physics engine for simulating movement and collisions, advanced lighting for achieving realistic scenes, effects like fire and water, and many other cutting-edge technologies that have emerged from the video game industry. Unity also makes it easy to distribute games to PC and Mac computers, onto websites, mobile phones and video game consoles like the Nintendo Wii. The developers who created Unity are constantly adding amazing new features and adding more devices on which Unity games can run. Some of the advanced features require Unity Pro, which professional developers can purchase to create commercial video games. Luckily there is a free version that allows new developers to learn the technology, make use of most of the capabilities of Unity and distribute the software they create to computers and websites. This free version is the one you will need to complete the exercises in this book. It runs on Windows and Mac operating systems.
Let’s get started. Download and install the software by going to the Unity website:
http://www.unity3d.com/
Once Unity is installed, start it up and you should see something like the screen in Figure 1.1.
If the project doesn’t open, select Asset Store from the Window menu and search for Bootcamp.
When Unity is first started an example project called Bootcamp is opened automatically. It serves as an introduction to the kinds of things that Unity is capable of producing. For those readers who have used 3D modeling software, the Unity interface should look somewhat familiar. The largest pane, called the Scene View, shows the scene currently being edited and allows the developer to move around and position objects. Around the Scene View are several other views, each labeled at the top with their name. In the lower left corner, the Hierarchy lists all of the objects in the current scene. Each object in the scene can be selected either by clicking on it in the Scene View or by clicking its name in the Hierarchy. In the middle is the Project View which lists all of the assets that can be used in the project. Assets are files like 3D models, images, videos and sounds. Dragging an asset from the Project View to either the Scene View or the Hierarchy places it into the current scene. The Inspector, on the right, lists all of the data about the currently selected object in the scene. This data consists of parameters like position, rotation and scale along with any materials that alter the object’s appearance or scripts that give the object behaviors. The Inspector is where all of the different aspects of an object’s look and behavior can be modified. The arrangement of all of these views can be changed by selecting an option in the Layout menu, but for the purposes of this book I will be using the default layout called Wide.
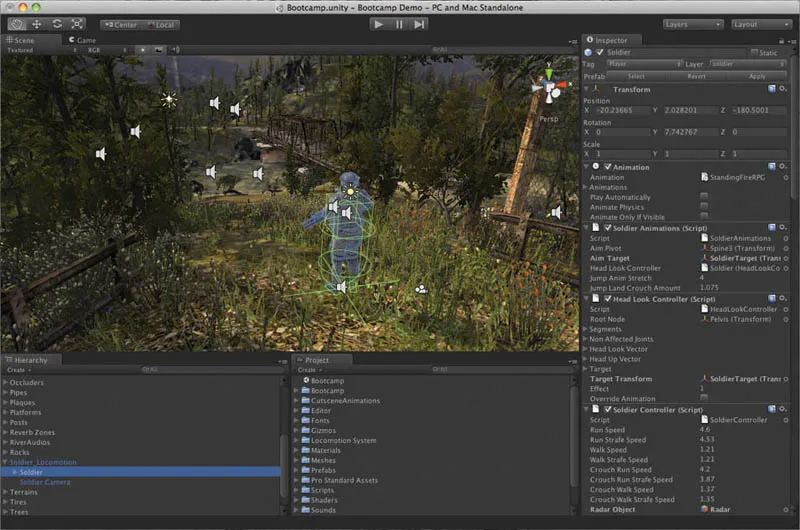
Fig. 1.1 The Unity development environment.

Fig. 1.2 Transform Tools – From left to right: hand, translate, rotate and scale.

Fig. 1.3 Play Mode Tools – From left to right: play, pause and step.
At the top of the Unity window is the Toolbar containing buttons and menus for some commonly used functions. The elements most frequently used are the Transform Tools and the Play Mode buttons.
If you click the hand button in the Transform Tools, then click and drag anywhere in the Scene View, your view of the scene will pan up, down, left or right depending on where you drag the mouse. Hold down the Alt key on the keyboard while dragging and the view will rotate similarly to rotating your head. If you hold down the control (Ctrl) key, you can zoom in and out of the scene. Zooming can also be accomplished by scrolling with a mouse or trackpad, just as with scrolling up and down in a webpage or document. The translate, rotate and scale tools to the right of the hand tool allow the selected object to be moved around the scene, rotated and resized respectively. Try clicking on an object in the scene to select it, then using each of these tools to move, rotate and resize the object. The Play Mode Tools control previewing how the game looks and functions. The play button starts the game, the pause button halts the action and the step button advances a single frame. Click the play button to see what the Bootcamp game feels like. In the game use the arrow keys to move around, the space bar to jump and click in the scene to have the soldier fire his gun. When you are finished you can exit play mode by clicking the play button once more.
There are obviously many more features of the Unity interface that I haven’t described. Many of these will come up in the following chapters and some are beyond the scope of this book. The important outcome here is to become familiar with the names of the most useful pieces of the interface, as they come up frequently throughout this book. The support section of the Unity website offers information on all aspects of the interface as well as instructions on basic techniques and in-depth tutorials on advanced topics. It is a valuable resource that comes directly from the people who made the software. I strongly encourage readers to refer to the Unity website in addition to the instruction provided in this book.
Trying It Out
Create a new project by selecting New Project from the File menu. Unity will ask if you want to save the Bootcamp project, but you can click Don’t Save.
The Project Wizard window will appear. Unity will give your project a default location and name. If you want to change these, click the Set button, type in a new name like FirstProject and select the folder where you want the project saved. The folder where you store your Unity projects is up to you and Unity will show all of your past projects when you choose Open Project from the File menu. Once the name and location of the project folder are set, click the Create Project button.
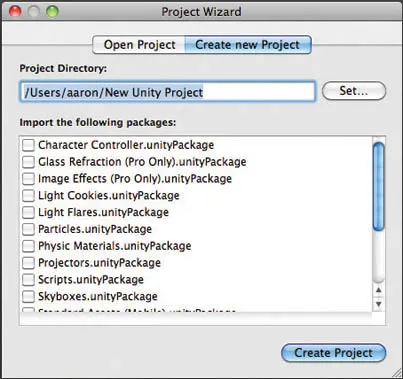
Fig. 1.4 Project Wizard window.
Your new project will look quite a bit more stark than the Bootcamp project. New projects in Unity have only one lonely object in the scene, the camera through which the player will look during the game called Main Camera. You can see what this view looks like by pressing the play button. Pressing play once again will return you from that empty blue world back into editing mode. In the Hierarchy, click on Main Camera to select it.
Three things happen once the camera is selected: a preview of what the camera sees appears in the bottom-right corner of the Scene View, a wireframe pyramid appears in the scene and the Inspector displays the camera’s properties. The pyramid that appears is called a frustum. Its purpose is to visually show what is inside the camera’s field of view. The tools in the Inspector show the variety of parameters that can alter the camera’s position, view and many other factors. For instance, the blue backdrop that the camera sees can be altered by clicking on the swatch of color to the right of Background in the Inspector.
In the Color window that appears, you can choose any color and see that change reflected in the Camera Preview.
Now that changes have been made to the scene, you should save it by selecting File > Save Scene or by typing Control-S (Command-S on Mac). Unity will ask you to name your scene; something like MainScene will suffice. The scene will be saved in the assets folder of your project and will appear in the Project View. The reason why you have to save both the project and the scene is that Unity projects can have multiple scenes. This is useful when making games with multiple levels or environments. The examples in this book will use only one scene.
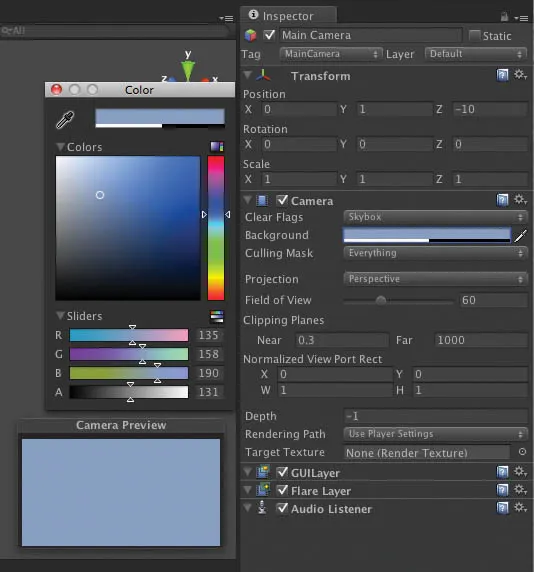
Fig. 1.5 Changing the camera’s background color.
It’s time to add an object to the scene. Unity has a number of built-in objects: primitive volumes like cubes and spheres, particle systems like fire and even configurable trees. In the interest of keeping things simple, add a cube by selecting GameObject > Create Other > Cube. A cube should appear in the scene and in the Hierarchy. In order to position the cube so that the camera has a good view of it, you have to know where the camera is and in what direction it’s looking. Clicking on Main Camera in the Hierarchy displays the camera’s position as x = 0, y = 1, z = −10 (0, 1, −10) in the Inspector. By selecting the cube in the Hierarchy you can change its location by typing new values into the x, y and z boxes under Position in the Inspector.
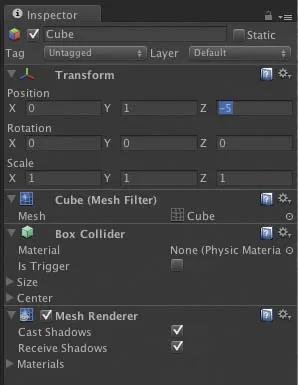
Fig. 1.6 Setting the cube’s position.
Setting the cube’s position to the point (0, 1, −5) should ensure the camera a good view. Objects can also be positioned using translate in the Transform Tools and dragging the object to the desired location. Often se...
Table of contents
- Cover
- Half Title
- Title Page
- Copyright Page
- Dedication
- Table of Contents
- List of Figures
- Introduction
- 1 TOOLS OF THE TRADE
- 2 BUILDING BLOCKS
- 3 SLINGSHOT
- 4 KIRIGAMI
- 5 COMPONENT LAB
- 6 SHOWROOM
- Conclusion
- Further Reading
- Index
Frequently asked questions
Yes, you can cancel anytime from the Subscription tab in your account settings on the Perlego website. Your subscription will stay active until the end of your current billing period. Learn how to cancel your subscription
No, books cannot be downloaded as external files, such as PDFs, for use outside of Perlego. However, you can download books within the Perlego app for offline reading on mobile or tablet. Learn how to download books offline
Perlego offers two plans: Essential and Complete
- Essential is ideal for learners and professionals who enjoy exploring a wide range of subjects. Access the Essential Library with 800,000+ trusted titles and best-sellers across business, personal growth, and the humanities. Includes unlimited reading time and Standard Read Aloud voice.
- Complete: Perfect for advanced learners and researchers needing full, unrestricted access. Unlock 1.5M+ books across hundreds of subjects, including academic and specialized titles. The Complete Plan also includes advanced features like Premium Read Aloud and Research Assistant.
We are an online textbook subscription service, where you can get access to an entire online library for less than the price of a single book per month. With over 1.5 million books across 990+ topics, we’ve got you covered! Learn about our mission
Look out for the read-aloud symbol on your next book to see if you can listen to it. The read-aloud tool reads text aloud for you, highlighting the text as it is being read. You can pause it, speed it up and slow it down. Learn more about Read Aloud
Yes! You can use the Perlego app on both iOS and Android devices to read anytime, anywhere — even offline. Perfect for commutes or when you’re on the go.
Please note we cannot support devices running on iOS 13 and Android 7 or earlier. Learn more about using the app
Please note we cannot support devices running on iOS 13 and Android 7 or earlier. Learn more about using the app
Yes, you can access Design Games for Architecture by Aaron Westre in PDF and/or ePUB format, as well as other popular books in Architecture & Architecture General. We have over 1.5 million books available in our catalogue for you to explore.